FAQ - Cisco Modeling Labs v2.x
Reference Platform and Images Questions
1. What are reference platforms?
Reference platforms are virtual instances of Cisco's operating systems. Some of these correspond to virtual products that are available on Cisco.com (e.g., CSR1000v, ASAv, and IOS-XR 9000v), while others are available only within Cisco Modeling Labs (e.g., IOSv and IOSv-L2). These virtual platforms offer software-level feature parity to physical devices that run the same operating system, with some exceptions. That is, any feature that can be done in software without underlying hardware for a given OS is generally supported in the reference platforms.
In addition to the Cisco reference platforms, Cisco Modeling Labs provides other supporting images such as Linux server VMs, desktop VMs, a traffic generator, and a "bump-on-the-wire" WAN emulator.
The Cisco Modeling Labs distribution includes an ISO image file that contains a set of default reference platforms and supporting images for use in your labs. For more details about each of the reference platforms and other VM images provided on the refplat ISO file, see VM Images for CML Labs.
2. Which reference platforms are provided by default?
| Reference Platform | Description | Version |
|---|---|---|
| ASAv | Cisco ASA firewall image | 9.22.1 |
| CAT 8000V | IOS-XE Catalyst 8000V Edge Software Router | 17.15.1a ED |
| CAT 9000v Q200 (beta) | IOS-XE Catalyst 9000 Q200 Virtual Switch (beta) | 17.15.01 |
| CAT 9000v UADP (beta) | IOS-XE Catalyst 9000 UADP Virtual Switch (beta) | 17.15.01 |
| CAT 9800-CL | IOS-XE Catalyst 9800 Cloud Wireless Controller | 17.17.01 |
| CAT SD-WAN Edge * | Cisco Catalyst SD-WAN Edge | 17.15.1a |
| CAT SD-WAN Controller * | Cisco Catalyst SD-WAN Controller | 20.15.1 ED |
| CAT SD-WAN Manager * | Cisco Catalyst SD-WAN Manager | 20.15.1 |
| CAT SD-WAN Validator * | Cisco Catalyst SD-WAN Validator | 20.15.1 |
| CAT SD-WAN vEdge * | CIsco Catalyst SD-WAN vEdge | 20.15.1 |
| CSR 1000v | IOS-XE Cloud Services Router | 17.03.08a |
| FMCv * | Secure Firewall Management Center Virtual | 7.6.0 |
| FTDv * | Secure Firewall Threat Defense Virtual | 7.6.0 |
| IOL | IOL XE Router | 17.15.01 |
| IOL-L2 | IOL XE Switch | 17.15.01 |
| IOSv | IOS classic layer 3 image | 15.9.3M9 |
| IOSv-L2 | IOS classic layer 2/3 switch image | 15.2 |
| IOS XRv 9000 | IOS XR 64-bit image | 24.3.1 ED |
| NX-OS 9000 | NX-OS layer 2/3 image | 10.5(1) F |
* CAT SD-WAN, FMCv and FTDv reference platforms are supplied on
refplat-20241016-supplemental.iso.
3. Which third-party images are included by default?
| Image Name | Description | Version |
|---|---|---|
| Alpine Linux | Console-based Alpine Linux | 3.20.3 |
| Desktop | Desktop Alpine Linux image that provides a graphical, Xfce interface | 3.20.3 |
| Server | Tiny Core Linux server image | 15.0 |
| TRex | Linux-based image with Cisco's packet generator | 2.87 (no client support) |
| Ubuntu | Full-featured Ubuntu server image using cloud-init YAML configuration | 24.04 LTS |
| WAN Emulator | Linux-based image that provides WAN-like delay, jitter, and loss effects to links | 3.20.3 (Alpine Linux version) |
Note: For all CML offerings other than CML-Free, the VMs for these third-party node types do not count toward the total licensed node limit.
4. How can I add additional images to Cisco Modeling Labs?
To add images (Cisco or third-party) for existing node types, upload a VM image formatted as a .qcow2 file to your CML server. You can either upload the .qcow2 file via the CML UI or by using Secure Copy (scp). In addition to the image files themselves, you will also need to add a definition for the image that will inform libvirt and the Cisco Modeling Labs engine how to boot up the node.
Complete instructions on adding a VM image to CML can be found in the CML User Guide.
If you would like to add an image for a completely different type of node, you must first add or import a node definition.
5. I don't see a node type that was available in earlier versions of the software. Where did it go?
Not all of the node types that were present in Cisco Modeling Labs or Virtual Internet Routing Labs v1.x are present in Cisco Modeling Labs v2.x. For example, Ostinato and the LXC containers are no longer available. Ostinato has been replaced by the Cisco TRex traffic generator, and Docker containers can be added to and run out of instances of the CoreOS node type. The Alpine node type includes the iperf3 and RouteM tools.
IOS XRv, NX-OSv and CoreOS have been deprecated and removed since CML 2.3.
6. What is the default login for the nodes?
Each node type has its own default login. See the table below for the specific node values.
Cisco Reference Platforms:
| Node Type | Default Username | Default Password |
|---|---|---|
| ASAv | N/A * | N/A * |
| CAT 8000V | N/A * | N/A * |
| CAT 9000v Q200 (beta) | N/A * | N/A * |
| CAT 9000v UADP (beta) | N/A * | N/A * |
| CAT 9800-CL | N/A * | N/A * |
| CAT SD-WAN Edge | admin | admin |
| CAT SD-WAN Controller | admin | admin |
| CAT SD-WAN Manager | admin | admin |
| CAT SD-WAN Validator | admin | admin |
| CAT SD-WAN vEdge | admin | admin |
| CSR 1000v | N/A * | N/A * |
| FMCv | admin | Admin123 |
| FTDv | N/A *** | N/A *** |
| IOL | N/A * | N/A * |
| IOL-L2 | N/A * | N/A * |
| IOS XRv | cisco | cisco |
| IOS XRv 9000 | Prompted at first boot | Prompted at first boot |
| IOSv | N/A * | N/A * |
| IOSv-L2 | N/A * | N/A * |
| NX-OS | admin | admin |
| NX-OS 9000 | admin | Prompted at first boot |
Linux Images:
| Node Type | Default Username | Default Password |
|---|---|---|
| Alpine | cisco | cisco |
| CoreOS | N/A ** | N/A ** |
| Desktop | cisco | cisco |
| Server | cisco | cisco |
| TRex | cisco | cisco |
| Ubuntu | N/A ** | N/A ** |
| WAN Emulator | cisco | cisco |
* = Note 1: The default enable password for ASAv is
Cisco1@3.
There is no enable password for CSR 1000v, IOL, IOL-L2, IOSv, and IOSv-L2.
There is no enable password configured for CAT 8000V, CAT 9000v Q200 (beta), CAT 9000v UADP (beta), and CAT 9800-CL, and you will be prompted to configure the default password.
** = Note 2: CoreOS or Ubuntu do not have any default account. You will need to restore the base cloud-init configuration or bootstrap the lab to be able to log in to these nodes.
*** = Note 3: FTDv is managed by FMCv.
7. Why do the default credentials not work on one of my nodes?
The default credentials are not baked into the VM Image itself. The account and password normally need to be created and set as part of the day-0 config on the node.
The default login is different if you use node definitions provided bundled with the CML (from refplat ISOs) and you do not modify configuration of nodes created from the CML node definitions, or you bootstrap a lab (see Bootstrap Configuration Building for details).
The default username is cisco for all node types except FMCv and FTDv.
The default password is cisco except ASAv, which default password is Cisco1@3.
The default username for FMCv and FTDv is admin and default password is Cis01@3.
Node types such as NX-OS 9000 or IOS XRv 9000 have additional account configured. Its default username is admin and password is cisco.
Node types such as CAT 9000v Q200 (beta) or CAT 9000v UADP (beta) do not have the default username and password configured.
8. What resources are required by each node type?
The following table lists the nominal vCPU, memory, and disk size for each node type. The resource usage of a particular node in a lab simulation depends on the node type, selected VM image, and the associated configuration. Note that CML over-provisions your system's actual hardware for virtualization, and CML uses Linux kernel same page merging to reduce the memory required to run a lab, especially when the lab has multiple nodes of the same type. Therefore, the resources required to run a simulation will generally be less than the nominal resource requirements of all of its nodes.
Cisco Reference Platforms:
| Node Type | vCPUs | Memory | Minimum Disk Consumption | Maximum Disk Consumption |
|---|---|---|---|---|
| ASAv | 1 | 2 GB | < 100 MB | 8.5 GB |
| CAT 8000V | 1 | 4 GB | 500 MB | 8 GB |
| CAT 9000v Q200 | 4 | 18 GB | 500 MB | 16 GB |
| CAT 9000v UADP | 4 | 18 GB | 500 MB | 16 GB |
| CAT 9800-CL | 2 | 6 GB | 500 MB | 16 GB |
| CSR1000v | 1 | 4 GB | 500 MB | 8 GB |
| FMCv | 4 | 32 GB | N/A | 250 GB |
| FTDv | 4 | 8 GB | N/A | 50 GB |
| IOL | 0 | 1 GB | < 100 MB | 2 GB |
| IOL-L2 | 0 | 1 GB | < 100 MB | 4 GB |
| IOS-XRv | 1 | 3 GB | < 100 MB | 4 GB |
| IOS-XRv 9000 | 4 | 20 GB | 5 GB | 64 GB |
| IOSv | 1 | 512 MB | < 100 MB | 2 GB |
| IOSv-L2 | 1 | 768 MB | < 100 MB | 4 GB |
| NX-OS | 1 | 3 GB | < 100 MB | 4 GB |
| NX-OS 9000 | 2 | 12 GB | 2.5 GB | 10.2 GB |
| SD-WAN Edge | 2 | 5 GB | 500 MB | 8 GB |
| SD-WAN Controller | 2 | 4 GB | 500 MB | 10.5 GB |
| SD-WAN Manager | 8 | 16 GB | 500 MB | 277 GB |
| SD-WAN Validator | 2 | 4 GB | 500 MB | 10.5 GB |
| SD-WAN vEdge | 2 | 2 GB | 500 MB | 10.5 GB |
Linux Images:
| Node Type | vCPUs | Memory | Minimum Disk Consumption | Maximum Disk Consumption |
|---|---|---|---|---|
| Alpine | 1 | 512 MB | < 100 MB | 16 GB |
| CoreOS | 2 | 2 GB | < 100 MB | 64 GB |
| Desktop | 1 | 512 MB | < 100 MB | 16 GB |
| Server | 1 | 128 MB | < 100 MB | 16 GB |
| TRex | 1 | 512 MB | < 100 MB | 2 GB |
| Ubuntu | 1 | 2 GB | < 100 MB | 64 GB |
| WAN Emulator | 1 | 512 MB | < 100 MB | 2 GB |
9. Where can I find other reference platforms?
In addition to the reference platforms included on the refplat ISO, there is a GitHub repository at https://github.com/CiscoDevNet/cml-community that provides a way for Cisco and external users to contribute node definitions, images, and labs for general use. This repository currently contains a number of additional Cisco and third-party node definitions. Watch the repository or come back to check it periodically for new node definitions and other Cisco Modeling Labs extras.
10. Can I copy the images from CML 2.7 refplat ISO files to an older version of CML?
Images from an older refplat ISO should work in newer CML versions but not vice-versa. Reference platforms included on a refplat ISO released with CML 2.5 should work if copied into a CML 2.7 instance. Conversely, reference platforms included on a refplat ISO released with CML 2.7 may not be available if copied into a CML 2.5 instance. If you need to use reference platforms included on the refplat ISO released with CML 2.7, you should upgrade your CML instance to 2.7. For example, if you want to use IOL or SD-WAN nodes initially introduced with CML 2.7, you must upgrade your instance to CML 2.7 before you can start those nodes types. If you tried to import those nodes into an instance running older CML version, e.g., CML 2.5, the instance will not be able to load or launch these nodes types.
11. Can I use an image taken from a physical device within CML?
Unfortunately, it is not possible to use images taken from a physical device in CML. The devices that run within CML run as x86_64 (amd64) virtual machines (VMs) or containers (in an x86_64 environment). The images that run on physical devices are designed and built for that architecture and a physical machine. They are not built to run as a virtual machine. Even if the CPU architecture of the physical device is x86_64, the image (typically a .bin file) that runs on the device is not built to be a virtual machine image, and it assumes underlying hardware that will not be present in CML.
For certain device types that can be modeled in CML (e.g., Catalyst 8000v, Nexus 9300v), you can find a virtual machine image on Cisco Software Central with the same version as the image that would run on the physical hardware versions (e.g., Catalyst 8500, Nexus 93180).
Installation Questions
1. Can I install Cisco Modeling Labs on a bare-metal machine?
Starting in Cisco Modeling Labs v2.1, bare metal deployments are supported. See the system requirements page for more details.
2. Can I deploy Cisco Modeling Labs on cloud platforms?
Cisco Modeling Labs can be deployed on cloud platforms like AWS (Amazon Web Services) and Azure. Please see the installation guide page for detailed instructions.
3. Can I upgrade from Cisco Modeling Labs v1.x or Virtual Internet Routing Labs to Cisco Modeling Labs v2.x?
No. There is no direct upgrade from Cisco Modeling Labs v1.x or Virtual Internet Routing Labs to Cisco Modeling Labs v2.x. However, you can do a fresh installation of v2.x and re-import your v1.x topology files. While not all node types exist in v2.x, many of the same node types are present and much of the same functionality is available. Upgrading from one version of Cisco Modeling Labs v2.x to another 2.x version is generally possible. See the In-place Upgrade page for details.
4. How many virtual network interfaces does the CML v2.x host require?
Cisco Modeling Labs v2.x only requires one total virtual interface for the CML Standalone All-in-One host. However, you can add other virtual NICs to it to allow for separated external connectivity to additional networks. See the instructions on how to add multiple interfaces in the CML Admin Guide.
In a CML cluster deployment, both the Controller and each Member host require one additional interface for intra-cluster communication. Compute Member hosts are not involved in external connectivity, hence they each need exactly two interfaces. See the cluster requirements page for more details.
5. Do I need an refplat ISO image in order to deploy Cisco Modeling Labs v2.x?
While the refplat ISO is not required to deploy Cisco Modeling Labs v2.x and boot it up, you will not be able to add nodes to labs until you do.
Note: if you deployed CML as a VM, you may need more allocated disk space than the default CML VM configuration. The current refplat ISO contents consume more than 10 GB of disk space.
To copy the refplat ISO to the Cisco Modeling Labs server, follow these steps:
- Make sure the refplat ISO is mounted to the VM.
- Ensure that all users have stopped all of their running labs.
- Log into Cockpit as a sysadmin.
- On the CML2 page, expand the Copy Refplat ISO sub-section.
- Click the Copy Refplat ISO button.
- Wait for the Output area at the bottom of the page to indicate that the copy process is complete.
- After the refplat ISO contents are copied to the CML server, the ISO will be unmounted and "ejected," and the CML services will be restarted. (No reboot of the CML server is required.)
Here are some tips in case the Copy refplat ISO process did not succeed:
- The copy process will fail if there are node VMs running, if there is no refplat ISO mounted, or if you have insufficient space on the CML server for the contents of the refplat ISO.
- The copy process may be falsely reported as successful even when it has failed, e.g., when cockpit gets disconnected, the process is halted and cockpit may wrongly show that the process has completed.
- You must ensure that your Cockpit session does not time out while executing the copy process. Alternatively, you can start the process from terminal using nohup or tmux, i.e.,
sudo /usr/share/cockpit/virl2/copy-refplat-iso-to-disk.sh &. - If the copy process failed or was interrupted, the Copy refplat ISO action must be re-run.
6. Can I use Cisco Modeling Labs v1.x or Virtual Internet Routing Labs topology files with Cisco Modeling Labs v2.x?
While the format of the lab export files differs between v2.x and v1.x (YAML vs. XML), you can import Cisco Modeling Labs v1.x or Virtual Internet Routing Labs .virl files into Cisco Modeling Labs v2.x just as you can with the new v2.x .yaml files. Be aware, however, that not all node types that were present in v1.x are present in v2.x. For example, Ostinato and LXC nodes no longer exist in v2.x. Such nodes will not show up in the lab once imported into v2.x.
7. What keyboard layout is used during installation?
Cisco Modeling Labs uses a US English keyboard layout when performing the installation. This means that if you are using another international keyboard layout, your complex password may not be what you expect (e.g., the @ and " may be swapped). To ensure the correct password, consider a simpler password for admin and sysadmin at installation time, and then change those immediately after the system is ready in the Tools > System Administration and Cockpit > Accounts respectively as these web interfaces will respect the current international keyboard layout.
8. I was using a previous refplat ISO. Do I need to upgrade my refplat ISO along with Cisco Modeling Labs?
Not necessarily. In fact, if you have labs that are still using the current refplat ISO (i.e., nodes that are not wiped), then replacing the current refplat ISO with a new one will break those labs. If you wish to get node and image definitions from the new refplat ISO, you have two choices.
- Refer to the question "Do I need the refplat ISO image in order to deploy Cisco Modeling Labs v2.x" above. Copy both refplat ISOs (the current and the new one) to the Cisco Modeling Labs VM. To do this, mount the current refplat ISO, run the copy script, then mount the new refplat ISO, and then re-run the copy script.
- Continue to use the current refplat ISO, and import node and image definitions from the new refplat ISO into Cisco Modeling Labs using the Tools > Node and Image Definitions interface. Only these imported node and image definitions will be copied to the Cisco Modeling Labs VM.
9. Can I perform an in-place upgrade if I run a CML instance that's in an air-gapped or offline environment?
Yes, you can use the pkg.zip file to perform an In-Place Upgrade on a CML instance that's in an offline environment. However, we recommend that you also set up means to propagate updates to base OS packages as they are released on a more frequent basis than CML releases.
10. How do I know when there's a new CML release?
You can check the CML software download page for the latest available release.
If you want to receive an e-mail notification when a new version of CML is released, click the My Notifications link next to the bell icon on the software download page. On the Add Notification dialog, configure a notification for All Releases of Cisco Modeling Labs and click Save.
11. How do I configure proxy in CML?
If the network where you installed CML requires a proxy to reach the Internet, then you will probably need to configure a proxy in CML.
Licensing: If you are not using an On-Prem SSM server or SLR licensing, you must configure the proxy in the licensing transport settings in the CML UI.
- Log into the CML UI as an admin user.
- Click Tools > Licensing > View/Edit Transport Settings.
- In the Transport Settings dialog, check the checkbox for HTTP/HTTPS Proxy.
- Enter the Proxy and Port number values for your proxy.
- Click Save.
Ubuntu OS Software Updates: You will need to set up a proxy for APT if you want to install the package from the Ubuntu repository. You can do it by creating a new configuration file at /etc/apt/apt.conf.d/:
sudo nano /etc/apt/apt.conf.d/proxy.conf- Add the following lines to the file:
Acquire::http::Proxy "http://[username]:[password]@[proxy-web-or-IP-address]:[port-number]/"; Acquire::https::Proxy "http://[username]:[password]@[proxy-web-or-IP-address]:[port-number]/";- Sample file shown below, skip username and password if not applicable.

- Save the file and exit. The configuration will be applied after a reboot.
Internet access for virtual nodes: If you are using External Connectors in your labs, and you want the virtual nodes in those labs to be able to access the Internet, then you will probably also need to configure the virtual nodes to use the proxy irrespective of the type of external connectivity used.
Internet access for CML Server: To configure proxy permanently to the underlying Ubuntu operating system, you have to edit the
/etc/environmentfile.- First, open the file in a text editor:
sudo nano /etc/environment- Next, update the file with the below information,
http_proxy="[username]:[password]@[proxy-web-or-IP-address]:[port-number]/" https_proxy="[username]:[password]@[proxy-web-or-IP-address]:[port-number]/" ftp_proxy="[username]:[password]@[proxy-web-or-IP-address]:[port-number]" no_proxy="localhost,local,127.0.0.1,::1"- Sample file shown below, skip username and password if not applicable.
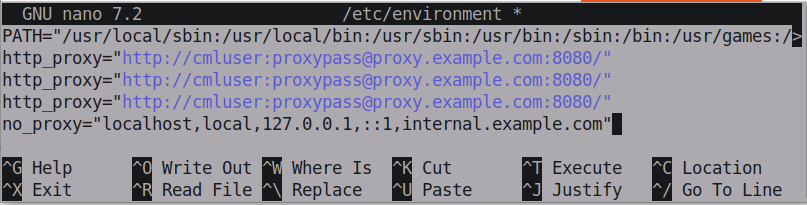
- Save the file and exit. The changes will be applied the next time you log in.
Sample Labs
To refresh the Sample Labs available in CML from the configured lab repositories, you may need to specify the proxy used bygit. Depending on your network's proxy setup and whether you have added any custom lab repositories to your CML server, you may need to configure the proxy in one or more of the following ways:- globally
- per git repository
- per host.
Globally:
Create the file
/var/local/virl2/.gitconfig, if necessary, and add the following lines to the file:[http] proxy = [username]:[password]@[proxy-web-or-IP-address]:[port-number] [https] proxy = [username]:[password]@[proxy-web-or-IP-address]:[port-number]Skip the
username:password@if your proxy does not require authentication.The "global" proxy configuration in .gitconfig overrides the Linux proxy configuration for scripts and processes that use
git.Per git repository:
Specifying a local proxy configuration in the repository folder overrides global proxy configuration for
git.- Before adding a new sample lab repository, configure a global proxy for
gitas shown above. - Add the new sample lab repository using the Lab Repositories page under Tools > System Administration in the CML UI.
- After that, you can move the proxy config from
/var/local/virl2/.gitconfigto/var/local/virl2/sample-labs/[repo-name]/.git/config, where [repo_name] is the name of the sample labs repository.
Note: you should remove the global proxy that you added to
/var/local/virl2/.gitconfigbecause it could affect previously-added repositories that require a different proxy or no proxy.Per host:
If you are using multiple different sample lab repositories on your CML server, and your network's proxy configuration requires different proxies to be used for different host destinations, you can specify proxies for each
githost.Create the file
/var/local/virl2/.gitconfig, if necessary, and add the following lines to the file:[http "http://git-host1.com"] proxy = [username]:[password]@[proxy-web-or-IP-address]:[port-number] [https "https://git-host1.com"] proxy = [username]:[password]@[proxy-web-or-IP-address]:[port-number] [http "http://git-host2.com"] proxy = [username]:[password]@[proxy-web-or-IP-address]:[port-number] [https "https://git-host2.com"] proxy = [username]:[password]@[proxy-web-or-IP-address]:[port-number]Skip the
username:password@if your proxy does not require authentication.
12. I had a CML-Personal instance deployed with VMware Fusion on MacOS, but it stopped working after upgrading to CML 2.6. How do I fix it?
CML is not compatible with Mac systems with Apple Silicon (e.g., an M1 or M1 Pro processor), but CML should work fine on a Mac with an Intel processor. If your CML VM is unable to start nodes after upgrading to CML 2.6 and if it was previously working fine while on CML 2.5.1, then follow the instructions to disable nested virtualization. Then, stop the CML VM and upgrade the virtual hardware version of the CML VM in VMware Fusion. Start the CML VM and try starting labs again.
13. Why am I unable to download CML-Personal installation files after purchasing CML-Personal?
When you purchase CML-Personal, you should receive an email from the Cisco Learning Network store with links to key CML resources. Make sure that you are using the Download button on your My Account Page to access the CML installation files. See also Downloading Files for CML Installation.
Note: If you try to download the CML installation files directly from the Cisco Software Central website, you may receive an error that indicates Service Contract Required.
First time users may experience issues with downloading CML because of problems with your CCO profile. Make sure your CCO profile is complete. Be sure to update the Company information in your CCO profile. If you do not work for a company (e.g., you are a student), you can provide your home address or your school address as your company address.
Once you update your CCO profile, clear your browser cache or switch to a different web browser. Try the download again.
If completing your CCO profile and clearing the browser cache does not help, then open a support case with the Cisco Learning Network (CLN) Store TAC. Only the CLN Store TAC can help you with problems related to your CML-Personal order or downloading CML-Personal. That is the only support team that has visibility into orders placed on the Cisco Learning Network store.
System Administration
1. How can I access the Cisco Modeling Labs v2.x system administration GUI?
System administration is performed via the Linux Cockpit tool. Cockpit is available on TCP port 9090 of the Cisco Modeling Labs controller VM. It is secured with HTTPS. For example, if your Cisco Modeling Labs controller VM IP address is 192.0.2.1, Cockpit can be accessed at https://192.0.2.1:9090 using your web browser. Use the sysadmin account that you created during Cisco Modeling Labs installation, and follow the instructions for logging into Cockpit.
2. How do I download the Cisco Modeling Labs logs?
If you are experiencing issues with Cisco Modeling Labs, and you require support, it's helpful to provide the log files. Logs can be downloaded from the Cockpit main page (the CML2 tab in the left-hand pane). Under the Maintenance section in the main, right-hand pane there is a button to download the Cisco Modeling Labs logs as a TAR, gzipped bundle.
3. How do I restart the Cisco Modeling Labs services?
From the CML2 tab in Cockpit, under the Maintenance section in the main, right-hand pane, expand the Restart Controller Services sub-section and click the Restart Services button. Note that this action stops all running labs and restarts all CML background processes on the controller VM, but it will not restart the CML server itself.
4. How do I clean up all labs and start fresh with Cisco Modeling Labs?
Cisco Modeling Labs offers the ability for an administrator to stop all running labs and remove all lab data across all users. This will essentially provide each user with a clean slate in their CML accounts. To perform a cleanup, log into Cockpit, go to the CML2 tab, and expand the Clean Up sub-section in the Maintenance section of the main, right-hand pane. Click the Clean Up button. The cleanup process will restart all Cisco Modeling Labs server processes which will logout all active users.
5. How do I reset my password?
You use the same credentials to access the Cisco Modeling Labs GUI, API, and console server.
If your CML system is configured for local authentication, a CML administrator can reset the password on the User Administration page of Tools > System Administration. If your CML system is configured for LDAP authentication, your credentials for logging into CML are not stored in CML, and you must reset your credentials in the LDAP system.
If you are the only CML administrator, and you forget your CML UI credentials, the only way to reset your admin credentials is to perform a factory reset. Warning: the factory reset is a destructive operation! It will erase all CML users and their labs and other data. To perform a factory reset, follow these instructions:
- Log into Cockpit as a sysadmin.
- On the CML2 page, expand the Factory Reset sub-section.
- Read the instructions there and gather information from the system so that you will know the new admin user's password after the factory reset is done.
- Once ready, click the Factory Reset button.
6. Does Cisco Modeling Labs support integration with external user databases like LDAP or Active Directory?
LDAP is supported, see Configuring LDAP Authentication in Administrator's Guide for more details.
7. How do I reboot my Cisco Modeling Labs server or VM?
In the Cockpit interface, go to the Overview tab in the left-hand pane of the window. Click the Restart button in the top right-hand corner of the window. This will prompt you for a message (optional) as well as a delay to reboot.
8. How do I install my own Certificate Authority (CA) signed certificate for Cisco Modeling Labs?
Cisco Modeling Labs includes self-signed certificates for the main web interfaces as well as Cockpit. The TLS / SSL certificate enables CML to use HTTPS and encrypt all of the traffic between the CML server and the web browser, the Breakout Tool, and other API clients. For step by step walk-through see Add SSL Certificate to CML
9. How can I create system-wide backups in CML?
We recommend making backups of your entire CML server both periodically and before making any majore changes in CML, such as upgrading to a new release. Your options for preserving the "cold" state of the CML server depend on your deployment type. A "cold" CML server is one where all of the CML labs are in the STOPPED state and the CML services are not running. For CML bare metal deployments, you can use any disk-level backup tool, such as dump, that is supported in the underlying Ubuntu Linux operating system to backup CML. CML releases 2.3.0 to 2.7.x are based on Ubuntu 20.04 Server LTS. CML releases 2.8.0 and higher are based on Ubuntu 24.04 Server LTS.
If you deployed CML as a VM in ESXi, then your other option is to use VM snapshots in ESXi of the CML VM itself to preserve a system-wide backup of the CML server. VM snapshots allow the CML admin to easily roll back the state of the CML server to a previous snapshot. If you have deployed CML in other hypervisors, you can use similar natively-supported backup mechanisms to preserve the state of the CML server VM.
CML does not currently support backup and restore of a "live" CML instance where one or more labs are running or where the CML services are running.
10. As a CML user, should I backup my labs in CML?
Any labs that you create in CML should continue to exist in CML’s database until the lab is deleted from the Dashboard in the CML UI.
However, extracting configurations from the applicable virtual nodes and regularly downloading the labs to your local system is a good practice, especially before any upcoming maintenance activities in CML. In a multi-user CML server, you can extract configurations and download labs that you own without any additional access or assistance from your CML server's adminstrator. In an event of catastrophic failure, once CML is restored, you can simply import your labs back into the CML instance and resume working on them. See Extracting Configurations for more information.
Licensing
1. How do I license Cisco Modeling Labs?
Licensing for Cisco Modeling Labs v2.x uses Cisco Smart Licensing. During the initial set up of your Cisco Modeling Labs installation, you need to register the installation with your Smart Licensing Virtual Account. You will paste a registration token in the dialog on the Licensing page of the Cisco Modeling Labs UI.
CML-Personal: Smart Licensing details are mostly hidden from CML-Personal users. Since many CML-Personal customers do not have a Smart Account of their own, CML-Personal 2.x licenses are placed in a special virtual account that is owned by the CLN Store. Even if you have a Cisco Smart Account, your Smart license for CML-Personal will not be visible there. Simply visit the My Account page on the CLN Store. Find your active order and click the View License(s) button to view and copy the registration token that corresponds to that order.
CML-Enterprise: The Cisco Smart Software Manager (CSSM) web portal for Smart Licensing is https://software.cisco.com/#module/SmartLicensing. When you purchase CML-Enterprise, one or more licenses will be deposited into a Smart Licensing Virtual Account, which is associated to a Smart Licensing Account. Depending on whether you are part of a larger company or organization or an individual, a given Smart Licensing Account may have many Virtual Accounts or just a single Virtual Account. Think of a Smart Licensing Account as an organization with Virtual Accounts as the users within that organization. At the Virtual Account level, you generate a registration token that will give your CML-Enterprise instance access to all of the available licenses in that Virtual Account. Copy a registration token for your virtual account for use in licensing your CML-Enterprise installation.
You must license Cisco Modeling Labs before you can start any node.
2. Does Cisco Modeling Labs support licensing an offline (or air-gapped) deployment via SLR or PLR?
Yes, starting with v2.0.1, Cisco Modeling Labs supports offline deployments with Specific License Reservation (SLR). See SLR - Specific License Reservation for detailed steps.
Cisco Modeling Labs does not support Permanent License Reservation (PLR).
3. How can I convert my Cisco Virtual Internet Routing Lab 1.x license to a Smart license?
If you have an active license for Cisco VIRL Personal Edition 1.x, then a license for CML-Personal 2.x will be auto-provisioned for you. Visit the My Account page on the CLN Store and find an order for the legacy VIRL Personal Edition product. The order will have a View License(s) button that provides a registration token that can be used to license a CML-Personal 2.x installation. Click the Download button associated with the order to download the CML-Personal 2.x OVA and ISO files.
4. How can I convert my Cisco Modeling Labs 1.x PAK license to a Smart license?
From the Cisco Smart Licensing Portal, click the Convert to Smart Licensing link at the top of the page and follow the instructions to complete the process.
5. Can Cisco Modeling Labs v1.x and v2.x be used concurrently?
Yes, Cisco Modeling Labs v1.x is authorized to run for 30 days after the PAK license has been converted to a Smart license.
6. Is there a demo for users who want to try out Cisco Modeling Labs before purchasing?
The DevNet Sandbox platform offers a Cisco Modeling Labs preview that you can reserve up to four hours at a time. This is a fully-functional Cisco Modeling Labs instance with a sample topology already setup for you to preview the tool's capabilities.
7. How do I fix an "out of compliance" license authorization status?
Check the Tools > Licensing page. This answer only applies to you if your licensing page indicates both
- Registration Status: Registered
- License Authorization Status: Out of compliance
The "out of compliance" authorization indicates that your CML instance could not authorize the specified licenses. There are a few different problems that will result in the same error message. Follow these steps to narrow down the problem and possibly fix the problem yourself.
Did you select the correct product during the initial set-up of your CML server?
- The license for the two products is different, and if you selected the wrong product during initial set-up, your CML installation will fail to authorize its license.
- If you purchased CML-Personal from the CLN Store,
- Select CML-Personal during the initial set-up, and
- the Smart License Usage table on the Tools > Licensing page will show a single row for CML - Personal License.
- If you purchased CML-Enterprise from the CCW or from a Cisco partner,
- Select CML-Enterprise during initial set-up, and
- the Smart License Usage table on the Tools > Licensing page will include CML - Enterprise License.
- If your instance indicates that you selected the wrong product, you must first deregister your CML instance and then change the product configuration. Follow the instructions on Changing the Licensed Product Selection.
Are you using the correct Smart Licensing account and registration token?
- If you purchased a CML-Personal product offering, do not attempt to use your own Virtual Account to generate a registration token. Simply follow the instructions on Getting the Registration Token for Licensing to get the registration token to use during Licensing.
- If you purchased CML-Enterprise from the CCW or from a Cisco partner, then you should be using your company's Smart Account and the Virtual Account assigned to you by your company's smart account administrator. See also Getting the Registration Token for Licensing.
Did you set the correct count for each license in the Choose Licenses dialog
- Check whether you have set the license count in CML larger than the number of available licenses in your Smart Licensing virtual account.
- Check how many licenses are available on the CSSM's Inventory page.
- In the CSSM site, be sure to select the same Smart Account and Virtual Account that are shown in the Tools > Licensing page in the CML UI.
- In the Licenses tab of the CSSM Inventory page, check the available Balance for each CML license entitlement.
- To adjust the requested count of the CML license entitlements, click the Choose Licenses button to open the Choose Smart Licenses dialog. See the Licensing page for more details on setting license counts.
- Alternatively, transfer additional licenses to your selected virtual account in the CSSM site.
- Check whether you have unused CML licenses in a different virtual account.
- A virtual account Admin can transfer licenses between virtual accounts in the CSSM.
- Check whether you have set the license count in CML larger than the number of available licenses in your Smart Licensing virtual account.
Is your license expired?
- Check your license's expiration date in the CLN Store (for CML-Personal purchases) or in the Smart Licensing virtual account (for CML-Enterprise licenses).
- If the license has expired, you will need to renew your license or purchase a new license first.
Have you already / previously used your license to successfully register a CML installation?
- To facilitate offline usage, after the CML server successfully authorizes the license, it will not release the license even if you stop the VM. Therefore, the Cisco Smart Licensing back end will consider the license to be in use even when the CML VM is not running.
- Only one CML server can authorize a particular license at a time.
- Before you delete, move, or re-deploy a CML VM, you must deregister the CML server to release its license before you can use the license on a different CML installation. See the Licensing - Deregistration page for instructions on deregistering a CML installation.
- If you successfully licensed a CML VM and then deleted the VM without first deregistering it, you will not be able to use that license for a new CML deployment until you manually delete the old CML instance from the Smart Licensing servers.
- (CML-Personal customers) Use the Self-Service Deregistration process in the CLN Store:
- Log into the CLN Store - My Account page with the CCO ID associated with your CML order.
- Find your CML order that has the license that you want to deregister.
- Click the View License(s) button to expand the area for the Smart license associated with that order.
- Click the De-register link next to the Smart Licensing registration token.
- A confirmation dialog is shown.
- Click Yes to confirm that you want to remove all CML 2.x instances registered with the order’s associated license.
- After doing that, you will be able to reregister the new instance of CML 2.x with the registration token.
Note: if you had registered the new instance in the CML UI and, when the authorization failed, used the De-register link in the CLN Store, then you will need to reregister the new instance by clicking Actions > Reregister on the Tools > Licensing page in the CML UI.
- (CML-Enterprise customers) You will need to log into CSSM with an account that is a smart account administrator or a virtual account administrator for your Smart Licensing Virtual Account.
- Click the Inventory link in the navigation bar.
- Select the virtual account that holds the CML-Enterprise licenses. It's the virtual account associated with the registration token you were using.
- Click the Licenses tab. You should see a row in the table for a CML-Base license with Purchased > 0 but with a Balance of 0 or less.
- Click the Product Instances tab.
- Find the instance that corresponds to the deleted CML VM and use Actions > Remove to remove it.
- Once the instance has been removed in the CSSM web portal, you will be able to use your license for a new CML instance.
- (CML-Personal customers) Use the Self-Service Deregistration process in the CLN Store:
Did you set the correct date and time in CML or configure NTP?
- CML may fail to validate the licenses if the date and time do not align with Cisco licensing servers.
- To set the date and time on your CML server, Log in to Cockpit.
- Click Overview in the navigation bar on the left.
- In the Configuration pane, click the date and time.
- We recommend configuring your CML server to use NTP, but you may need to change the setting from Automatically using NTP to Automatically using specific NTP servers if CML cannot find your preferred NTP server automatically.
- Alternatively, you can set the date and time manually.
8. Why did the CML license deregistration fail with my CSSM On-Prem server?
There is a known issue with CML 2.2.x and some versions of the CSSM On-Prem software that may cause license deregistration to fail. If you are unable to deregister the CML 2.2.x instance from the CSSM On-Prem server, open a support case for CML.
External Connectivity
1. How can I connect my lab to an external network?
Cisco Modeling Labs provides out-of-box external connectivity in two ways: L3 NAT and through an L2 System Bridge. In L3 NAT mode, the Cisco Modeling Labs VM will perform dynamic network address translation for L3 traffic initiated by lab nodes. The default subnet is 192.168.255.0/24, and lab nodes should be configured for DHCP on the connected interface. The traffic is ultimately routed out of one of CML host's virtual network interfaces (vNIC) using that host's own routing configuration. L3 NAT mode is useful when you only want to provide outbound connections from your topology (e.g., provide internet access to download additional software).
In L2 bridge mode, the Cisco Modeling Labs VM vNIC is shared with the virtual lab. A node connected to an L2 bridge form of external connectivity will be on the same L2 subnet as the VM's vNIC. L2 bridge mode is useful when you want to peer with external devices using routing protocols like OSPF or EIGRP; when you want to use your own DHCP server to provide IP addressing; or when you want to connect to your running topology directly from an external network (e.g., with network management or automation applications). CAUTION: if you connect an IOSvL2 switch to an L2 bridge external connectivity node, that switch will participate in spanning-tree and dynamic trunking protocol by default. This may cause unintended effects on your local network. Consider enabling BDPU filter and turning off dynamic trunking negotiation on the port in the switch's day 0 configuration.
To add external connectivity to a lab, drag the External Connector node from the palette to the topology. Select the node and go to the Config tab in the sidebar pane. Select between NAT or System Bridge based on the desired form of external connectivity. Additional connectivity options are possible and discussed further below.
2. How many external connectivity nodes can I have within a lab?
You can add as many as you want. You can, for example, connect each node directly to an external network if you so choose. You can also connect a switch to an external network and then connect subsequent nodes to that switch to provide common external network access. You can connect multiple interfaces of a node to any external network, though connecting some node types to the same network multiple times can trigger undesirable behavior in such nodes. External connector nodes do not count toward the running node count license.
3. How can I add multiple different external networks to Cisco Modeling Labs?
The two default forms of external connectivity leverage the single primary vNIC of the Cisco Modeling Labs host to provide the connectivity. If, however, you have multiple external networks (e.g., multiple VLANs) that you wish to expose within labs, you can do that by adding additional vNICs to the CML host. This is described under the external connectors section of the Cisco Modeling Labs Admin Guide. In a CML Cluster deployment, only the Controller host requires these additional interfaces.
Once you have created additional bridges on the CML server and configured them as described in the Admin Guide, you will be able to use them in your labs. Select an External Connector node and then go to the Config tab in the sidebar pane. Select the desired bridge from the dropdown list, or use one of the advanced options to configure which bridges are used in the current lab. See the external connectivity section of the Cisco Modeling Labs User Guide.
Advanced Topics
1. Does Cisco Modeling Labs v2.x support clustering?
Cisco Modeling Labs Version 2.4 for Enterprise and Education introduced multiple CML servers that can be clustered together to provide means to scale large labs horizontally, as well as run more labs concurrently.
Read more about CML clustering in the CML clusters.
See the CML Installation Guide for instructions on deploying a CML cluster.
2. How can I add custom image or node types to Cisco Modeling Labs?
It is possible to add customer images and/or node types to Cisco Modeling Labs. Images are typically different versions of an existing node type (e.g., a new version of IOS-XE for the CSR1000v node). Node types are wholly new elements you can select from your palette when building labs. These can include third party network elements or hosts. See the Cisco Modeling Labs documentation for details on adding custom VM image definitions and custom node definitions.
To add a custom node type, go to Tools > Node and Image Definitions from the main menu at the top of the Cisco Modeling Labs window. Click the Node Definitions tab at the top. Nodes are defined using libvirt properties. Consult your node's requirements to see what you will need to fill out for the various field values. What might be helpful is to download a current node type definition, modify it, and then import it as a new node type. Once a new node type has been defined, you can add images for it using the new image procedure mentioned above.
3. How does Cisco Modeling Labs allocate MAC addresses for virtual nodes?
A specific MAC address is assigned to interfaces of all virtual lab nodes. The exceptions are interfaces of Unmanaged Switch and External Connector nodes. The MAC addresses are assigned automatically each time a node is started for the first time (or after a wipe).
The 6-byte MAC address is composed of the high 3-byte OUI, while the lower 3-bytes are picked at random. Lab users may pre-select the lower 3 bytes for each assignable interface. The MAC addresses in a given CML deployment must be unique.
The OUI defaults to 52:54:00 and may be changed by the system administrator. Changing the value is recommended in case multiple CML instances are deployed and they share the same L2 external connector networks, including the primary network for bridge0. Otherwise, MAC address clashes may occur and cause unpredictable traffic issues.
Another exception exists for IOL node interfaces. The MAC addresses for these nodes always use the OUI of aa:bb:cc, and the lower 3 bytes are picked from a set of 1023 possible value sequences. The possibility of address clashes on shared L2 network is increased for these node types.
See the CML User Guide for more details on MAC address assignment.
See the CML Administration Guide for instructions on setting the system OUI.
Troubleshooting
1. When I configure dot1q sub-interfaces on a CSR1000v node, it cannot pass traffic. Why?
Due to a missing low-level ethernet driver, the CSR1000v cannot currently use dot1q sub-interfaces. A workaround is to use carrier ethernet service-instances instead. That is, instead of dot1q sub-interfaces to terminate VLANs 100 and 200, do the following:
interface GigabitEthernet1
 service instance 100 ethernet
  encapsulation dot1q 100
 service instance 200 ethernet
  enacapsulation dot1q 200
!
bridge-domain 100
 member GigabitEthernet1 service-instance 100
!
bridge-domain 200
 member GigabitEthernet1 service-instance 200
!
interface BDI100
 ip address ...
 encapsulation dot1q 100
!
interface BDI200
 ip address ...
 encapsulation dot1q 200
See this community thread for more details.
2. When I try to start a lab, I get the error, "Failed to start node NAME: Unable to define node (Unable to clone image)." Why is this?
The reference platform ISO has not been properly mounted. This can also result in nodes hanging in the QUEUED state. In VMware settings, make sure the ISO is configured to be connected at power on, and then reboot the Cisco Modeling Labs VM.
3. Why am I not able to send jumbo frames with NX-OS 9000 nodes?
Jumbo frames work by default in the NX-OS 9000 nodes in CML, but configuring MTU on an interface is not supported by NX-OS 9000 until version 9.3(3). To use jumbo frames, change your lab to use a NX-OS 9000 VM image version of 9.3(3) or higher.
4. Why do nodes that use my custom image definition fail to start?
- In the Workbench, click the node that is failing to start.
- Click the Simulate tab in the lower pane and check the Image Definition property for the node.
- Ensure that the node is using the image definition that you expect.
- If the node is using the
Automaticimage definition, try selecting a specific image from the dropdown menu. - If the only value listed in the image definition dropdown menu is
Automatic, then your CML server has no images for this type of node.
- If the node is using the
- If you still cannot start the node after you have selected a specific image definition for it, log into Cockpit.
- Check the output of this command:
sudo journalctl virl2-lowlevel-driver | grep ERROR - Check the last few errors.
- If you are seeing an error that includes this message:
The most likely problem is that the Boot Disk Size for the node's node definition or image definition is too small.Disk resize failed: qemu-img: warning: Shrinking an image will delete all data beyond the shrunken image's end.
In the node definition (or image definition), the Boot Disk Size cannot be smaller than the VM disk's
virtual size, as reported byqemu-img info.If your image definition's ID was
foo-1.0.0, then you can check the virtual size of the disk associated with the image definition's .qcow2 file using this command:qemu-img info /var/lib/libvirt/images/virl-base-images/foo-1.0.0/*.qcow2 | grep -i virtualYou should get output that includes a line like this:
virtual size: 21 GiB (22548579328 bytes)In this case, the Boot Disk size specified in the image definition for the custom VM image must be 21 GiB or larger. If there is no Boot Disk size set in the image definition, then the Boot Disk size in the associated node definition must be 21 GiB or larger.
5. CML-Personal Licensing registration fails with communication timeout. What are the troubleshooting steps?
CML reports a communication timeout error during licensing when it fails to reach Cisco's Smart Licensing servers. CML-Personal only supports direct (online) licensing, which requires your CML server to have Internet access. If you encounter this error during licensing, try these troubleshooting tips:
Verify that your CML server can reach the Smart Licensing servers.
- Log into Cockpit as a sysadmin.
- Click the Terminal tab so that you can run commands directly on the CML server.
- Run:
ping -c 3 smartreceiver.cisco.com- If that fails, then run:
ping -c 3 www.cisco.com- If that succeeds, then it may mean that smartreciever.cisco.com is temporarily offline.
- Wait 30 minutes and try again.
- If both ping commands fail, then your local network may be blocking ICMP traffic.
- Run:
curl -s --head https://smartreceiver.cisco.com/licservice/license -o /dev/null || echo "FAILED"- If that command just completes with no output in the Terminal, then your CML server is able to reach the Cisco Smart Licensing servers.
- If that outputs
FAILED, then your CML server cannot access to Cisco Smart Licensing servers. Try the network troubleshooting steps below.
- Run:
- If that fails, then run:
Network troubleshooting for licensing
- Is DNS working?
- In the Terminal, run:
nslookup smartreceiver.cisco.comThe response should include a non-authoritative answer, like this:
Server:         127.0.0.53
Address:        127.0.0.53#53

Non-authoritative answer:
Name:   smartreceiver.cisco.com
Address: 146.112.59.81
Name:   smartreceiver.cisco.com
Address: 2a04:e4c7:fffe::f
If not, then correct your DNS settings.
- In Cockpit, click the Networking tab.
- Click Bridge0.
- Click the link for the IPv4 or IPv6 settings (whichever is appropriate for your CML server).
- In the IPv4 Settings (or IPv6 Settings) dialog, check and correct the DNS settings.
- Once you correct the DNS settings, try again.
- In the Terminal, run:
- Make sure the host machine where your CML-Personal server is running is not connected to any VPNs.
- If host machine is connected to a VPN, it could interfere with the network traffic from CML server.
- Disconnect from all VPNs, and then try again.
- If you are running CML as a VM, ensure that VMware network settings are correct.
- In VMware workstation/player, right-click the CML VM's Settings > Network adapter settings.
- Try switching the setting to NAT.
- Stop the CML VM.
- Reboot the host OS (the laptop or workstation where you were running the VM).
- After rebooting, start the CML VM.
- CML's management interface should receive an IP address from the "internal network" (normally in the 192.168.230.0/24 subnet for VMware workstation).
- Try again.
If CML can successfully ping smartreceiver.cisco.com, and the license registration still fails, try these steps:
Try a Licensing Reset
- Log into Cockpit as the sysadmin user.
- On the CML2 tab, expand the Factory Reset group.
- Click Licensing reset.
- Now, return to the CML UI, and try to license it again.
If you still get a communication error, then verify that you can get a response from the Cisco Smart Licensing servers.
In the Cockpit Terminal, run
curl https://smartreceiver.cisco.com/licservice/licenseThe command should print output similar to this in the Terminal.
This is the Smart Receiver! Environment information: cisco.life = prod License Engine = https://swapi.cisco.com/software/csws/ssm/services License EngineSLE = https://swapi.cisco.com/software/csws/ssm/v2/services License Crypto Service = https://lcs.cisco.com/LCS Crypto Enabled = true Retry Enabled = true Retry Timeout = 55000 Rate Limit Window Length = 3600 Rate Limit Max Allowed in Window = 12- If the
curlcommand fails to get any response from smartreceiver.cisco.com, then the Cisco Smart Licensing servers may be temporarily offline. Wait 30 minutes, and try again.
If none of the above steps helped, please create a new discussion in the CML Personal community forum.
6. Why did my CML management interface get 192.168.255.1 as its IP address?
This situation arises when CML the VM management network interface is configured to acquire an IP address via DHCP, but your local network does not have a DHCP server configured. If CML does not acquire an IP address via DHCP, it receives the IP address 192.168.255.1 from libvirt. However, you will not be able to access the CML UI using that IP address.
To restore access to CML UI webpage, there are two options.
- Assign a static IP address from your local network to CML's management interface.
- If you do not know the networking details of your local network, do not attempt to use a static IP address. Instead, try this.
- Leave the CML's management interface to be configured with DHCP.
- In VMware workstation/player, right-click the CML VM's Settings and click Network adapter settings.
- Try switching the setting to NAT.
- Stop the CML VM.
- Reboot the host OS (the laptop or workstation where you were running the VM).
- After rebooting, start the CML VM.
- CML's management interface should receive an IP address from the "internal network" (normally in the 192.168.230.0/24 subnet for VMware workstation).
- Verify the newly-acquired IP address by opening the console of the CML VM in VMware.
- Log into the console as the
sysadminuser. - Run the command
ip aand look for the IP addresses assigned tobridge0. - If the correct IP address was assigned, then try using this new address to open the CML UI.
7. Why doesn't external connectivity work in my CML ESXi deployment?
By default, you can use External-Connector nodes in a CML lab in either Bridge or NAT mode.
In NAT mode, the virtual nodes are connected to the CML's virtual fabric and are not directly exposed to your physical network. In most cases, external connectivity should work right out-of-the-box when used in NAT mode.
In bridge mode, as the name suggest, CML directly creates a bridge to the management network of the CML VM. The node (or nodes) in your lab that are directly connected to the bridged external-connector or that are in the same L2 domain as the bridged external-connector will be exposed directly to your physical network. It's similar to putting the nodes in your CML lab on your network behind a dumb switch (the bridged-external connector) whose an uplink port is sending its traffic out CML's management port.
If you frequently use external connectivity with bridge mode, we recommend dedicating a separate management network for CML, especially if your CML server is shared by many users or is used by inexperienced network engineers for training purposes. That way, network disruptions caused by using a bridged external-connector will be less likely to knock your whole CML server off the network.
Here are a few tips for troubleshooting external connectivity:
vSwitch security settings
- Make sure that all the three security settings (promiscuous mode, forged transmits and mac address changes) are set to accept in the corresponding VM port group. See the step near the end of Deploying the OVA on ESXi Server.
- In vCenter/vSphere client, select the CML host server.
- On the Configure tab, click Networking > Virtual Switches.
- Find the VM port group assigned to CML VM.
- This troubleshooting step is applicable for Bridge, NAT, and Custom external connectivity methods.
Custom bridges
- If you have created custom bridges as described in the CML training videos, log into Cockpit.
- In Cockpit, click the Networking tab.
- Select the custom bridge, and verify or modify the settings.
- Set IPv4 to be disabled.
- Set IPv6 to ignore.
- Repeat these steps for all the custom bridges that you have created.
Redundant uplinks
In certain ESXi environments, the vSwitch used for external connectivity could be connected to multiple vmnics as part of a NIC teaming environment for redundancy.
NIC teaming can operate in either an active-active or active-standby configuration.
To verify the NIC teaming setup in the vCenter/vSphere client:
- Select the CML host server.
- On the Configure tab, click Networking > Virtual Switches.
- Verify the uplinks and their configuration.
In a NIC teaming environment, you may need to set an additional parameter to ensure proper functionality. For more information, refer to this VMware community thread.
- In the vCenter/vSphere client:
- Select the CML host server.
- On the Configure tab, click System > Advanced System Settings.
- Click the Edit button.
- Use the filter to search for the
Net.ReversePathFwdCheckPromiscparameter. - Set
Net.ReversePathFwdCheckPromisc = 1.
- Important: After setting the parameter, reboot the CML VM to ensure the changes take effect.
- In the vCenter/vSphere client:
8. Why is external connectivity not working in my CML-Personal VM, deployed on a laptop or workstation?
Internet access for virtual nodes
If the requirement is to just allow internet access to the virtual nodes in CML for downloading custom packages from repositories, the best option is to use the NAT setting in VMware fusion/player's network settings for the CML VM. In this case, when using an external-connector node in your CML lab, be sure to set the node to NAT mode in the Edit Config tab of the CML Workbench. NAT mode enables only outbound connectivity from virtual nodes.
Assuming that the laptop/desktop has internet connectivity, any virtual node interface in "up" state and configured with DHCP, when connected to an external connector which is set to operate in NAT mode, will obtain an internal IP address dynamically. It should then be able to connect to Internet without any further configuration.
Note: When the CML VM is set to operate in NAT setting, the external connector node supports only NAT mode.
Virtual nodes to be part of local network
If you want your virtual nodes in CML to be part of your physical/local network, the best option is to use the Bridge setting for in VMware fusion/player's network settings for the CML VM. In this case, when using an external-connector node in your CML labs, be sure to set the node to Bridge mode in the Edit Config tab of the CML Workbench. Bridge mode enables both inbound and outbound connectivity to virtual nodes.
- Assuming that DHCP is enabled in the local network, any virtual node in CML with an interface in "up" state and configured with DHCP, when connected to an external connector in Bridge mode, will obtain an IP address dynamically from your local DHCP server/gateway and should be able to reach the network gateway. Depending on your network setup, additional parameters, like DNS or proxy settings, may be required to reach beyond the gateway.
- If DHCP is not enabled in the local network, the virtual node's interface in CML needs to be configured with a static IP address from your local network to be able to reach the gateway.
Note: When CML VM is set to operate in Bridge setting, the external connector node supports both Bride and NAT mode.
9. How do I fix external connectivity when the virtual nodes in my CML lab can reach the external gateway, but they cannot reach the Internet?
If the CML instance needs a proxy to reach the Internet, then so do the virtual nodes in your CML labs. You will need to update the node configuration to use a proxy for any virtual nodes that need to reach the Internet irrespective of the type of external connectivity used.
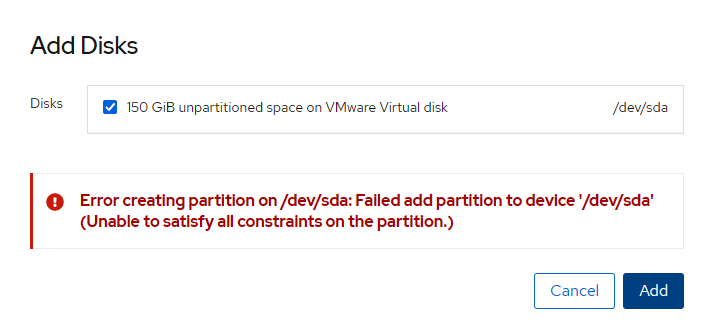
10. Why did the CML disk expansion fail?
The CML installation uses a GUID Partition Table (GPT). When you increase the disk space for an existing CML VM in ESXi and then try to grow the partition as described in Method 2, you may receive an error that says, "Unable to satisfy all constraints on the partition."
When that happens, follow these steps to check the disk's partition table:
- Log into Cockpit as a sysadmin.
- Click the Terminal tab so that you can run commands directly on the CML server.
- Run:
sudo fdisk --list /dev/sda. - Check whether the output includes a message about a
GPT PMBR size mismatch.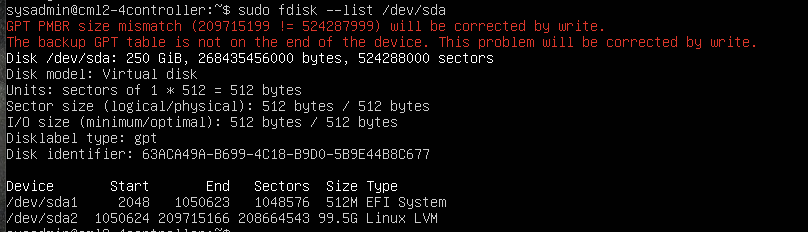
If so, then you can resolve the problem by following these steps:
- In the Terminal, run this command:
sudo fdisk /dev/sda. - Without making any other changes, just use the
woption to write the partition table back to disk.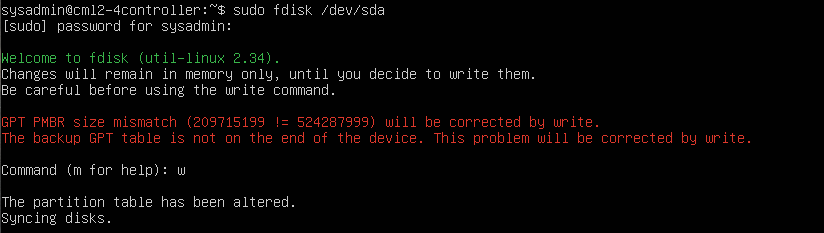
After fixing the GPT PMBR size mismatch, you can retry expanding the CML disk size again. Grow the partition by following the instructions in Method 2 from the admin guide.
11. scp fails with "subsystem request failed" error
When you attempt to copy the .pkg file or a .qcow2 VM image file to the CML server, you may receive an error like this:
scp cml2_2.5.1-10_amd64-5.pkg admin@172.16.0.10:

admin@172.16.0.10's password:
subsystem request failed on channel 0
scp: Connection closed
The service that runs on port 22 of your CML server in releases before 2.7.0 only supports scp with the SCP protocol, but some newer scp clients use the SFTP protocol by default. Check the documentation for your scp client to see whether it provides an option, such as -O, to use the older SCP protocol. If so, retry the copy operation using that option. You should not use the flag if your CML server is 2.7.0 or later.
For example:
scp -O cml2_2.5.1-10_amd64-5.pkg admin@172.16.0.10:
12. Why does VMware Player or Workstation report an error about "Intel VT-x" or "nested virtualization" when I power on the CML VM?
When you attempt to start the CML VM, VMware pops up a dialog that indicates either
Virtualized Intel VT-x/EPT is not supported on this platform.
or
Error while powering on: VMware Player does not support nested virtualization on this host.
Module "HV" power on failed.
You may also encounter similar problems following a Windows Update. Some customers who had a working CML deployment reported that the CML VM could no longer start nodes after applying the latest updates to the host Windows OS. In that case, the update process altered some Windows system settings related to nested virtualization support.
To ensure adequate performance when deploying CML as a virtual machine (VM), the hypervisor must run CML with nested virtualization support. That option exposes the underlying processor's virtualization extensions so that they can be used by the CML VM when it runs the node VMs for your CML labs.
You should ensure that the virtualization extensions are enabled and passed through at each level:
- The processor must provide virtualization support (e.g., Intel VT-x and EPT extensions).
- The processor's virtualization extensions must not be disabled in the BIOS of the host system.
- The hypervisor must expose those virtualization extensions to the CML VM itself.
Once you ensure that those settings are correct, you may need to take additional steps to disable Hyper-V on the Windows host OS since it can interfere with VMware. Follow the steps in the latest version of CML Personal Intel VT-x/EPT Issue.
Even if you previously had a working CML VM, you may have to repeat those steps after a Windows Update. In this case, after you apply the latest updates to the Windows OS, you will see new errors about kvm, virtualization, or nested virtualization whenever you try to start a lab in CML. Shut down the CML VM and follow the steps in the CML Personal Intel VT-x/EPT Issue document.
Note that recent (Nov / Dec 2025) changes in the Windows operating system have made it more difficult to disable Hyper-V so that VMware can enable nested virtualization for the CML VM. We are working on impacted customers to ensure that our updated documentation works for all supported deployment options. If you are still getting the same error after following those instructions, please contact CML support.
13. Why does CML indicate Insufficient space available on controller and Bytes Available 0 when I try to upload the PKG file?
You know that there is sufficient free disk space on your CML controller, but when you upload the CML upgrade PKG file to the server, you get an error that indicates Insufficient space available on controller and Bytes Available 0. In CML 2.6.x, you will get this error if you put the controller into Registered state before you upload the PKG file. The bug is a known issue in CML 2.6.x, fixed in CML 2.7.0.
You will not encounter this problem if you follow the steps in In-Place Upgrade in order.
If you are upgrading from CML 2.6.x, and you already put the controller into Registered state, you can work around the problem by following these steps:
- Log in to the CML UI as an administrator.
- Click Tools > System Administration > Compute Hosts.
- On the Compute Hosts page, put the controller back in Online state.
- Return to the Tools > Upgrade System page.
- Upload the PKG file. You will not get the
insufficient space availableerror. - Once the file upload is finished, you can put the controller back into Registered state and proceed with the upgrade. See In-Place Upgrade.
Alternatively, since the bug only affects the CML APIs and UI, you can simply scp the PKG file to your CML server. Use the same credentials that you use to log in to the CML UI as an administrator and the default scp port (22). For example:
scp cml2_2.7.0-4_amd64-20.pkg admin@172.16.0.10:
As long as there is sufficient space, you should be able to scp the PKG file to the CML controller.