Add and manage network devices
Alert: Cisco has made the end-of-life (EOL) announcement for the Cisco Edge Device Manager (EDM).
Add network devices that can be used for data management by other Cisco IoT Operations Dashboard (IoT OD) services such as Edge Intelligence or Industrial Asset Vision (IAV). You can add a single device by entering the information for that device, or bulk add devices from a CSV file.
Prerequisites
| Requirement | Description | More information |
|---|---|---|
| Obtain and provision network devices | Network devices must be provisioned for use with Cisco IoT. Provisioning is performed by the Cisco Plug and Play (PnP Connect) system when you order a network device, or you can manually add an existing device to PnP Connect. | How to order |
| Complete the network device requirements | Complete the requirements for network devices, including firmware, Wi-Fi, and cellular. | Requirements |
| Complete the network requirements | Open the required TCP/UDP network ports and IP protocols on the network firewall to allow the network devices to communicate with Cisco IoT. | Requirements |
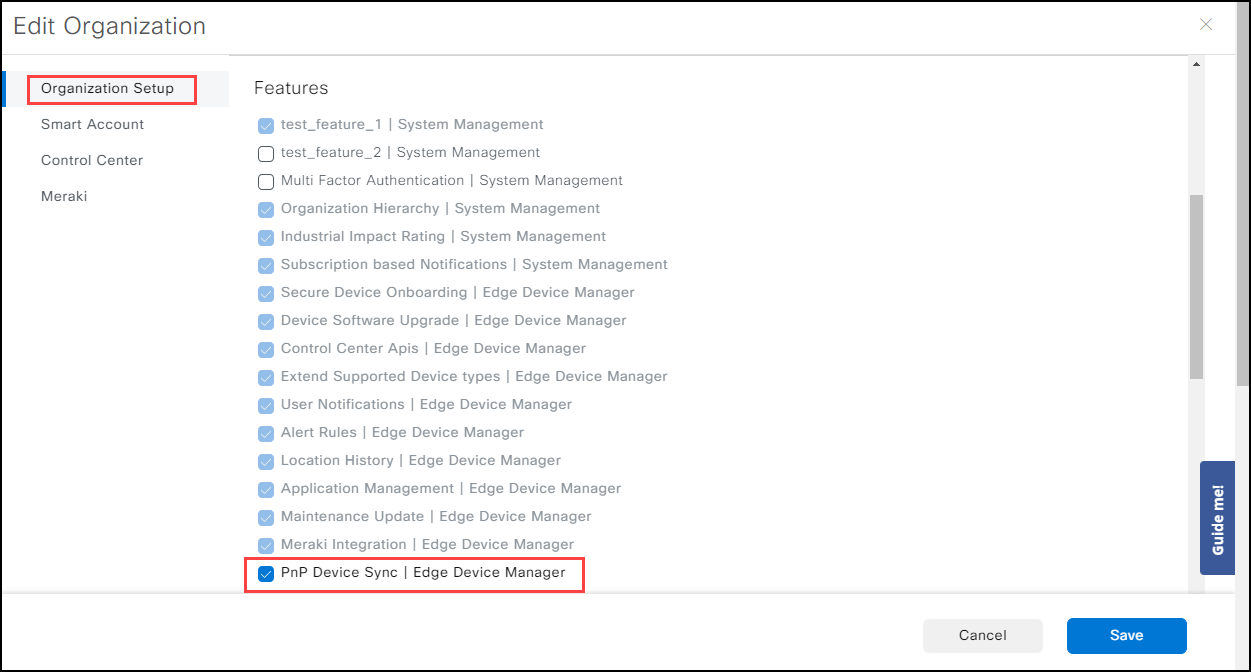
IMPORTANT: You must enable the following feature: PnP Device Sync.
To enable the feature:
- Click the "people icon" in the far right of the header. Click > Organization Settings > Edit Organization.
- Scroll down to Features.
- Click the following feature flag: PnP Device Sync | Edge Device Manager.
- Click Save.
Add a single device
- From the left pane, click Inventory. Notice two new tabs that show the status of all of your detected network devices: In Use and Unused. In Use is defined as those network devices that have been assigned to a group (with a configuration template already attached). Unused are network devices that you purchased that have NOT yet started the onboarding process. They are visible in the IoT OD, but not yet available because they have not successfully completed the Plug-n-Play set up or been assigned to a group.
- Click Unused.
The following error scenarios may cause your devices to appear in the Unused tab.
| Item | PnP Status | Status | Group | Next Steps | Error Details | Troubleshooting Steps |
|---|---|---|---|---|---|---|
| 1 | Unconfigured | Unheard | Assigned/ Unassigned |
No valid PnP Connect Controller Profile. Troubleshoot | No valid PnP Connect Controller Profile detected in the Virtual Account associated with this organization. | 1. Log in to the PnP Connect Controller Profiles page: Plug-n-Play and select the Virtual Account combination corresponding to the current organization 2. Verify that there is a valid IoT OD controller profile (valid URL and certificate). If not, create one. 3. Navigate to the PnP Connect Devices. Using the serial number, search the entry for the current device. Assign the valid IoT OD Controller Profile to this device. 4. In IoT OD, ensure that the device is assigned to a valid Configuration Group. 5. Power on the device and ensure the device has connectivity to devicehelper.cisco.com and to IoT OD. |
| 2 | Pending Redirection | Unheard | Assigned/ Unassigned |
PnP onboarding not yet initiated. Troubleshoot | Device has not yet connected to PnP service for redirection and onboarding by IoT OD. | 1. Ensure that the device is assigned to a valid Configuration Group. 2. Power on the device and ensure it has connectivity to devicehelper.cisco.com and to IoT OD. 3. For details on what is required to ensure connectivity, please refer to Troubleshooting IR device onboarding. |
| 3 | Redirected | Unheard | Assigned/Unassigned | PnP redirection initiated but has not reached this IoT OD account. Troubleshoot | Device has connected to devicehelper.cisco.com PnP service and been redirected but has not reached this IoT OD account for onboarding. | 1. The device is currently undergoing the PnP onboarding process but has not reached this IoT OD account. Ensure the device remains powered on and it will periodically re-attempt the onboarding process every 30 minutes. Ensure that the device is assigned to a valid Configuration Group. Wait for 30 minutes. If issue persists, go to Step 2. 2. Check the PnP Connect Controller Profile for this device: https://software.cisco.com/software/csws/ws/platform/home#pnp-controllerProfiles to ensure it is redirecting to the correct IoT OD cluster. 3. Check the PnP Connect Controller Profile for this device: https://software.cisco.com/software/csws/ws/platform/home#pnp-controllerProfiles to ensure that a valid certificate is added. 4. Ensure that the device has connectivity to IoT OD. Refer to [Troubleshooting IR device onboarding]/edge_manager/onboarding/ts_ir_onboard.md). 5. If after 30 minutes or more the device status does not change, collect the PnP logs (pnp tech-support/show tech-support) from the device and contact TAC Support. |
| 4 | Redirect Successful | Unheard | Assigned/ Unassigned |
PnP redirection initiated but has not reached this IoT OD account. Troubleshoot | Device has connected to devicehelper.cisco.com PnP service and been redirected but has not reached this IoT OD account for onboarding. | 1. The device is currently undergoing the PnP onboarding process but has not reached this IoT OD account. Ensure the device remains powered on. It will re-attempt the onboarding process every 30 minutes. Wait for 30 minutes. If issue persists, go to Step 2. 2. Check the PnP Connect Controller Profile for this device: https://software.cisco.com/software/csws/ws/platform/home#pnp-controllerProfiles to ensure it is redirecting to the correct IoT OD cluster. 3. Check the PnP Connect Controller Profile for this device: https://software.cisco.com/software/csws/ws/platform/home#pnp-controllerProfiles to ensure that a valid certificate is added. 4. Ensure that the device has connectivity to IoT OD. Refer to Troubleshooting IR device onboarding. 5. If after 30 minutes or more the device status does not change, check the PnP logs for this device at PnP Connect Devices page: https://software.cisco.com/software/csws/ws/platform/home#pnp-devices and find the entry for current device using serial number. |
| 5 | Contacted | Unheard | Assigned/ Unassigned |
PnP onboarding initiated but has not redirected to this IoT OD account. Troubleshoot | Device has connected to PnP service but has not been redirected to this IoT OD account for onboarding. | 1. The device is currently undergoing the PnP onboarding process but has not reached this IoT OD account. Ensure the device remains powered on. It will re-attempt the onboarding process every 30 minutes. Wait 30 minutes. If issue persists, go to Step 2. 2. If after 30 minutes or more the device status does not change, check for the errors in PnP logs against device Serial Number at PnP Connect Devices page: https://software.cisco.com/software/csws/ws/platform/home#pnp-devices. 3. If issue persists, create a TAC Case for support. |
| 6 | Error | Unheard | Assigned/ Unassigned |
PnP onboarding process has failed prior to reaching IoT OD. Troubleshoot | PnP Connect onboarding process has detected a device error and failed. It is unable to reach IoT OD. | 1. The device is currently undergoing the PnP onboarding process but has not reached this IoT OD account. Ensure the device remains powered on. It will re-attempt the onboarding process every 30 minutes. Wait 30 minutes. If issue persists, go to Step 2. 2. If after 30 minutes the device status does not change, check for errors in PnP logs against device Serial Number at PnP Connect Devices page: https://software.cisco.com/software/csws/ws/platform/home#pnp-devices. 3. If the issue is not resolved, collect the PnP logs (pnp tech-support/show tech-support) from the device and contact TAC Support. |
| 7 | Any State | Heard | Unassigned | PnP redirection successful. Assign device to Group to complete onboarding. Troubleshoot | PnP has successfully redirected this device to this IoT OD account for onboarding but no Group configuration is assigned. | 1. PnP has successfully redirected this device to this IoT OD for onboarding but no Group Configuration is assigned. Assign device to a valid Group for configuration. 2. Ensure the device remains powered on. It will re-attempt the onboarding process every 30 minutes. Wait 30 minutes. If issue persists, go to Step 3. 3. If after 30 minutes the device status does not change, check for errors in PnP logs against device Serial Number at PnP Connect Devices page. 4. If the issue is not resolved, collect the PnP logs (pnp tech-support/show tech-support) from the device and contact TAC Support. |
| 8 | Any State | Pending Delete | Unassigned | This device is requested to be deleted from IoT OD. Troubleshoot | This device is requested to be deleted from IoT OD. The system is awaiting a response from the device. If this state remains for a long time, please raise a TAC case. | 1. Raise a TAC Case (https://www.cisco.com/c/en/us/support/index.html) and provide the details of Device Serial Number. 2. Once this issue is resolved, this device will be deleted from IoT OD. |
| 9 | Conflicted Device | - | - | This device Serial Number is already in use in a different tenant. Troubleshoot | This device is already configured in a different tenant and is in use. Raise a TAC case to resolve this issue. | 1. Raise a TAC Case (https://www.cisco.com/c/en/us/support/index.html) and provide the details of Device Serial Number. 2. Once this issue is resolved, start the PnP process for device onboarding. |
| 10 | Any State | Pending Delete | Unassigned | This device is requested to be deleted from IoT OD. Troubleshoot | This device is requested to be deleted from IoT OD. System is awaiting response from device. If this state remains for a long time, raise a TAC case. | 1. Raise a TAC Case (https://www.cisco.com/c/en/us/support/index.html) and provide the details of Device Serial Number. 2. Once this issue is resolved, start the PnP process for device onboarding. |
| 11 | Any State | Any | Assigned | Make sure per-device configuration parameters have been provided to initiate onboarding. Troubleshoot | For this device: per device configuration parameters were not provided, which are mandatory for the associated group. | 1. Click on the device name and navigate to Device Configuration tab. 2. Click on Edit Config link and provide the values for mandatory attributes. Save the configuration. 3. System will retry bootstrapping process in 5 minutes and post this operation. Device will start onboarding process. |
| 12 | N/A (manually added) | Unheard | Assigned | PnP onboarding not yet initiated. Troubleshoot | Device is not connected to PnP service for redirection and onboarding by IoT OD. | 1. Ensure that the device is assigned to a valid config group. 2. Power on the device and ensure it has connectivity to devicehelper.cisco.com and to IoT OD. 3. For details on what is required to ensure connectivity, refer to Troubleshooting IR device onboarding. |
| 13 | PnP Sync device | Heard | Assigned | PnP redirection successful. Wait for 10 minutes for the device to complete onboarding. Troubleshoot | PnP has successfully redirected this device to this IoT OD account for onboarding. Please wait for 10 minutes for the device to complete the onboarding process. | 1. PnP has successfully redirected this device to this IoT OD for onboarding. 2. Ensure the device remains powered on. Please wait for 10 minutes. If issue persists, go to Step 3. 3. If after 10 minutes or more the device status does not change, check for the errors in PnP logs against device Serial Number at PnP Connect Devices page: https://software.cisco.com/software/csws/ws/platform/home#pnp-devices. 4. If the issue is not resolved, collect the PnP logs (pnp tech-support/show tech-support) from the device and contact TAC Support. |
| 14 | N/A (manually added) | Heard | Assigned | PnP redirection successful. Wait for 10 minutes for the device to complete onboarding. Troubleshoot | PnP has successfully redirected this device to this IoT OD account for onboarding. Please wait for 10 minutes for the device to complete the onboarding process. | 1. PnP has successfully redirected this device to this IoT OD for onboarding. 2. Ensure the device remains powered on. Please wait for 10 minutes. If issue persists, go to Step 3. 3. If after 10 minutes or more the device status does not change, collect the PnP logs (pnp tech-support/show tech-support) from the device and contact TAC Support. |
| 15 | If PnP, then any state other than pending redirection, redirected, redirect successful, contacted, error, or any state. If manual, then N/A (both PnP sync and manual) |
Unheard | Unassigned | Assign device to Group to complete onboarding. Troubleshoot | No group configuration is assigned to this device. Please make sure to assign a valid group to start the onboarding process. | 1. Assign the device to a valid configuration group. 2. Power on the device and ensure it has connectivity to devicehelper.cisco.com and to IoT OD. 3. For details on what is required to ensure connectivity, refer to Troubleshooting IR device onboarding 4. If the issue is not resolved, collect the PnP logs (pnp tech-support/show tech-support) from the device and contact TAC Support. |
Note: Unheard devices will still continue to show up in Operations Dashboard maps.
Conflicted devices
Conflicted devices are the ones which have already been onboarded in IoT OD by a different organization and are still present in the Plug and Play account in the SA/VA associated with your organization. These devices will be synced in the Unused list but cannot be moved to In Use until the conflict is resolved. Please raise a TAC case so that a Cisco engineer can contact the Tenant Admin of that respective organization and can ask to deactivate that device. Once this step is complete, you can onboard this device in IoT OD.
You can change the columns that display here. Use the Gear Icon (in red box) and click Edit Table Columns. Device Type does not show by default.
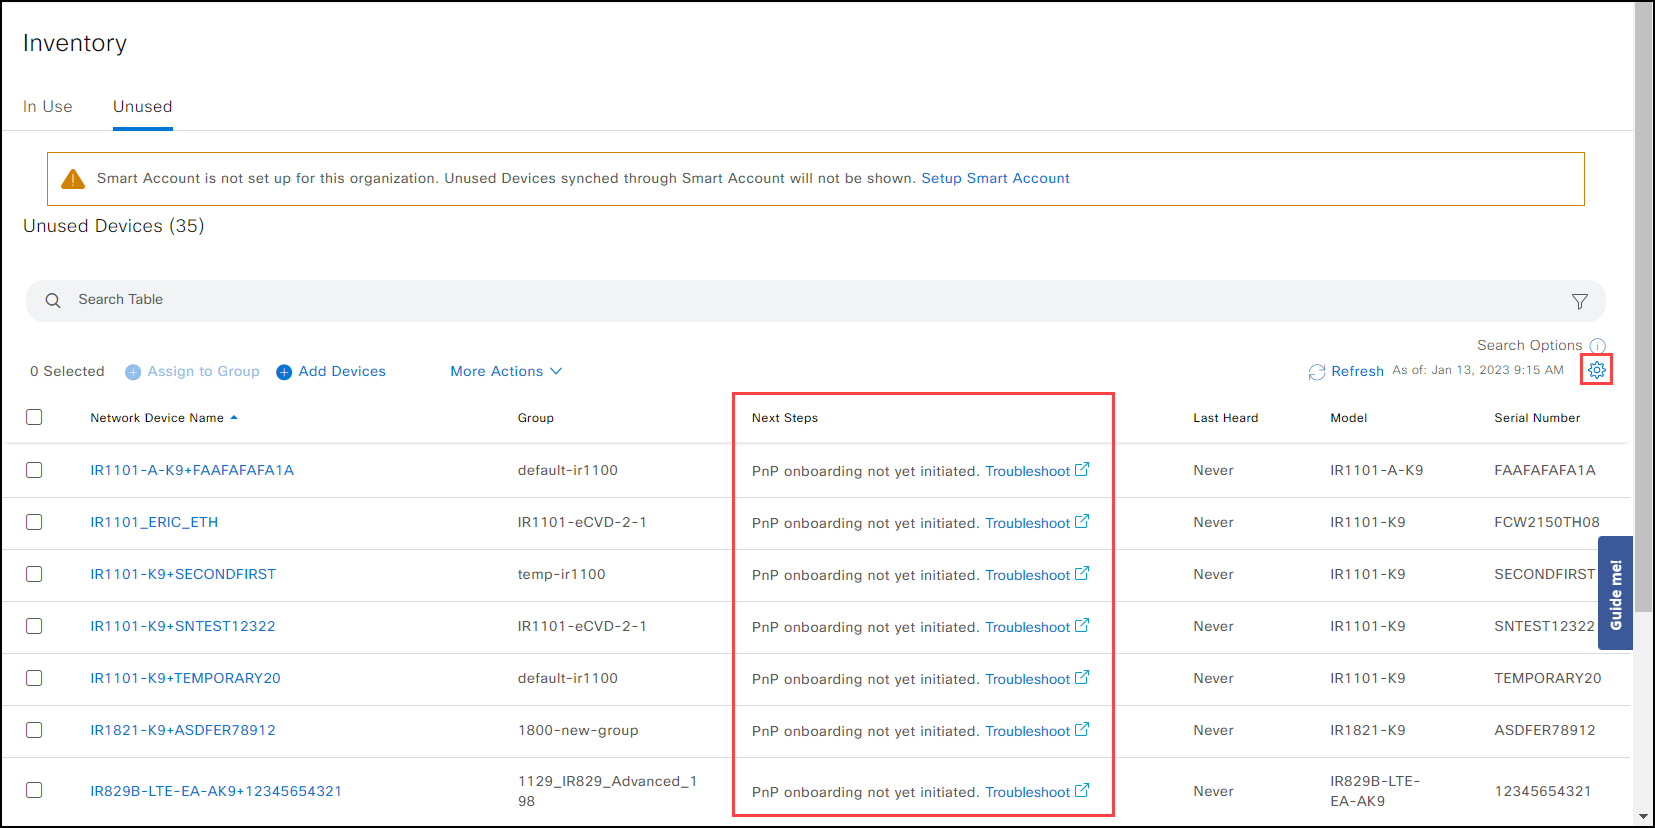
Scroll through the list and find devices with no information in the Group column. These are devices that were synced with PnP Connect, but have no Group assigned to them, so they must appear in the Unused list. Also, it will display Never in the Last Heard column. This is normal.
To search Groups:
Click the Group down arrow. The Group column sorts. Click it again and the devices from the bottom appear at the top of the list (not assigned to a group yet).
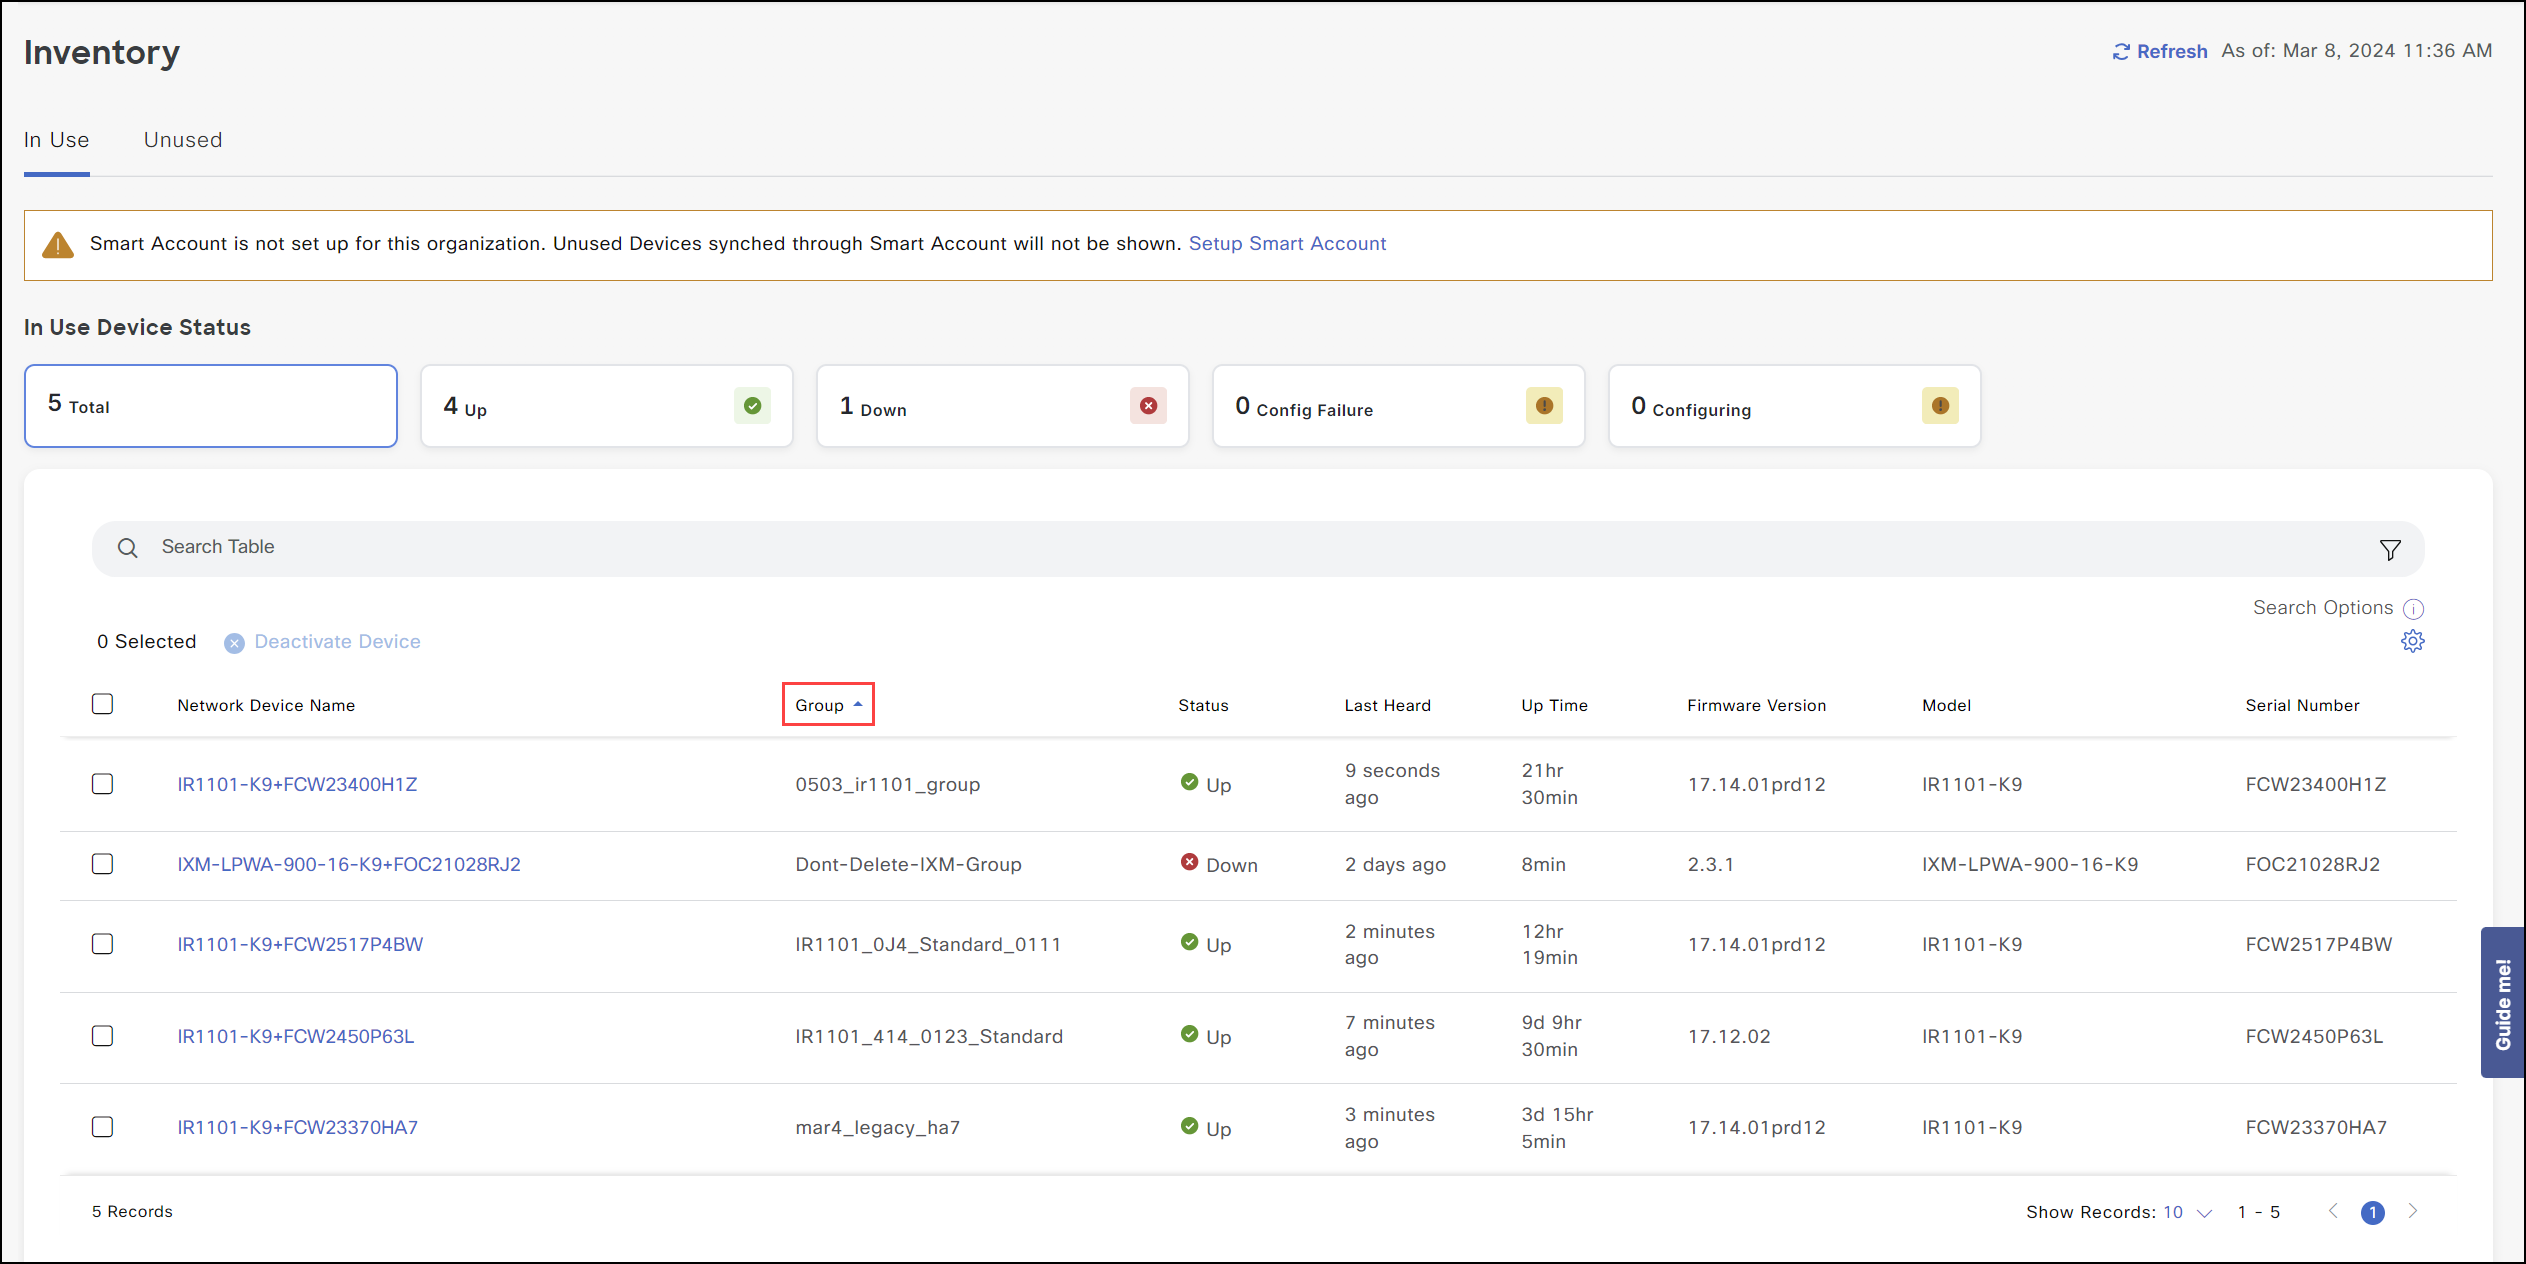
There are 2 statuses of devices in the Unused list: Unheard and Pending delete.
- Pending delete is defined as: you took an action to Delete Device.
- Unheard is defined as: the device is not part of a group assignment, has not been synced to IoT OD using PnP Connect, and onboarding to IoT OD failed.
Assign a configuration group to devices
Note: Since configuration groups are device-type specific, all the devices selected for assigning to a group must be of the same device type. For example, all IR11xx.
- Click the devices you want to assign to a group.
- Click Assign to Group. The new Assign Device(s) to Group screen appears.
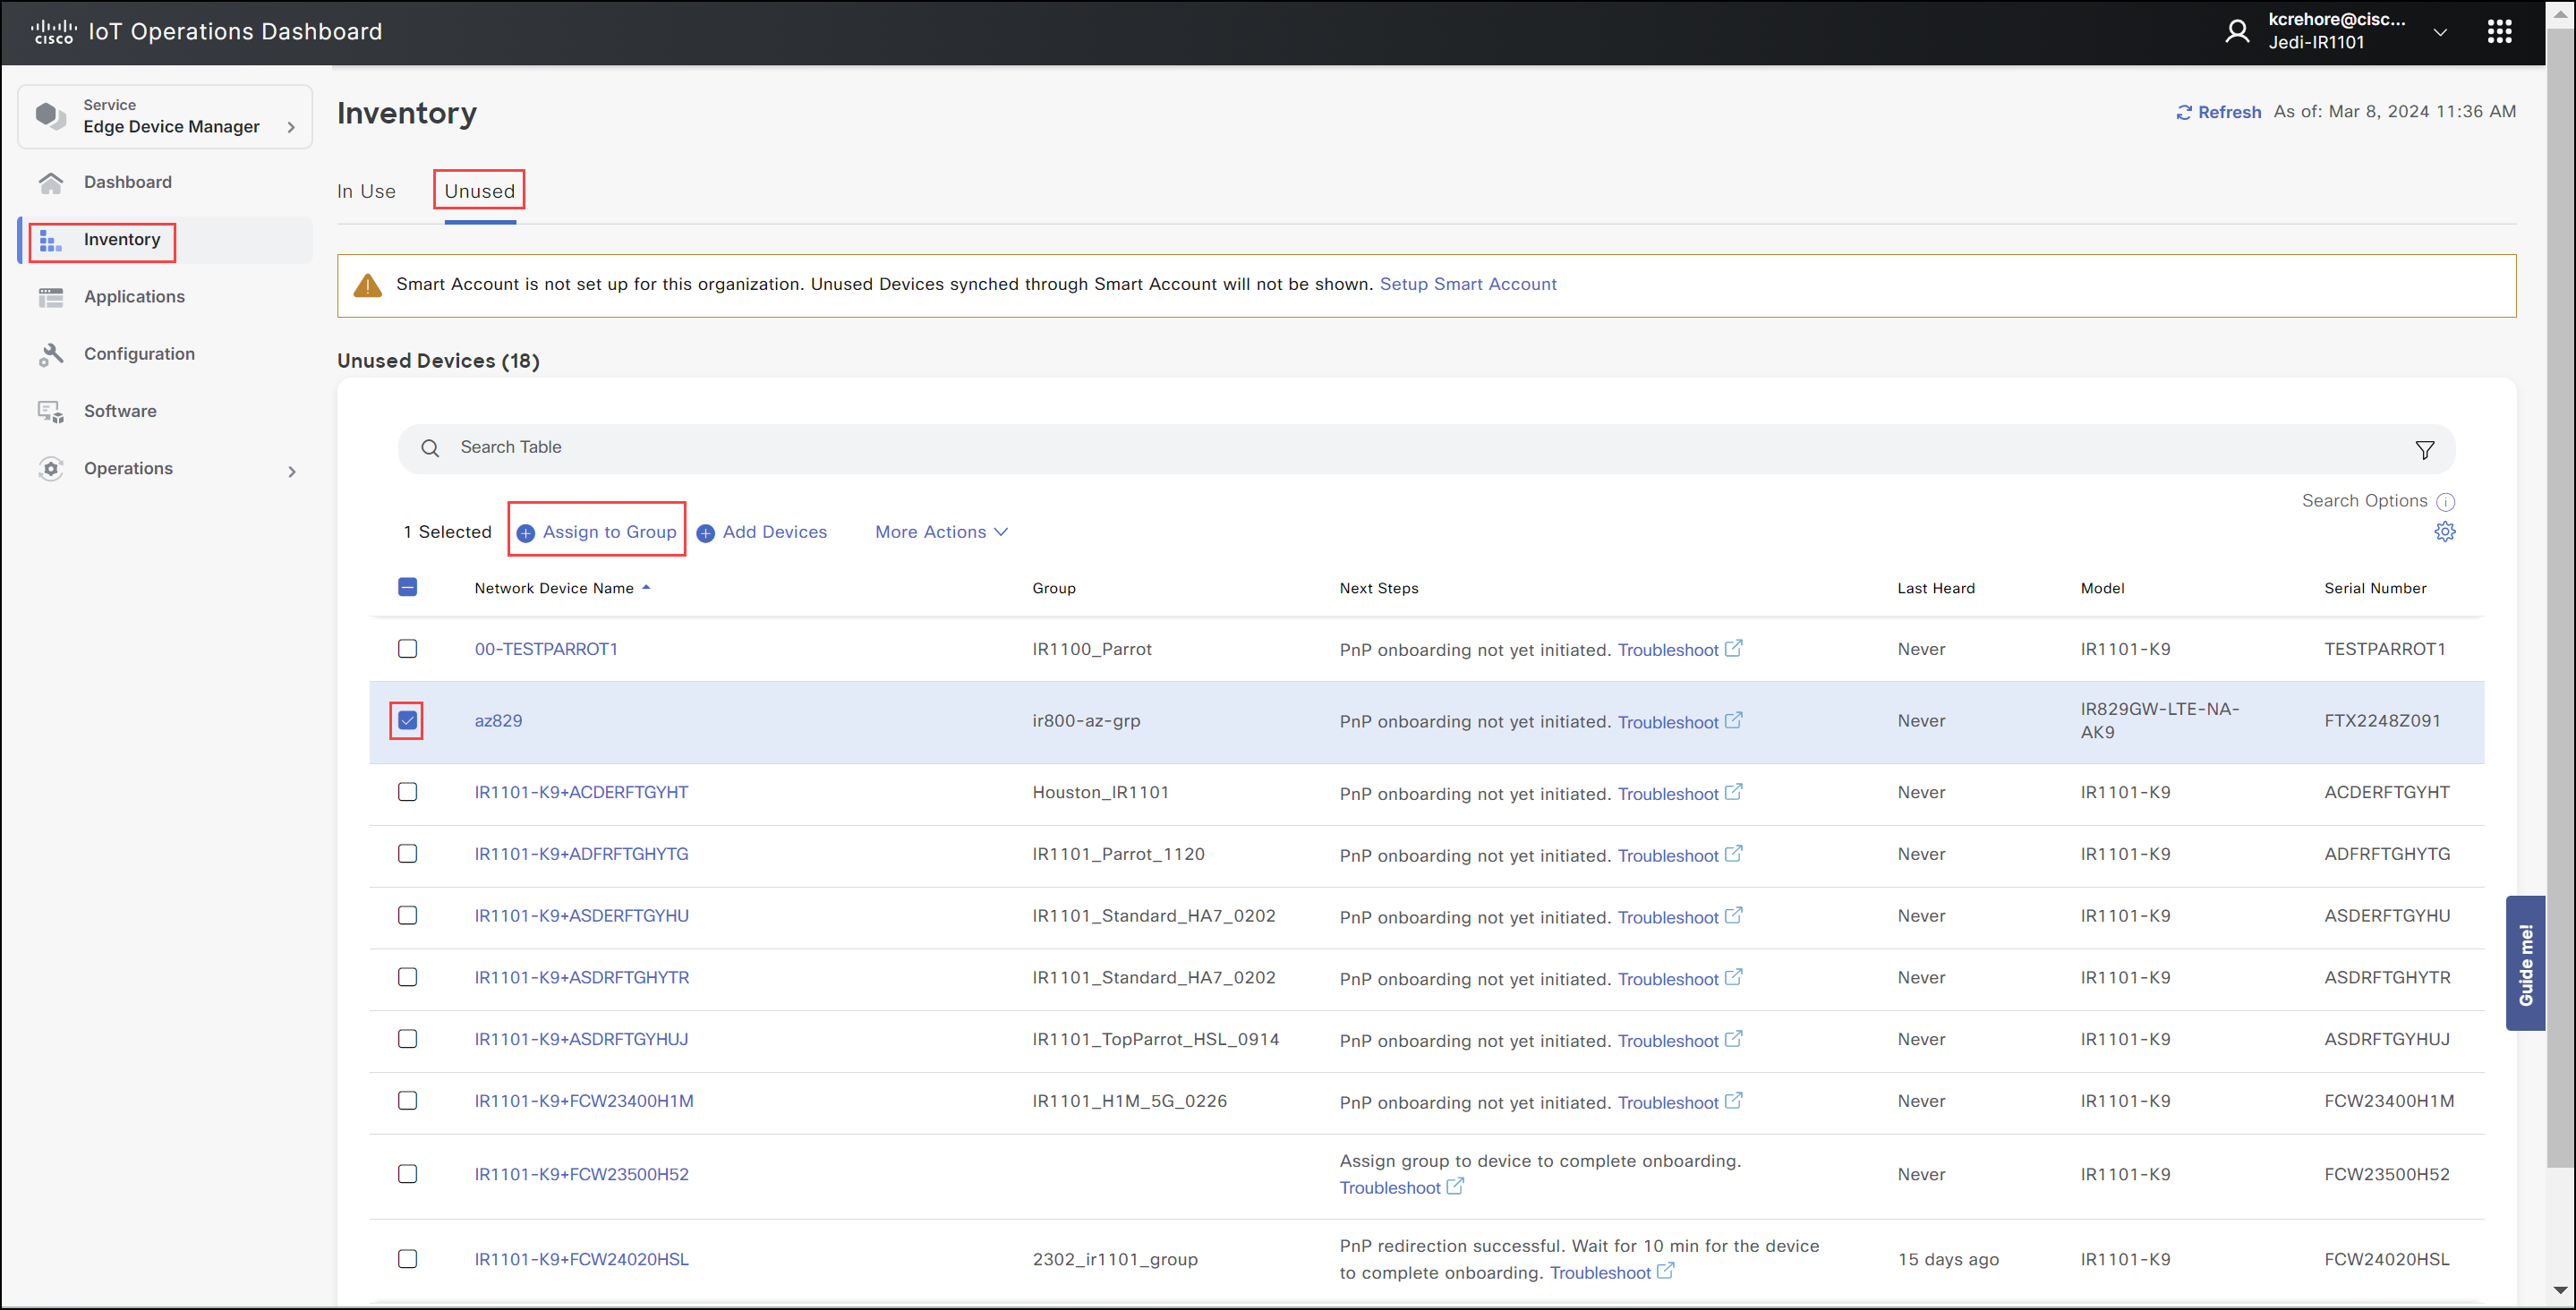
- Select a Group from the drop-down list. Only the compatible groups will show in the list. The information for that group loads.
- If the selected group does not have device-specific parameters, click Next and proceed with group assignment. The Review device(s) screen appears.
- If the selected group has device-specific parameters, optionally, these parameters can be specified from this screen. See "Optional Device Specific Settings" below.
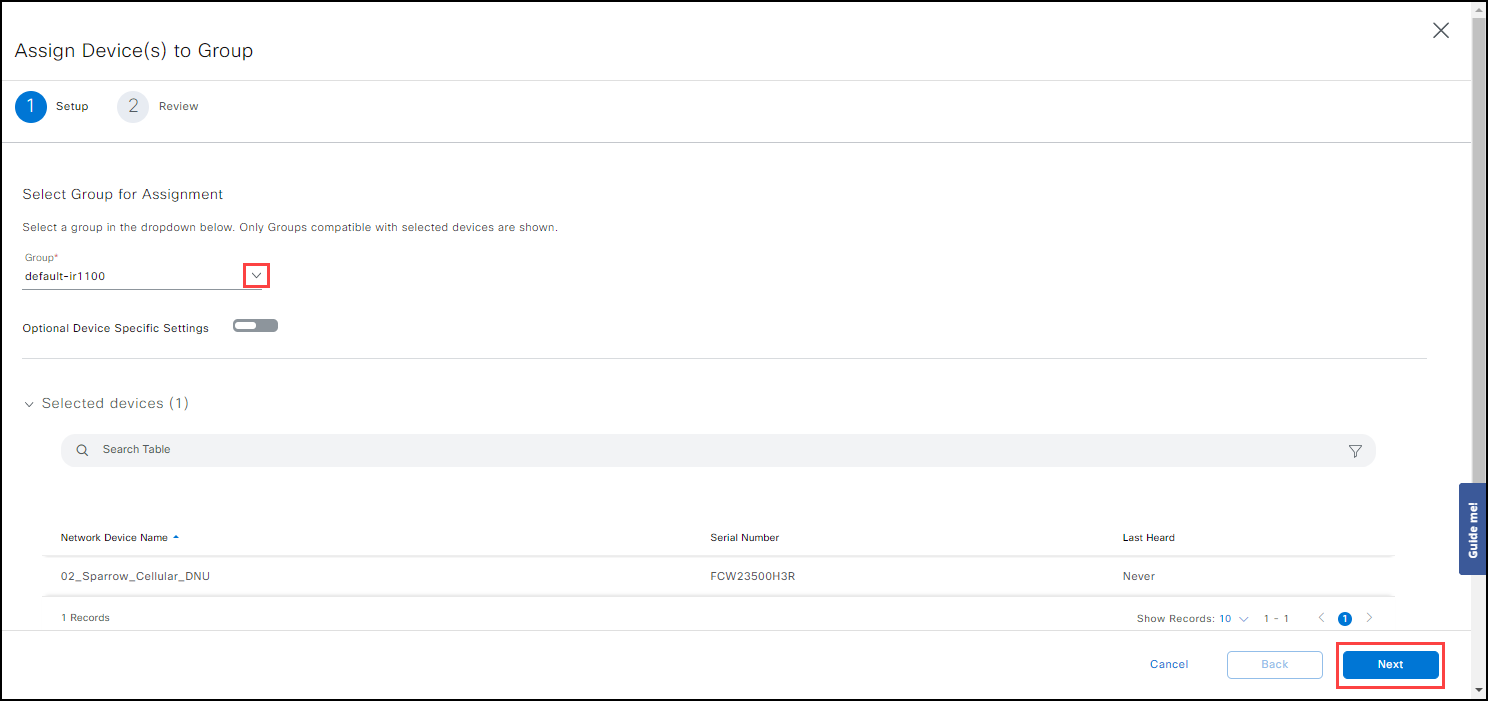
Optional Device Specific Settings
- Click the slider to enable Optional Device Specific Settings. The following two options are available:
- Click Download pre-populated configuration settings for individual devices. The .CSV file will have few mandatory fields (eid, device type, config group) pre-filled followed by optional fields (e.g., name). For each device in the file, fill the applicable values under appropriate columns. Save the file.
- If the pre-populated .CSV was already downloaded and filled with necessary parameters, click Choose a file or drag and drop to upload the filled .CSV file.
- Click Next.
IMPORTANT: The contents of the .CSV file take precedence over the selections in the UI and the devices specified in the .CSV will now appear in the group assignment Review Devices screen.
Expand Review Devices to see the device and group you chose. Scroll down for Group Configuration details. Depending on the group configuration, one or more of the following sections may show up showing details of the currently selected group:
Management Profile, WAN Uplink, Cellular, Ethernet, Wi-Fi, DNS/NTP, DHCP, Port Forwarding, and VPN. Each section has its own screen and fields.
Check the set of devices and the group configuration.
Click Assign to Group.
Even after devices are assigned to a group successfully, the devices will show up in the Unused tab of Inventory. These device(s) will move to the In Use tab when the device contacts IoT OD and the onboarding and configuration process starts.
To edit device specific settings for a particular device after assigning a group, choose one of these methods:
- Go to Device Configuration tab in the Device Details screen. Click Inventory > Unused > select device > Device Configuration > Edit Config. Update the properties as required from the UI.
- Select the device in Unused tab and perform Assign a configuration group to devices again, selecting the same group and uploading a .CSV file with updated properties.
- Use the Device Properties workflow under Configuration menu. Click Configuration > Group > group name > Edit Group > Properties > Device Properties. Upload a .CSV file containing the updated properties.
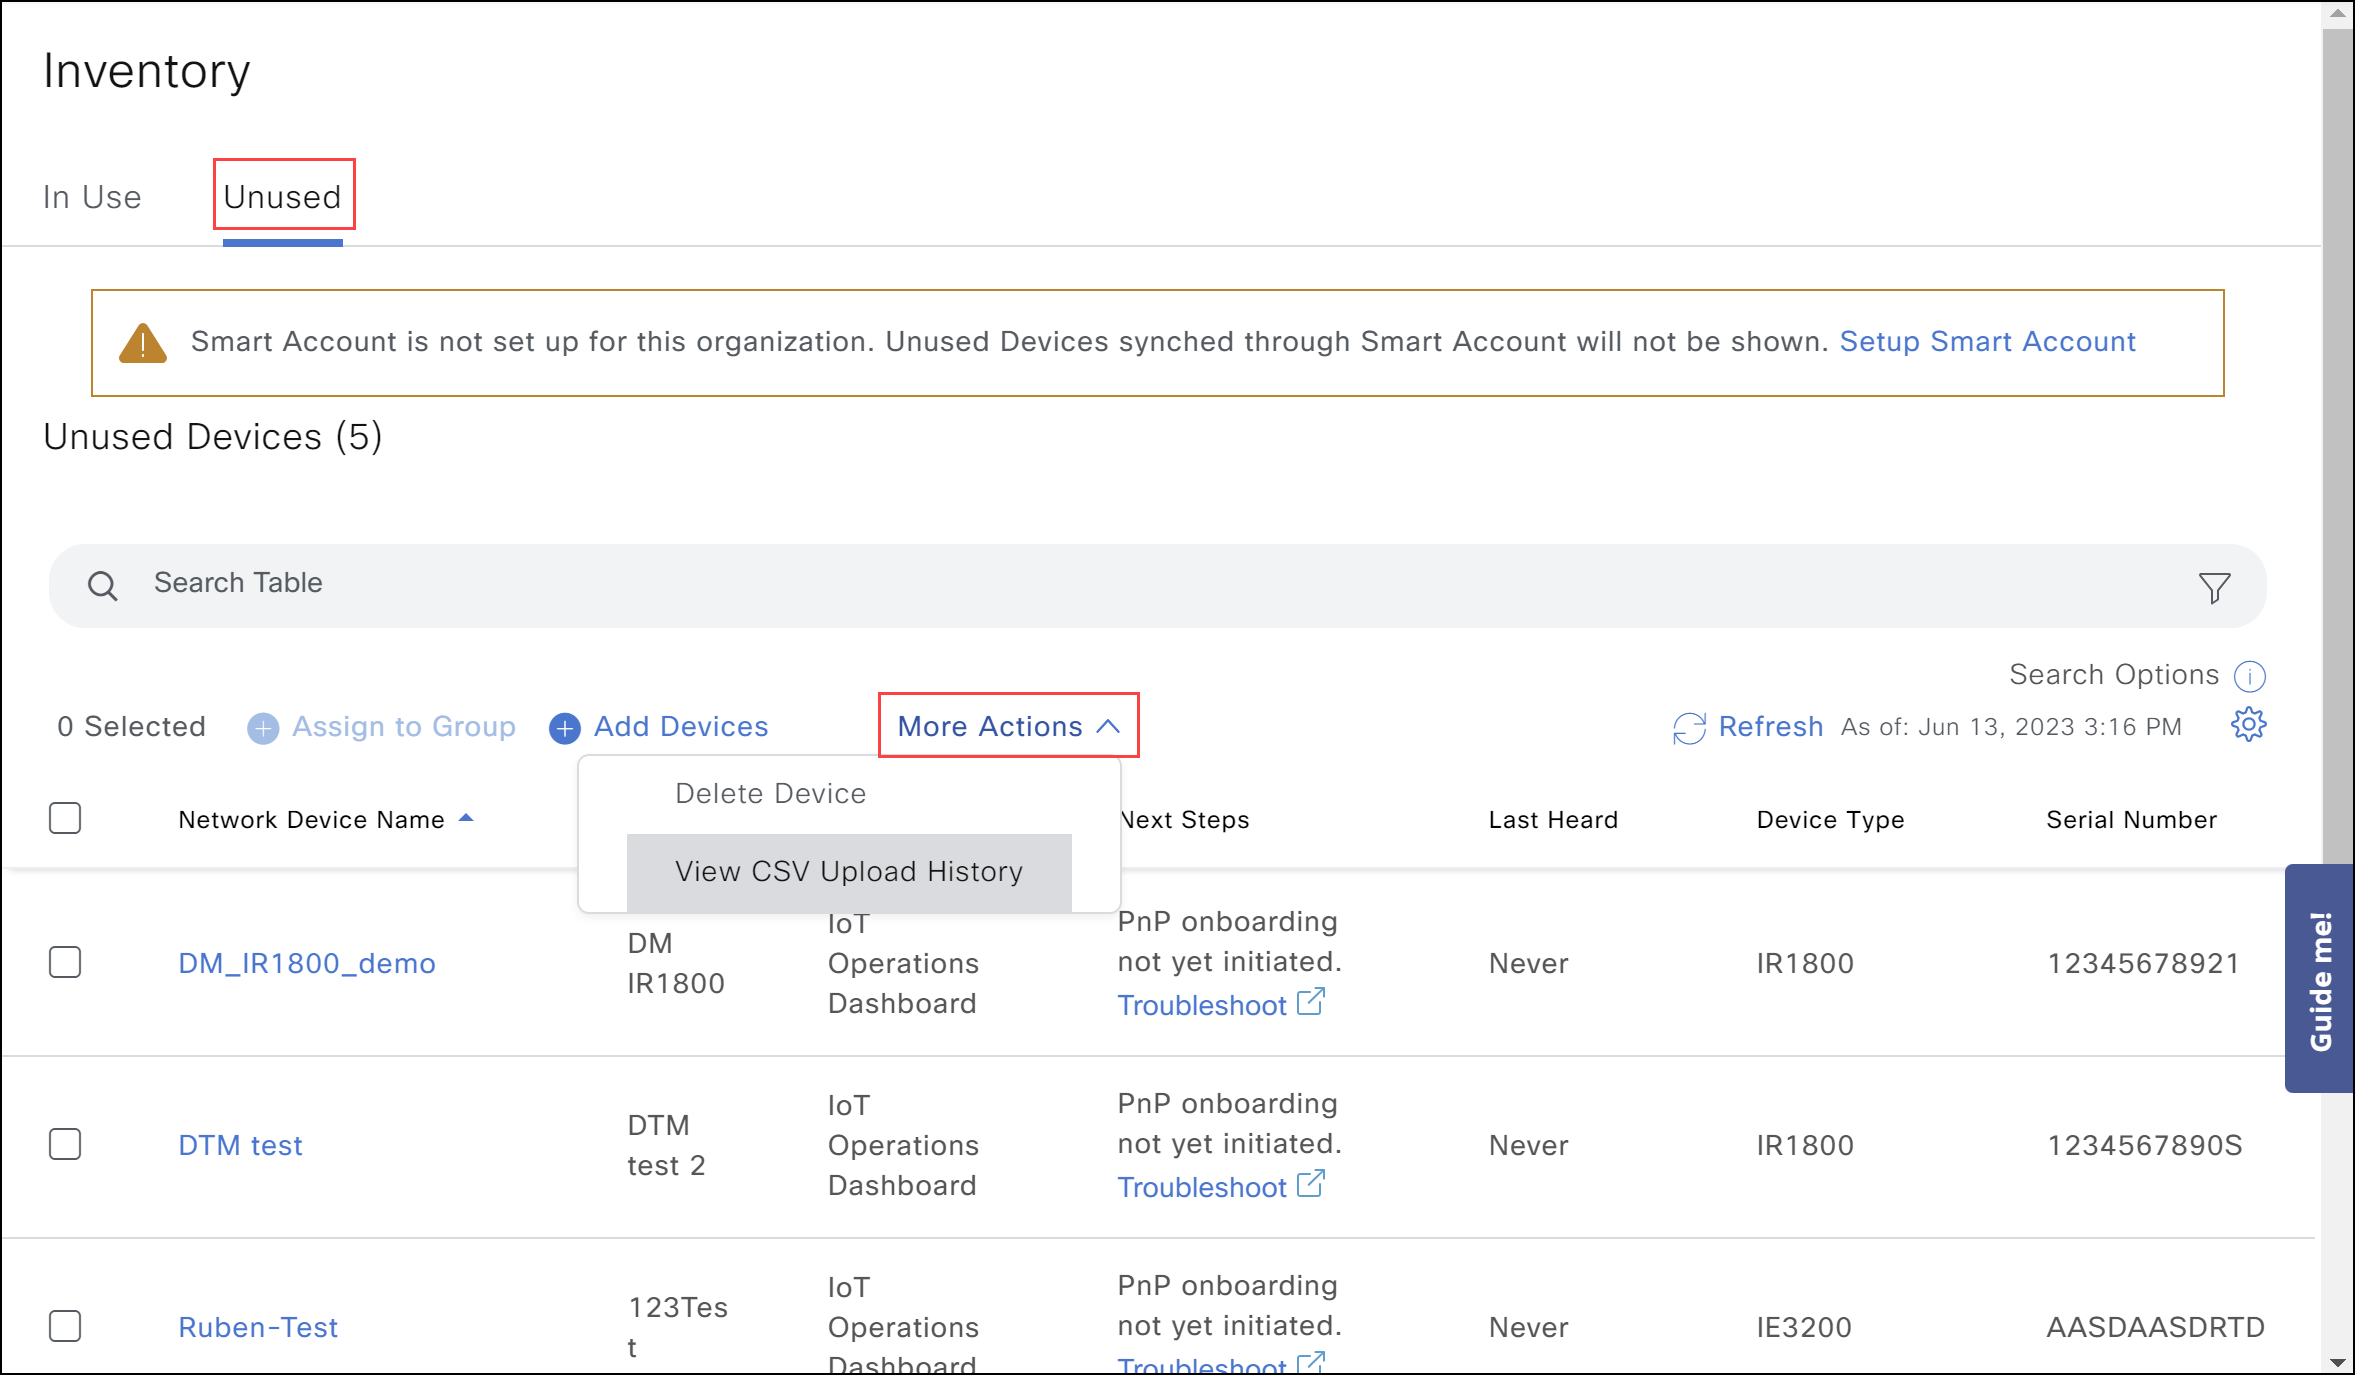
To check the status of your uploaded job:
Click More Actions > View CSV Upload History. Use the Search function to find information quickly.
Bulk and Manual adding of devices
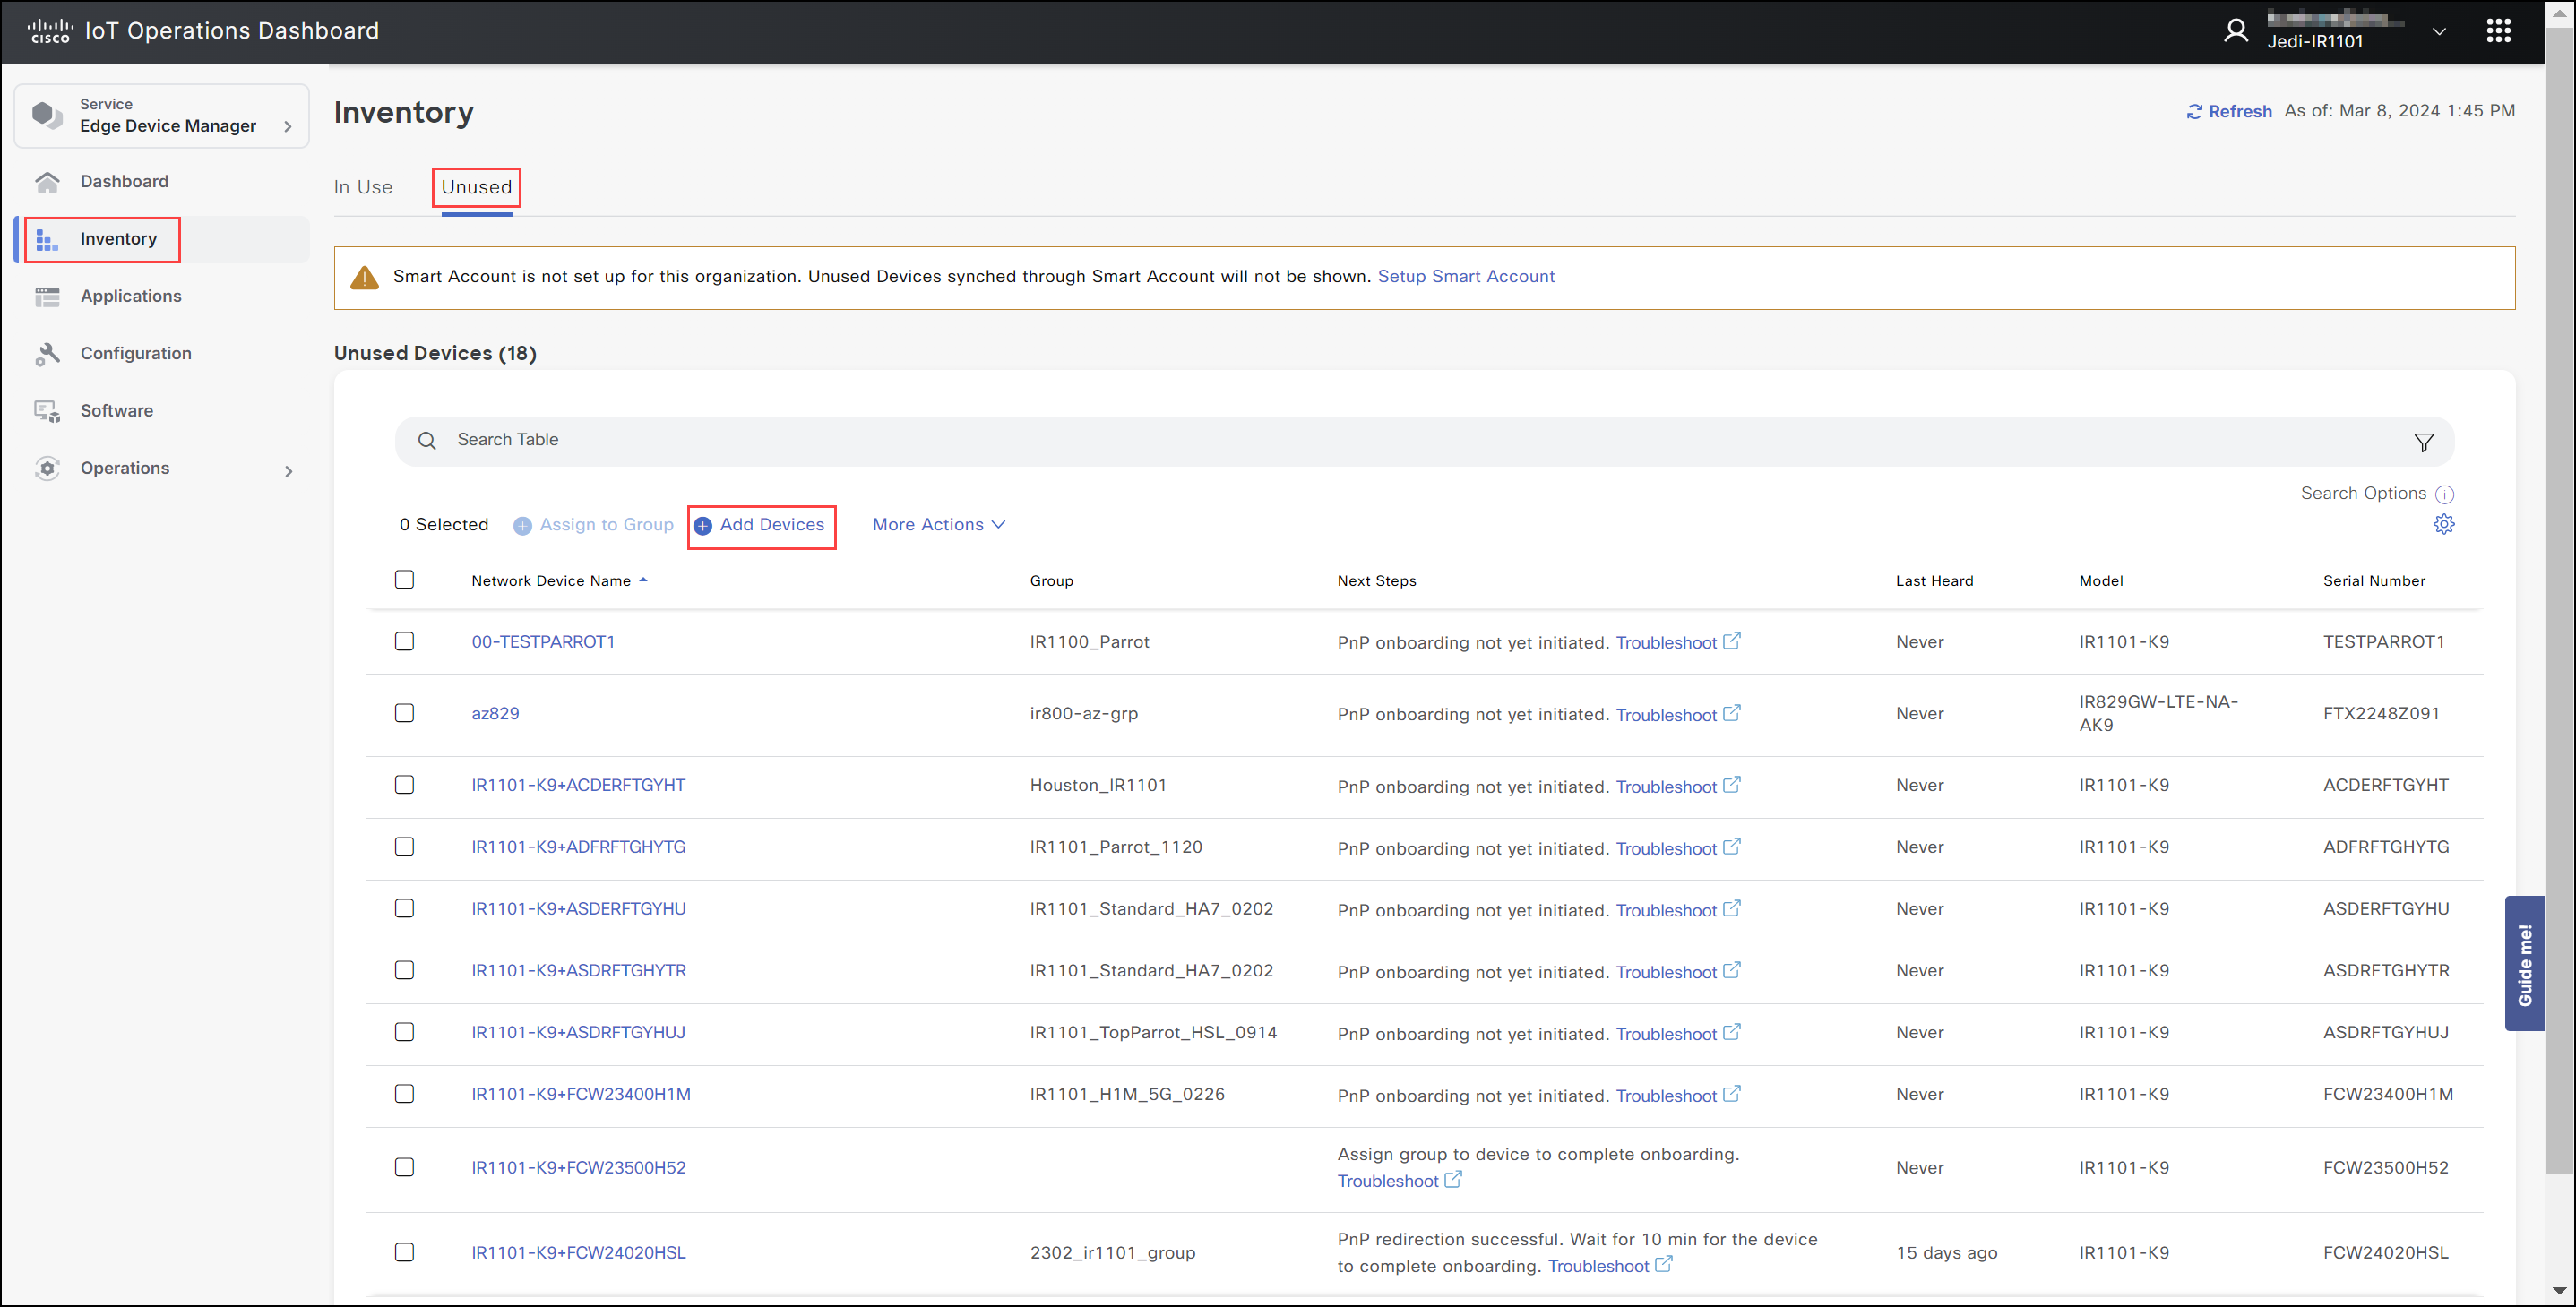
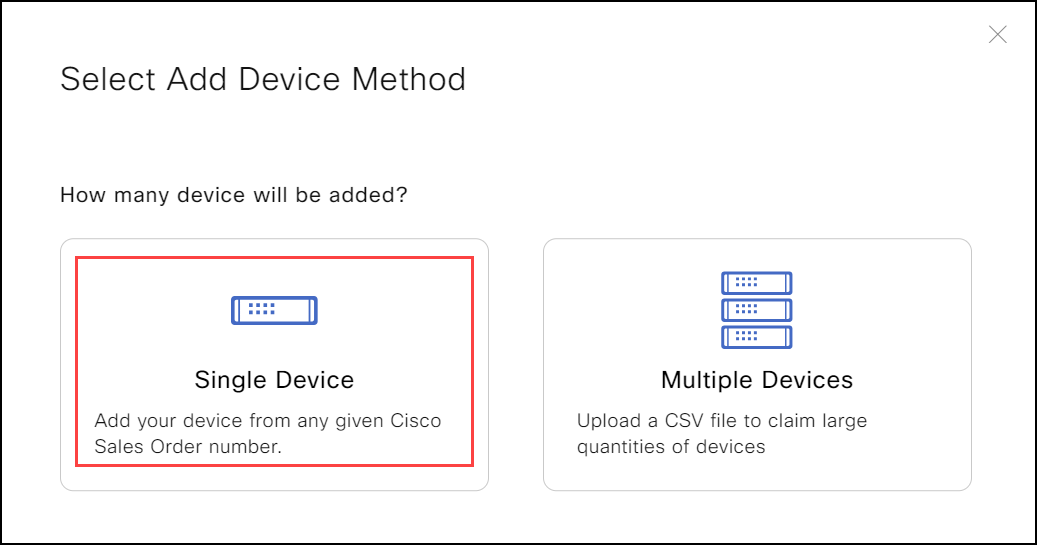
To add device(s) not previously auto-detected from PnP Connect:
- Click Inventory > Unused > Add Devices.
- Select Manual Add and complete the following fields in the Add Devices page.
| Field | Description |
|---|---|
| Product ID (PID) | Select the product ID (model number) from the drop-down list. |
| Serial Number | Enter 1 serial number. Serial numbers are 11 characters. |
| Name | Enter the name for the device. |
| IP Address | Enter an IP address used by the device to communicate with Cisco IoT OD. |
| Latitude / Longitude | Enter the location of the device to display it on a map. |
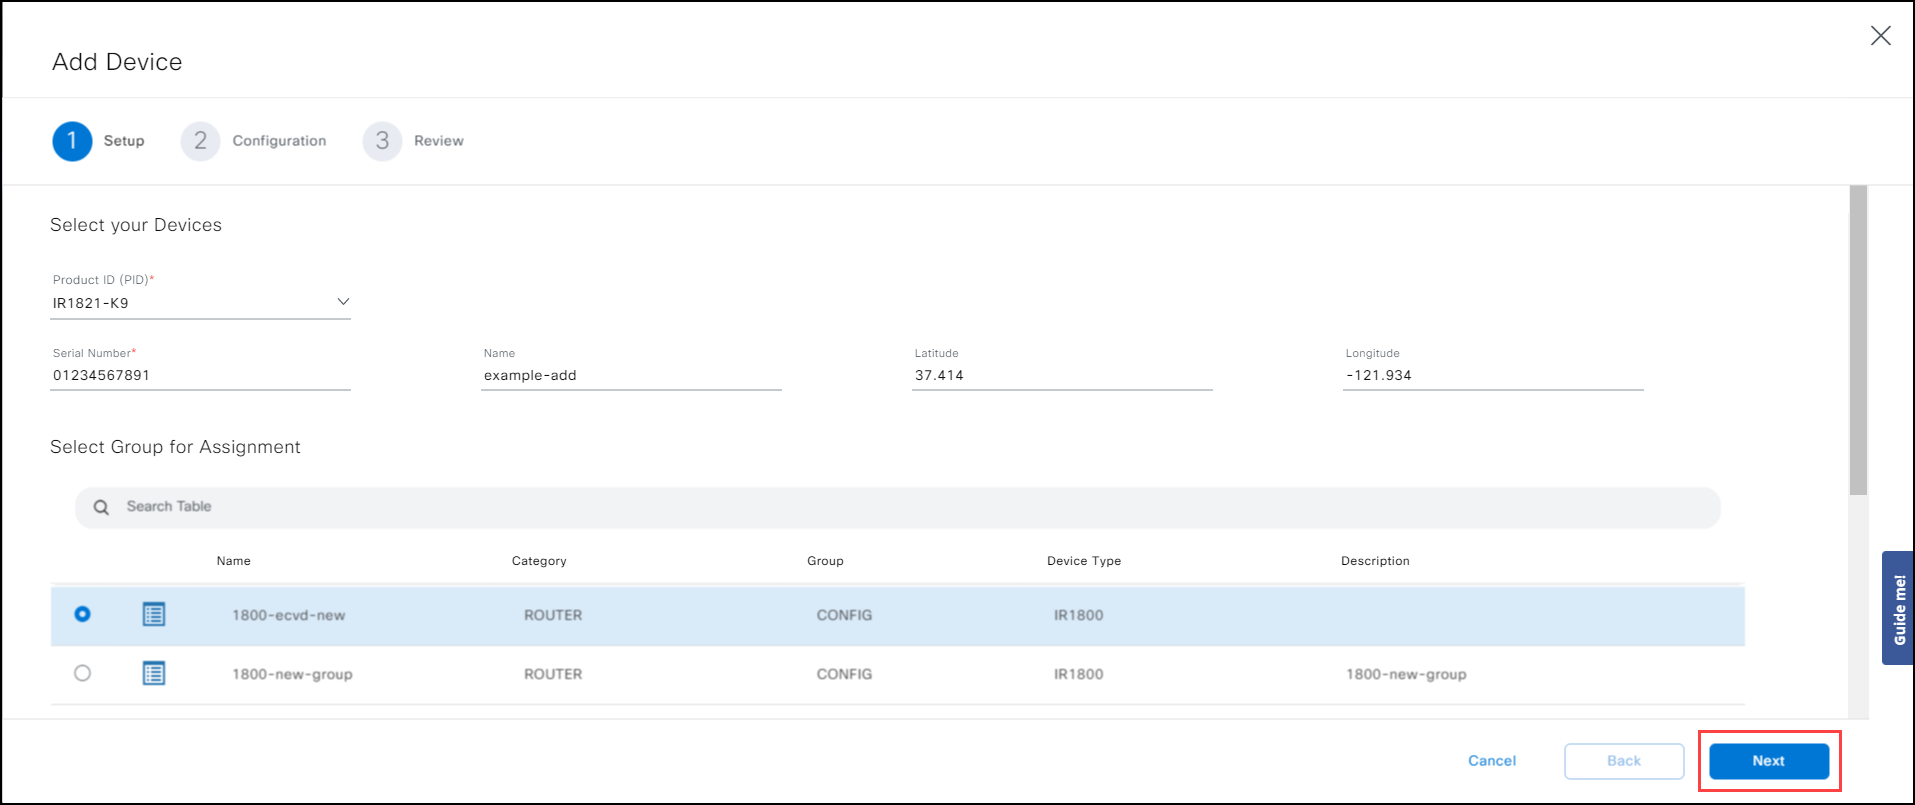
- Select a configuration group from the list. The configuration template associated with that Group will be applied to the network device.
- Click Next.
- In the Configuration window, complete the settings and variables included in the custom template, if used for the selected Group.
If no settings appear, the Group's configuration does not include additional variables and only the base configuration will be applied. - Click Next after all settings are complete.
Correct any errors before proceeding, if necessary. - In the Review window, check that your settings are correct and click Save.
Add multiple devices
Use a .CSV file to add a large number of network devices.
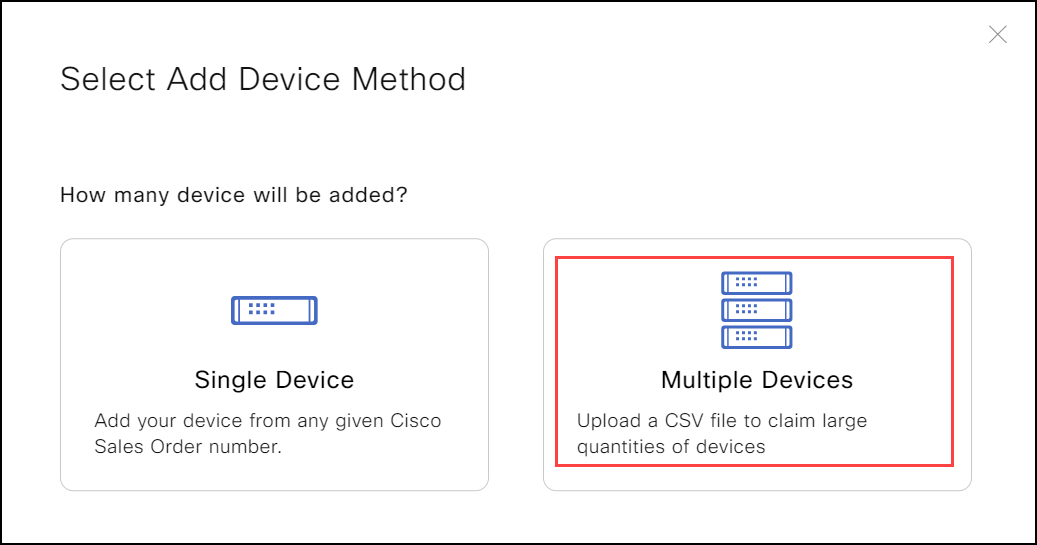
- From the left pane, click Inventory > Unused > Add Devices.
- Select Bulk Add.

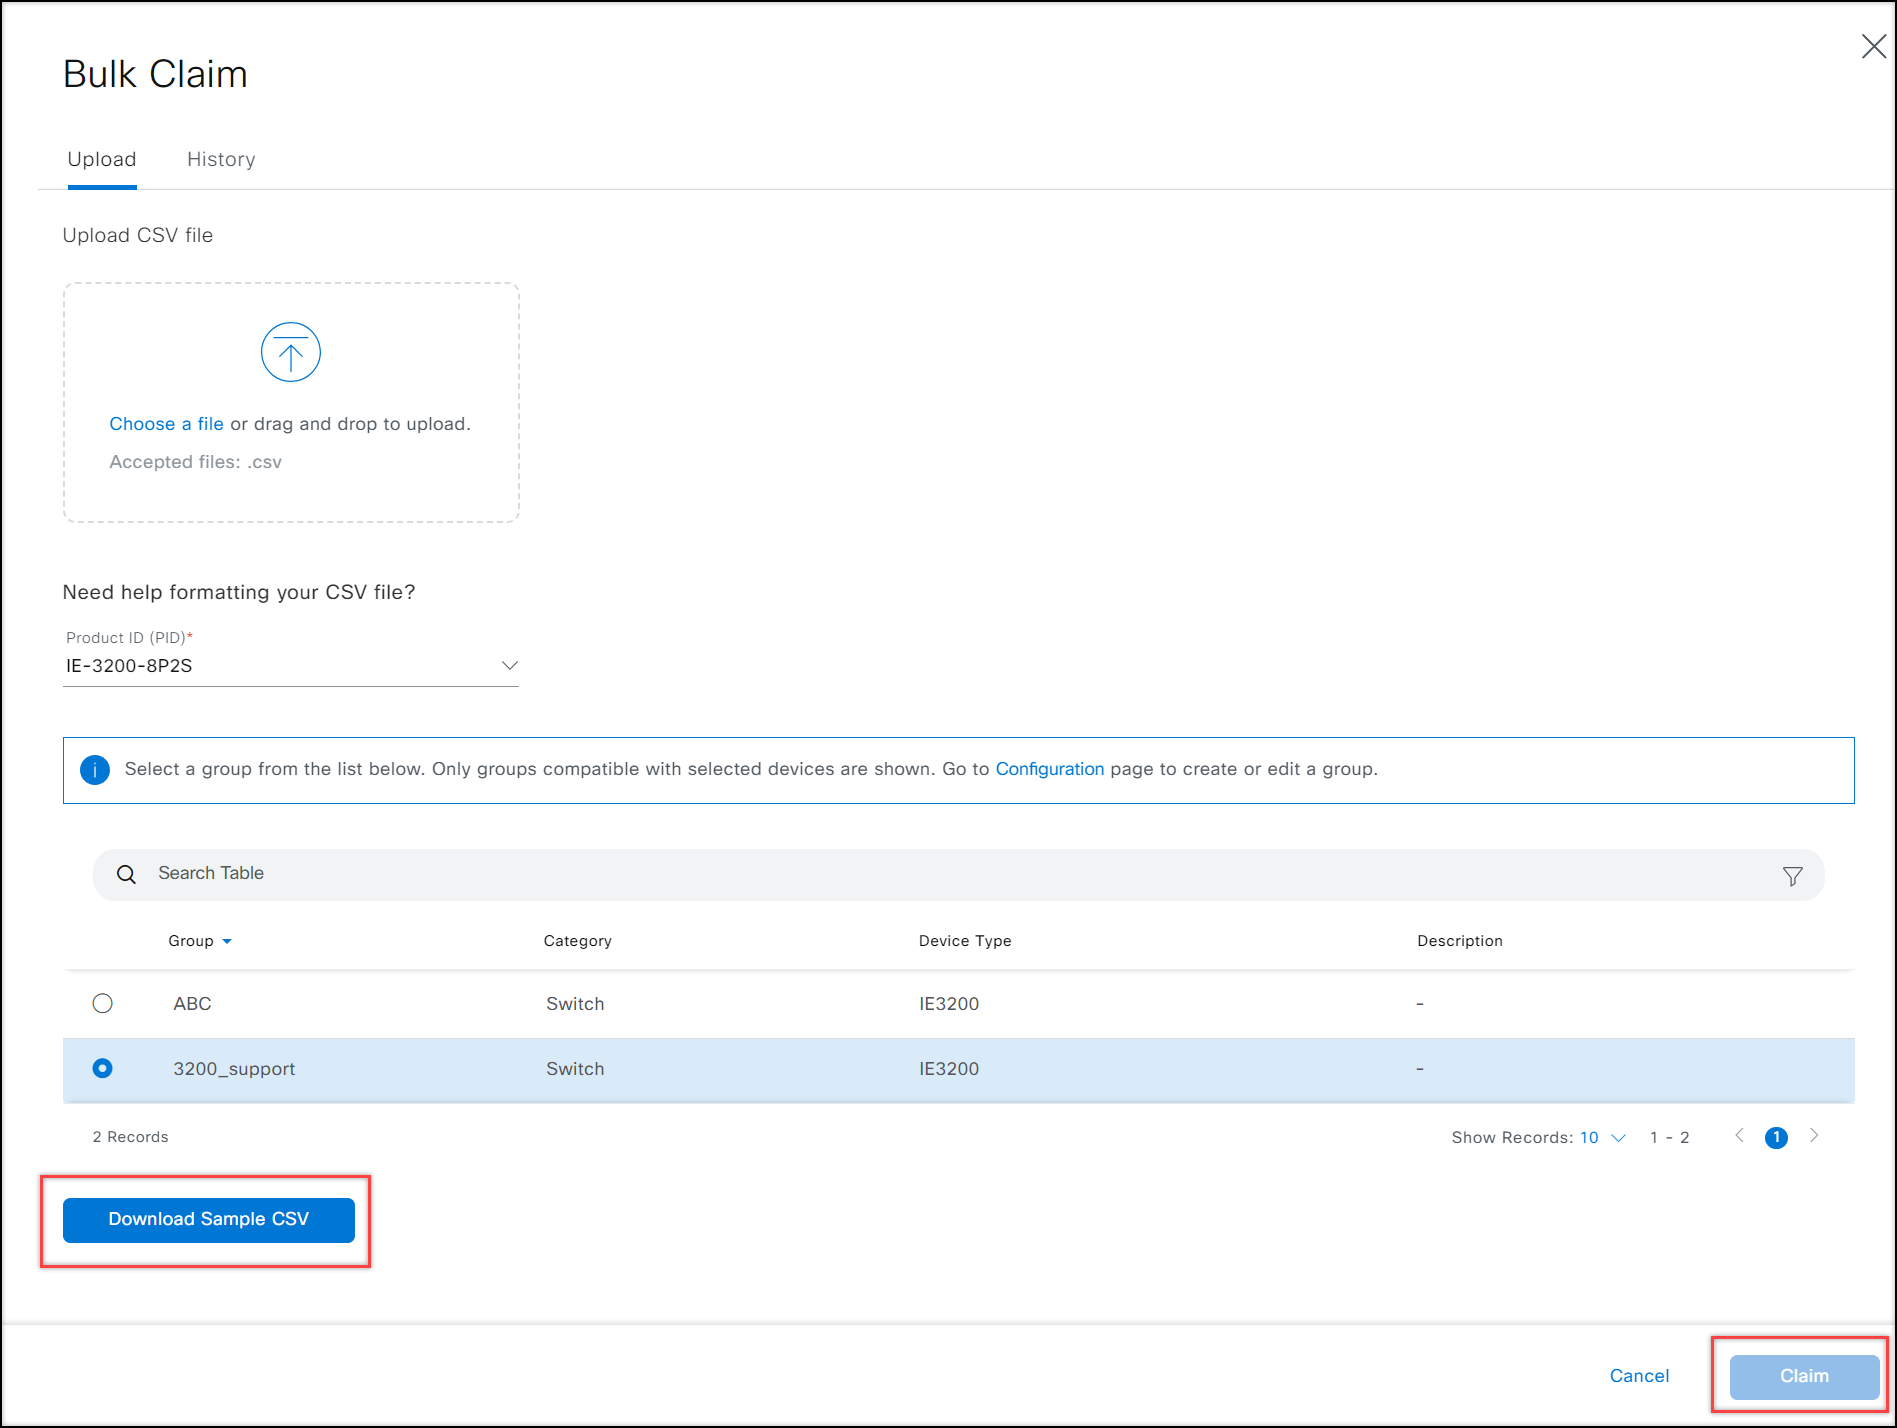
For help formatting your .CSV file:
a. Select a Product ID (PID) and Group.
b. Download the sample file that contains the correct column fields.
c. Enter the settings and variables for your network devices.Note:
- If the Group's configuration includes additional variables, enter the values for each device.
- Some fields may not be included. Be sure to include a column for all settings required by your devices.
- Upload the .CSV file that includes the settings for your network devices.
- Click Claim and wait for the success message to appear. If the claim fails, correct your .CSV file and try again.
Example .CSV file
Each row in the .CSV file creates a device entry based on the eid column (product PID+serial_number). Additional required columns identify the device type and configuration.
Required values for each device entry
- ei: Product ID (PID) + device serial number that uniquely identifies the device. For example: IR829GW-LTE-NA-AK9+FTX2149Z015
- configGroup: The device Group that defines the configuration template for the devices. For example: default-ir800
- deviceType: The device model for your supported device. For example: IR800 or IR1101.
Additional configuration values: Port forwarding example
Additional configuration values can be included in the .CSV file.
For example, to configure Port Forwarding, include a column called "portForwarding". For each device row, enter the values for protocol, privateIP, localPort, publicPort. The following table shows the portForwarding format and a sample configuration.
| eid | configGroup | deviceType | portForwarding |
|---|---|---|---|
| IR829GW-LTE-NA-AK9+FTX2149Z015 | ir800-testGroup | ir800 | "[{"description":"PF2","protocol":"udp","privateIP":"1.1.1.2","localPort":"8443","publicPort":"443"},{"description":"PF1","protocol":"tcp","privateIP":"1.1.1.1","localPort":"8080","publicPort":"80"}]" |
| IR829GW-LTE-NA-AK9+FTX2149Z016 | default-ir800 | ir800 | "[{"description":"Adding array property","protocol":"udp","privateIP":"10.1.1.1","localPort":"8443","publicPort":"443"}]" |
Search and filter devices
The Search bar enhancements include the following:
- Improved Search function across the entire list of devices, not just the first records shown
- A Filter function which allows you to focus your search using more specific criteria
- A Bookmark icon, to save a search
Click in the Search bar to see these icons. Start typing a text string, then hit Return. The Searched devices appear in the table.
Note: The UPT variable changed from 1.20 to 1.21 and device properties have enhanced search capability.
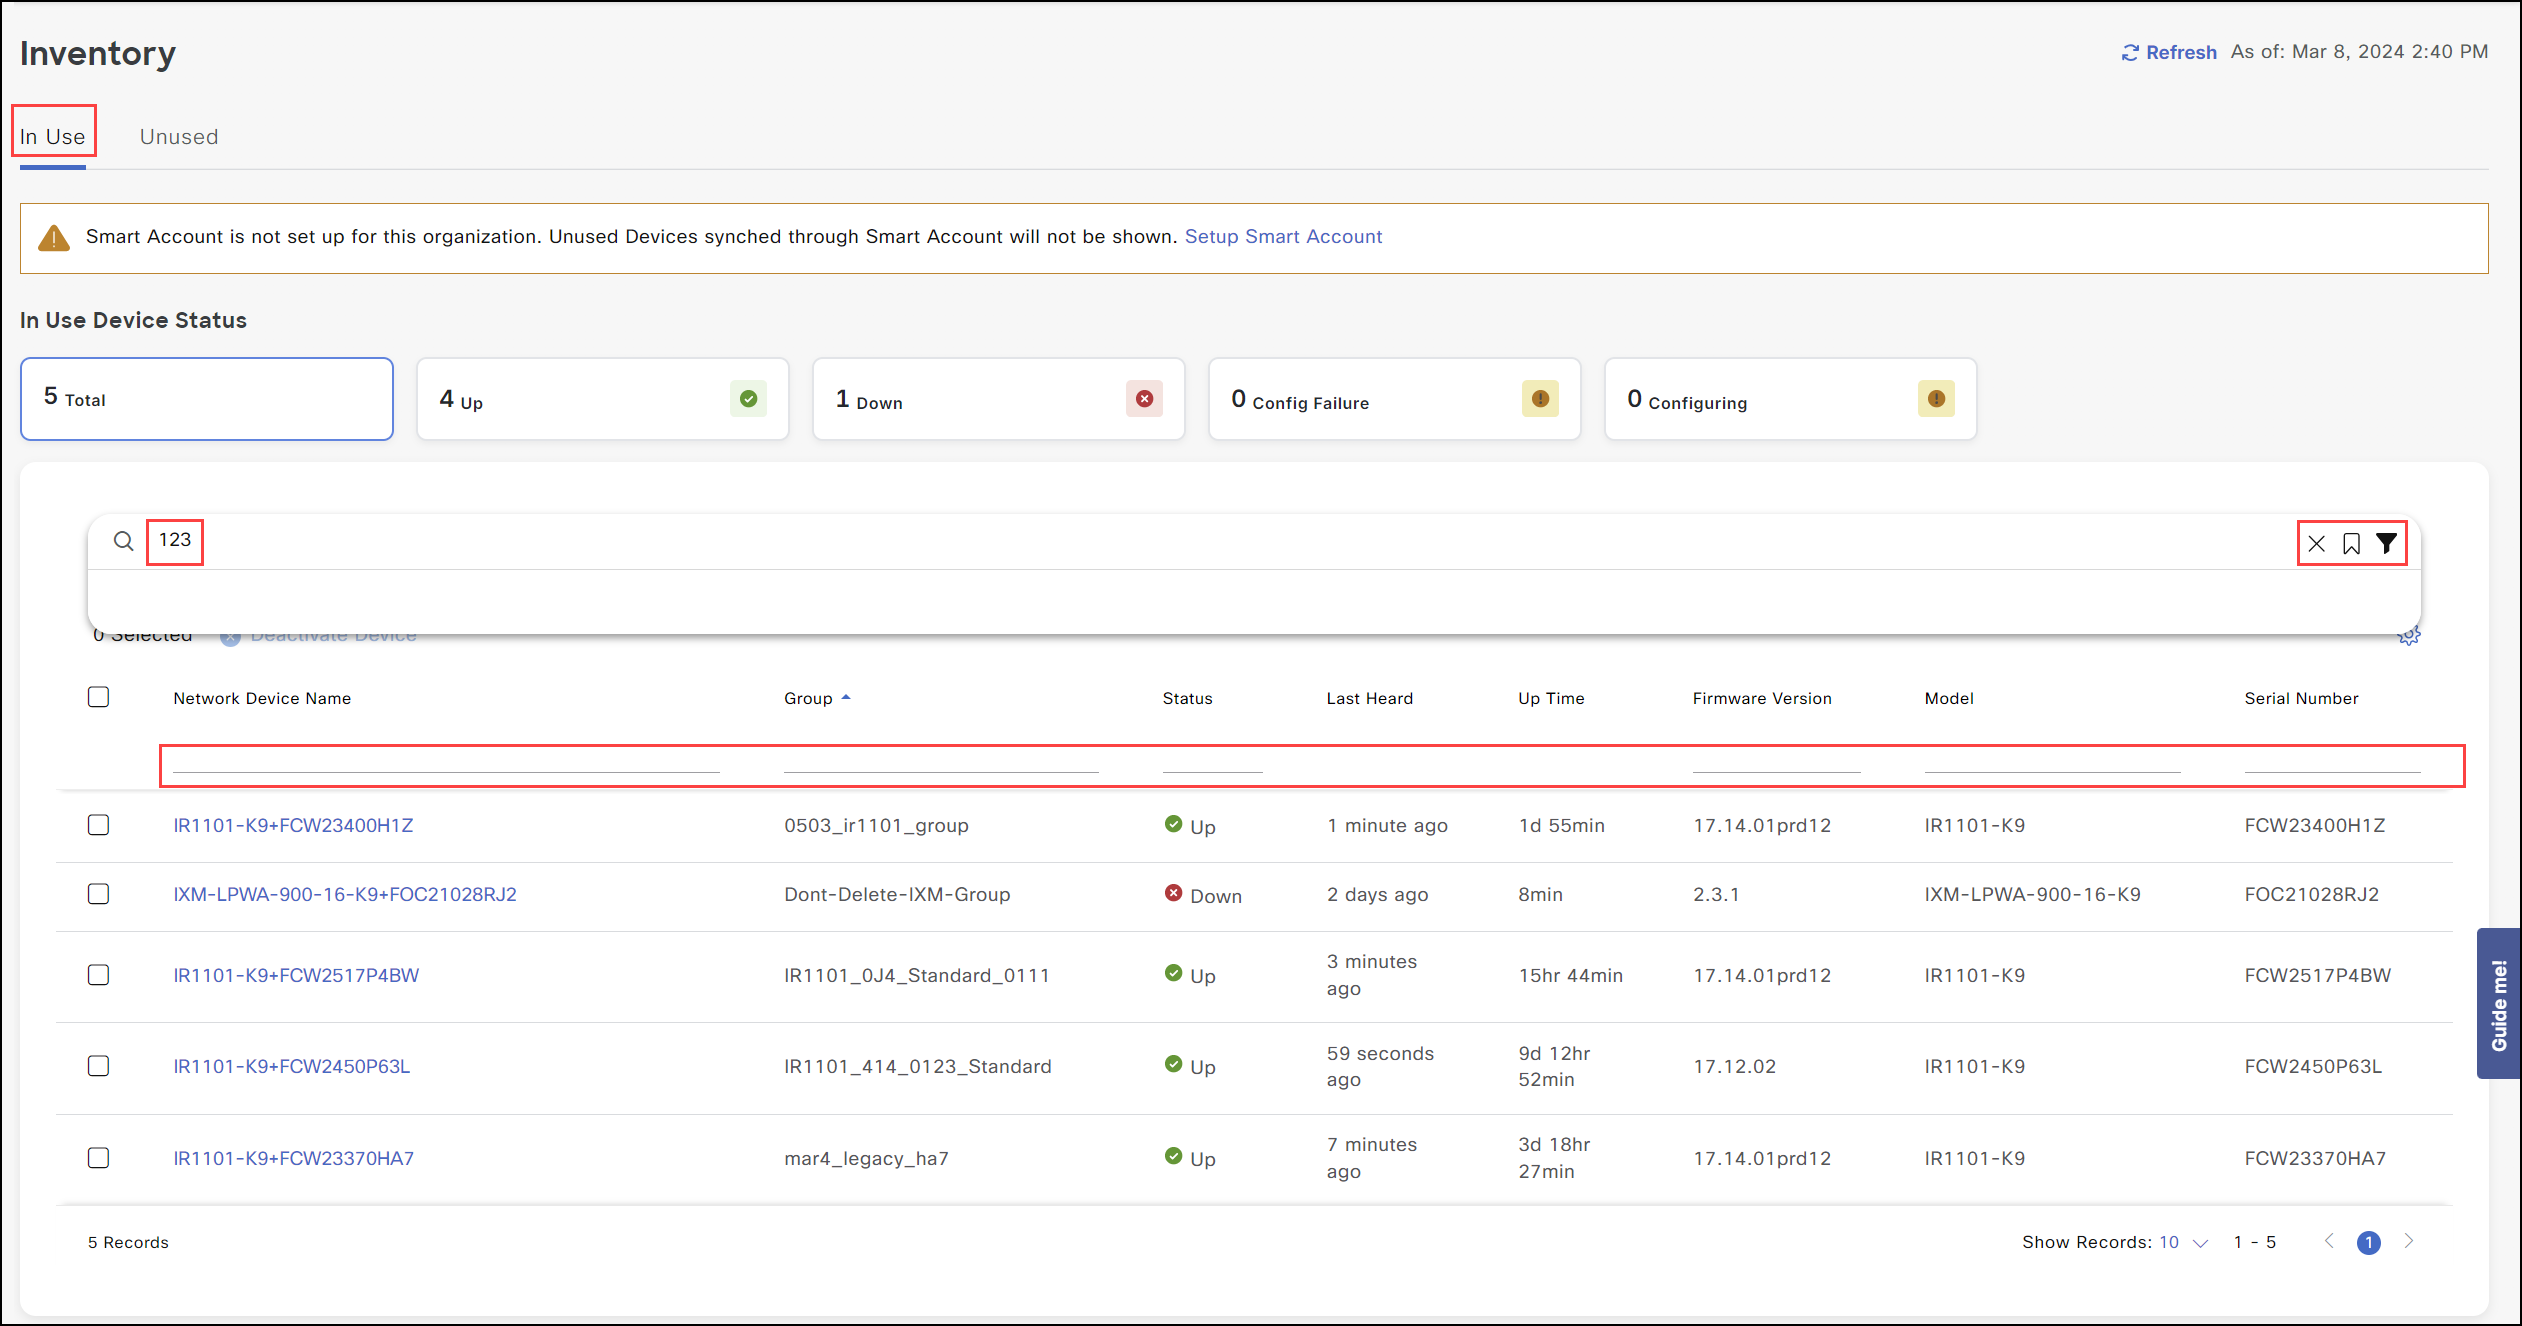
Click the Search Options "i" icon for additional Search functions. Search function compares Name, Serial Number (SN#), and Firmware Version. For more Search Options, type in the format key:value (no spaces). The following key values are supported:
- deviceType - Type of the device--can be one of IR800, IR1100
- cellularICCID1 - This is the ICCID of the primary SIM card of the device
- cellularICCID3 - This is the ICCID of the secondary SIM card of the device
- cellularIMEI1 - This is IMEI number of the primary SIM card slot
- cellularIMEI3 - This is IMEI number of the secondary SIM card slot
To define a complex filter function using multiple key values:
- Click the Filter icon. A row showing the following fields appears.
- Name
- Status
- Group Name
- Firmware
- Serial Number
- Type in a text string in the field you want to filter.
For Status, click the blank line and the drop-down appears.

Table Display Enhancements
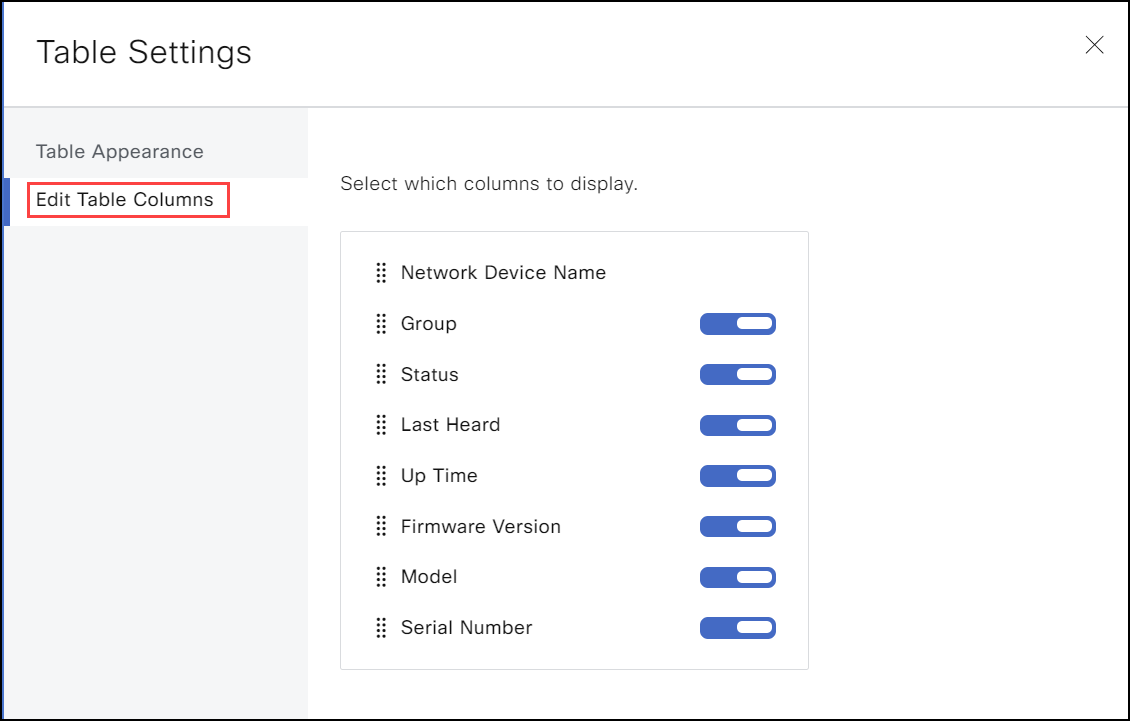
Click the gear icon on far right to get a Table Settings window. Customize your table displays throughout the UI, wherever you see the gear icon.
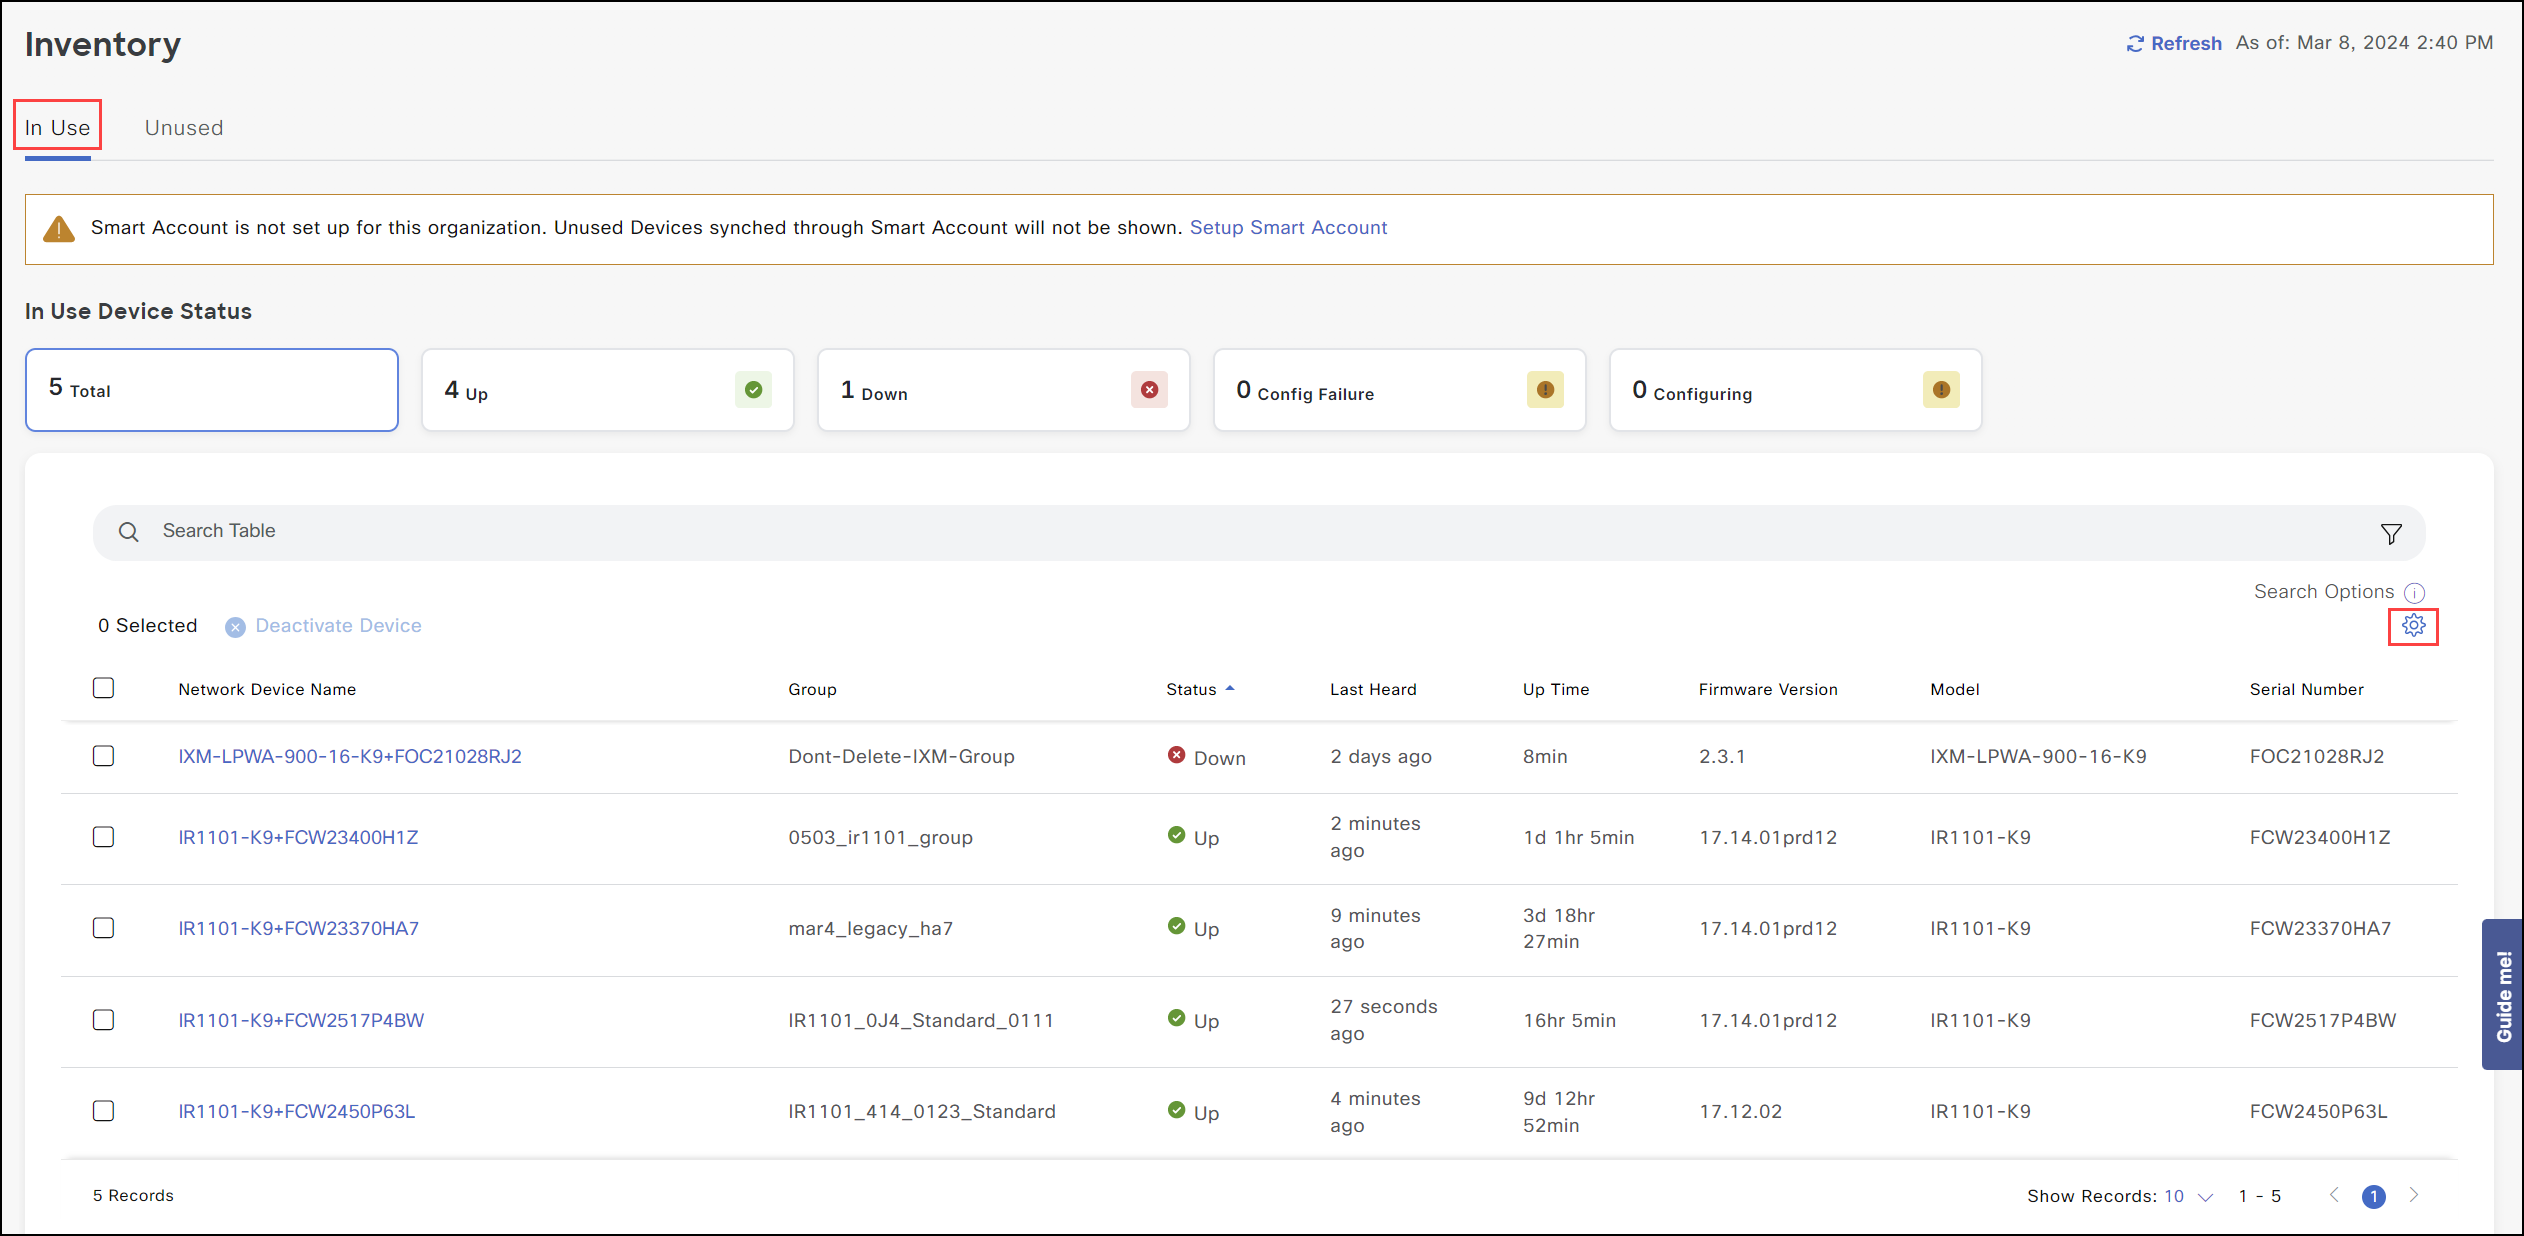
Click the Edit Table Columns tab on the left to choose which columns you want to display. Click Apply.
