Onboarding Quick Start Guide - IR devices
Alert: Cisco has made the end-of-life (EOL) announcement for the Cisco Edge Device Manager (EDM).
Introduction
This document describes how to onboard Industrial Router (IR) network devices on the Cisco Internet of Things Operations Dashboard (IoT OD) using Edge Device Manager (EDM).
After you add the network device, you can set up remote sessions on subtended devices using Secure Equipment Access (SEA). This process should take 30 minutes or less.
Important: Existing network devices, such as RMA replacement devices or devices that are being repurposed for IoT OD, must be erased and prepared for onboarding. For details, see Prepare existing devices for IoT OD.
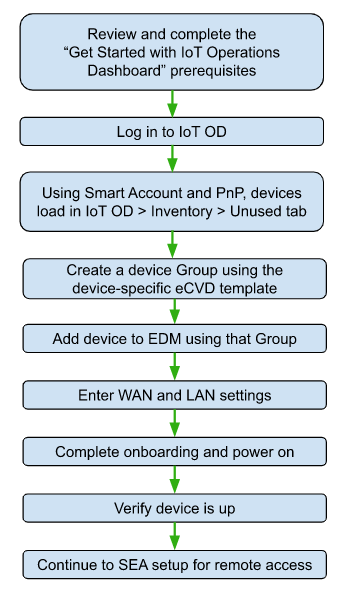
Add the network device
Use Edge Device Manager (EDM) to add network devices to IoT OD. Enter the device serial number and select the configuration group that is associated with the correct configuration template. You can then make any device-specific settings and add the device.
The following example describes how to create a configuration group and apply an eCVD (Cisco Validated Design) template to an IR1101 or IR1800 series device.
Note: You can add the device to Cisco IoT OD either before or after connecting it to the network. The configuration is applied when the device is available on your network.
- Complete all tasks in Get Started with IoT Operations Dashboard.
- Set up a new organization in Cisco IoT OD, or log in to an existing Tenant Admin account.
- To set up IoT OD, go to https://eu.ciscoiot.com/ or https://us.ciscoiot.com/ and click Create an account. Complete the online instructions to create an organization and Tenant Admin account. This process creates a new organization in Operations Dashboard with an Administrator who can create additional users, onboard and configure network devices, create sub-organizations, etc.
- If you already have an IoT OD Organization, go to https://eu.ciscoiot.com/ or https://us.ciscoiot.com/ and log in to a Tenant Admin account.
- Contact iotod-account-request@cisco.com for assistance, if necessary.
- Select the Edge Device Manager Service in the left banner.
- Create a configuration group and choose or create a configuration template.
Device groups allow you to apply the same configuration and template to groups of similar network devices. Any network device you add to the group will receive the group template. Any changes to that template will apply to all devices in the group.
Click Configuration.
In the Groups tab, click Create Group.
Enter the group settings:
- Group Name: Enter a relevant name.
- Group Type: (Not available to new organizations created after July 1, 2023.) Specify the group type. It can be one of the following:
Note: You cannot convert one group type to the other once it has been created.
* Standard (Recommended) - Choose this group type to configure the base configuration settings through CLI. Use this option to add and customize a new configuration for the group.
* Legacy - Choose this group type to configure using the Cisco-provided eCVD template that is accompanied by the default bootstrap configuration template. The bootstrap template has the bare minimum configuration required to establish connectivity between OD and the device. - Device Type: Displays the device model such as the IR1101 or IR1800 series. Each device type has a different set of features that can be configured. Note: Each group is specific to one device type. Device type cannot be changed for the group, once the group is created.
- Base Template: (Not applicable for Standard Group Type) The configuration based on the Cisco-provided eCVD template applies to all network devices added to the group. For Legacy Group Type, select the template from the drop-down. It can be one of the following options:
- The default template, such as default-ios, provides basic configuration functionality that helps the device connect to the OD and be managed through it.
- The eCVD templates provide a form-based user interface that enables you to get your IoT OD deployments up and running. You can also modify the eCVD templates to create more customized templates. See Create Custom Templates for more information.
- Group Description: (Optional) Provides a relevant description for the devices and configuration of the group.
Click Create to create the group or Cancel to exit without saving. Click the Groups tab to see your new group listed.
- Configure the group's WAN Uplink settings.
This is only required if your deployment uses a private or custom APN that is not automatically recognized by the modem. If a public APN is not in the modem’s default list, use the steps described below to add it. If the APN name is required, use Ethernet for the initial onboarding. After you add the device to IoT OD, disconnect Ethernet.Click the Group name > Edit Group.
Click the Configurations tab and select Form View.
Click WAN Uplink, enter the following settings and click Save.
Field Description:
WAN Uplink 1 translates to WAN priority 1, WAN Uplink 2 translates to WAN priority 3 and so on.
Interface: A drop-down list with the following modalities:
- Cellular 1 and/or Cellular 2
- Work Group Bridge (WGB)
- Ethernet
Description: Provides a reference for the interface.
IP Address for IP SLA Test: A service level agreement (SLA) is used to test the reachability of that IP over the selected interface, and determines if that link is up and functioning. If this SLA IP address is not reachable by the associated WAN interface, then traffic failover is triggered, provided there are multiple WAN uplinks.
Note:
- The IP SLA test occurs every 50 seconds.
- If the IP address being used in the WAN IP SLA is outside the firewall, it must be allowed to get through the firewall.
    * **Cellular Access Point Name** (if Applicable):  Provide the name of the APN for the WAN. The Access Point Name (APN) on the modem is used to communicate with the service provider. By default, an APN is configured by the device or the service provider. However, when you enter an APN in this field, you have the option to edit or add a custom APN. This is required only if using a cellular service.
    * **Cellular APN Username & Password** (if Applicable): Specify the username and password for the APN. Obtain this from the service provider. Authentication types supported for IoT OD are **PAP** or **CHAP** and **None**. If you do not specify the username/password, **None** is used by default.
    *  **Cellular SIM PIN** (if Applicable): SIM PIN is an authorization code (ranging between 4-8 digits) used to unlock the SIM card.  If you enter an incorrect PIN 3 times in a row, the SIM is blocked as a security measure.

        <blockquote class="note info">

        **Note**:

        * When using a dual SIM card configuration on a single modem, use the PIN to unlock the active SIM card as only one SIM can be active at a given point of time while the other SIM is in standby mode.
        * You cannot unlock a SIM card if it is installed in the second slot of the modem.
    * **Enable Second SIM** (if applicable):  Select **Installed** to enable a second SIM slot setting if using two SIM cards. The following parameter settings are required for a SIM failover to occur.
      + **Jitter**: Enter the threshold (in milliseconds) for variation in latency on packet flow before determining the link failure. The default value is 30 ms.
      + **RTT** (Round Trip Time): Enter the threshold time for determining the cellular link latency. The default value is 500 ms.
      + **Time Duration**: Enter the timeout period before a SIM switchover is triggered. The recommended time span is 11 minutes.
        **Note**: If a second SIM is installed and enabled, use the existing defaults or set the numerical parameters to trigger a SIM switchover. A switchover occurs if either a Jitter or RTT is exceeded 3 times within a specified time duration. The default time duration is 15 minutes.<br>

      **SIM Failover**: The eCVD template uses the [Path Jitter IP SLA command](https://www.cisco.com/c/en/us/td/docs/ios-xml/ios/ipsla/configuration/15-mt/sla-15-mt-book/sla_icmp_pathjitter.html) to track packets to a public IP address from the primary SIM card. If the IP SLA fails or the RTT and/or the Jitter thresholds fail, then there will be a failover of primary SIM to the secondary SIM. Time duration refers to the period in which the failure counters will be cleared. If the max threshold failures is met within the specified time, then the SIM failover is triggered.  A time set to a higher number will demand a stricter tolerance criteria and less tolerance for intermittent connection issues. By allowing a longer timeframe with fewer instances of connection problems within that time, you can ensure to minimize disruptions and maintain a more stable cellular connectivity.

      **Note**: If a second SIM is installed and enabled, use the existing defaults or set the numerical parameters to trigger a SIM switchover. A switchover occurs if either a Jitter or RTT is exceeded 3 times within a specified time duration. If it recovers within 3 consecutive times, the counter will be reset to zero. The default time duration is 11 minutes.
Add a device to IoT OD and map it to an existing configuration group.
- From the left pane, click Inventory > Unused tab.
- Click Add Devices.
- Select IoT Operations Dashboard > Single Device and complete the following fields in the Add Device page.
Field Description Latitude / Longitude (Optional) Enter the location of the device to display it on the dashboard map.
If blank, the device antenna is used to find GPS co-ordinates.Name (Optional) Enter a device name. Product ID (PID) Select the product ID (model number) from the drop-down list.
For example: IR1101-K9 or IR1831-K9
Tip: Type the model number, such as 1101 or 1831 in the search field to see the matching PID options.Serial Number Enter a serial number.
Serial numbers are 11 characters.
For example, FTX2007800N- Select the device Group you just created. The configuration template for that Group will be applied to the network device.
- Click Next.
- In the Configuration window, complete the settings and variables included in the template. The following settings are required to create a remote session with the subtended device.
Field Setting WAN Uplink Enable the following for your WAN back-haul settings:
* Cellular - Click Enabled. For a public APN, leave the Primary Cellular Access Point Name blank (the name is automatically entered). For custom or private APNs, the APN name configured for the configuration group appears.
* Ethernet - Click Enabled for Private or custom APNs, or if your device uses a wired network connection. Use Ethernet for private or custom APNs to onboard the device. After you add the device, disconnect Ethernet. Use the private/custom cellular network instead.- Click Next after all settings are complete. Correct any errors before proceeding.
- In the Review window, check that your settings are correct. Click Save.
Connect the device to power and add it to your network. When the device is powered on and connected to the network using either Ethernet or Cellular, it will connect to IoT OD and be configured for use with IoT OD. The selected template configuration will also be applied. The device will go through following states — Unheard → Configuring → Up (Green). This can take 5-7 minutes.

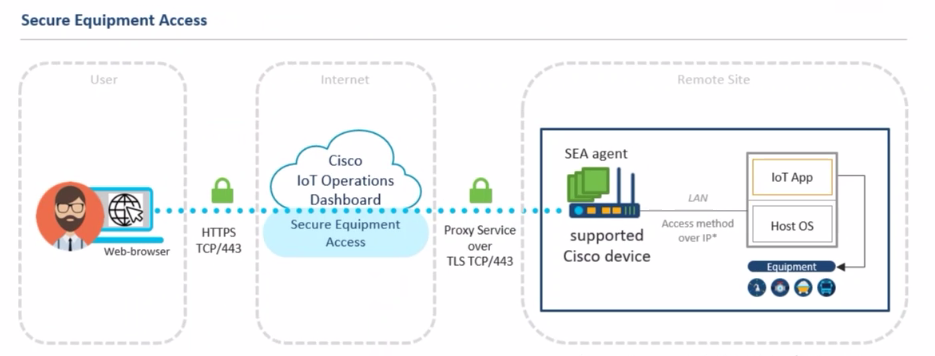
Open a secure remote connection with a connected device
After the network and subtended device is added, use Secure Equipment Access (SEA) to set up remote connectivity. Use SEA to directly troubleshoot or monitor the IoT devices in your deployment. For example, an administrator can use a VNC connection to remotely access and control a Windows computer attached to the gateway.
Summary steps

Set up device access
Add a network device.
- Select the Secure Equipment Access service. If SEA is not available, send an email request to iotod-account-request@cisco.com to request access.
- From the left pane, click System Management.
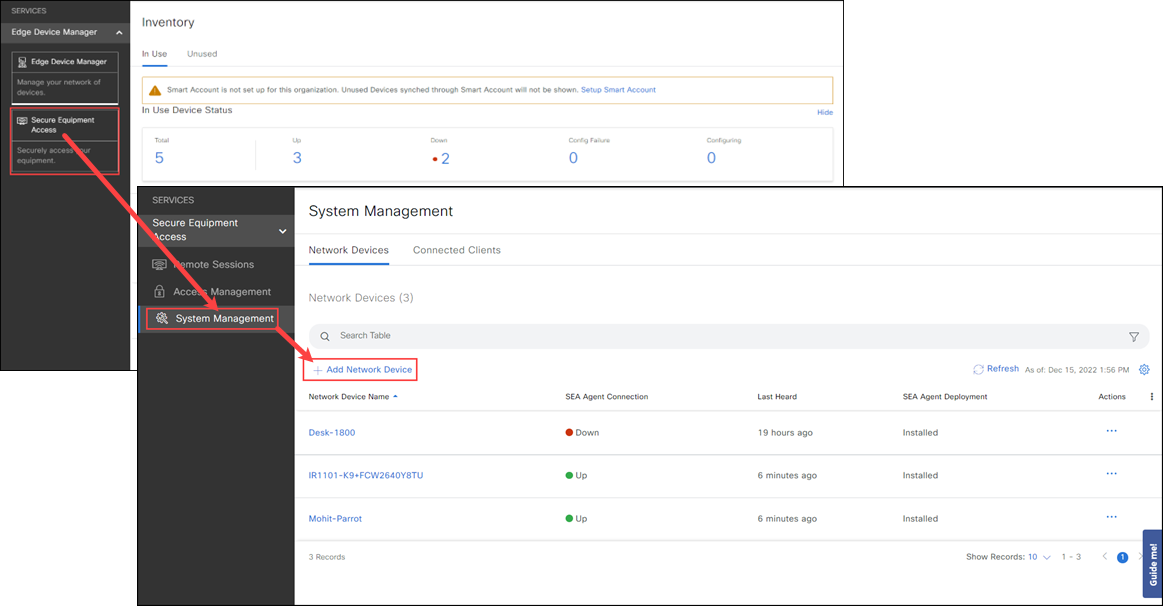
- From the Network Devices tab, click Add Network Device and select the device you just added in EDM.
- Click Add Network Device and then click Next. A confirmation box appears.
- Wait for the network device status to change to Online, which may take a couple of minutes, and SEA Agent status to Installed. Click Refresh to update the Status information. If the status is incorrect after a few minutes, check if the network device is online. For detailed information on installing an SEA application, see Add network devices and connected clients to a group.
Add Connected Clients. This can be a subtended device that users can communicate with.

- From the Network Devices details page, click Add Connected Client, select Manual Entry and enter a known device IP address. Use a known IP address that was configured on the subtended device. The IP address can be static or received via DHCP.
- Click Add Network Device.
Add an access method(s) for the Connected Client.
- From the Network Devices details page, click on a device name to open the device details page.
- Click Add Access Method.
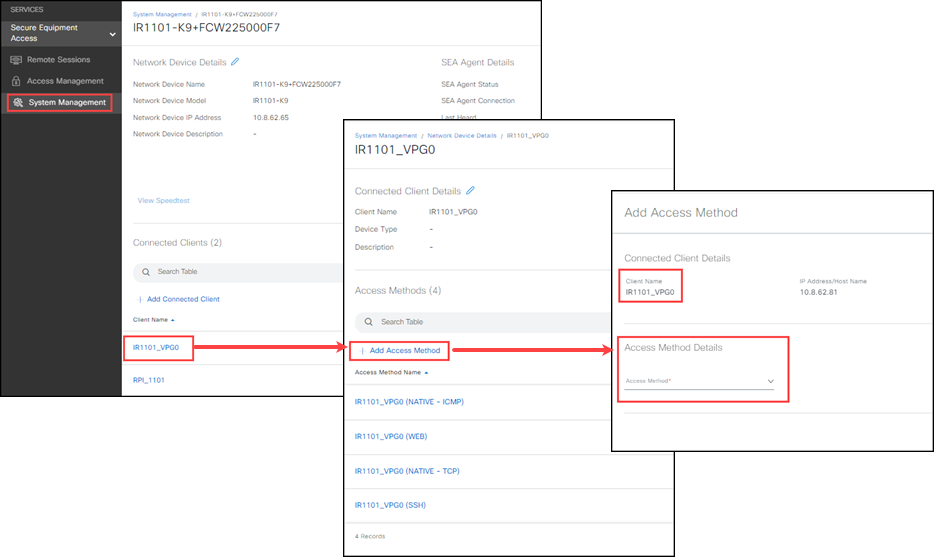
- Complete the following settings, click Validate Name and then Add Access Method.
| Setting | Description |
|---|---|
| Connected Client Details | |
| Device Name | Read-Only |
| IP Address/Host Name | Read-Only |
| Access Method Details | |
| Access Method | Select an option from the drop-down list. * SSH: Enter a username and password to hide the credentials when a user accesses the device. Leave the credentials blank to prompt users for the username and password. * RDP: For RDP and VNC, enter a username and password, if required. You will not be prompted later, if it's left blank. * VNC: If the VNC session uses a session number, add the session number to the port value. For example, if the session number is 6, the port value is 5906. * Web App: Supplies the full URL information for the web page you are accessing. The IP Address/Host Name in the full URL should match the IP Address/Host Name of the connected client. Note: Web App does not support Websockets. * Telnet: Opens a Telnet session for the devices. User name and password is not required. You must specify the port number. Use this access method if a reverse Telnet functionality is required. Note: You may need to perform additional configurations on your device. * SEA Plus: The SEA Plus App access method allows remote access using IP-based protocols with a TCP, UDP, or ICMP header. |
| Description | (Optional) Enter the description. |
| Port | (Optional) A default port number is automatically entered based on the selected Access Method. Enter an alternative device port number, if necessary. * SSH: If blank, the default port number 22 is used. * RDP: If blank, the default port number 3389 is used. * VNC: If blank, the default port number 5900 is used. If the VNC session requires a session number, add the number to the port value. For example, if the session number is 6, enter the port value as 5906. * Web App: Supplies the full URL information for the web page you are accessing. The IP Address/Host Name in the full URL should match the IP Address/Host Name of the connected client. Note: Web App does not support Websockets. * Telnet: Opens a Telnet session for the devices. A user name and password is not required. You must specify the port number. Use this access method if a reverse Telnet functionality is required. Note: You might need to perform additional configurations on your device. |
| Session Timeout (Seconds) |
(Optional) Enter the session timeout in seconds. |
| Advanced Settings | Complete the advanced setting based on the selected Access Method. |
| External Equipment Management | External Equipment Management lets users associate connected clients with other devices so that the connected clients can be accessed through these devices. Enable this option to manage the additional devices (such as cameras, PLCs, etc.), that are connected to the connected client. * For example, if the device is a camera management server, you can allow users who connect to the server to configure and manage cameras. * In SEA, add the managing device, such as a server, to the network device. Then specify the access methods for that device. Under External Equipment Management, select the devices, such as cameras, that can be managed by the server. Note: * Be sure to select the Access Method, such as VNC, required to manage the equipment. * Connected clients added in SEA do not appear as Connected Clients in EDM, and cannot be used in External Equipment Management. |
| Managed Connected Clients | Select the additional devices that will be managed by this device. Only subtended devices added to the network device as Connected Clients in EDM can be selected. See Add network devices and connected clients to a group. |
| Credential Details | Enter the username and password used to access the device. * SSH: Enter a username and password to hide the credentials when a user accesses the device. Leave the credentials blank to prompt users for the username and password. * RDP: Enter a username and password if configured on your Windows computer. If blank, users will not be prompted for their credentials when opening a remote session. * VNC: Enter a username and password if configured on your VNC server. If blank, users will not be prompted for their credentials when opening a remote session. * Web App: A web application (or web app) is an application software that runs on a web server. The user accesses web applications through a web browser with an active network connection. A web server is computer software and the underlying hardware that accepts, requests, and sends responses through HTTP or its secure variant, HTTPS. HTTP/S are the network protocols created to distribute web content (web pages, etc.) to clients. * Telnet: A Telnet session for the device is used to virtually access a computer and provides a two-way, collaborative, and text-based communication channel between two machines. It follows a user command Transmission Control Protocol/Internet Protocol (TCP/IP) networking protocol for creating remote sessions. A username and password are not required, but you must specify the port number. * SEA Plus: IMPORTANT: * The current SEA Plus App release ONLY provides support for Windows 10 OS SEA Plus app versions. * If you have VPN clients installed on your computer, only use the SEA Plus App without any other VPN client in active mode. * Make sure that your virus scanner (antivirus) does not block the SEA Plus application. The SEA Plus App access method allows remote access using IP-based protocols with a TCP, UDP, or ICMP header. You can transfer files to or from a remote system through the SEA Plus channel. Access by SEA Plus App requires a particular user application (SEA Plus App) that runs on the Microsoft Windows 10 platform and is installed on your computer. The SEA Plus application runs as a lightweight VPN-client and helps to establish a secure communication channel between the user’s computer and a remote system. Note: * To use SEA Plus features, ensure the feature is activated in your Organization on IoT OD. If you don't know the status of the feature, please email iotod-account-request@cisco.com to obtain the status or activate the required feature. * The SEA Plus features are premium features and require an Advantage license on IoT OD. |
| Access Name | |
| Name | (Required) Keep the auto-generated access name as it is or customize it. It should be unique. |
| Validate Name | Click this to verify the name is unique. |
| 4. Click Validate Name and then click Add Access Method. | |
| 5. Continue to Access Management to give users access to the devices you just added to SEA. |
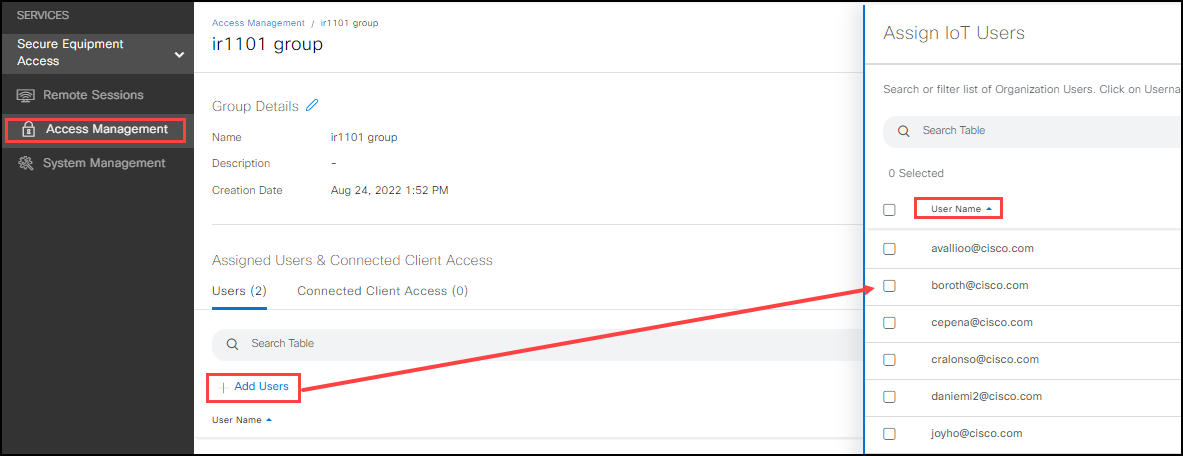
Give users access to secure remote sessions
After the network devices and subtended devices are set up, use Access Management to create groups of users who can remotely access the network devices and attached devices.
Note: You must have the SEA Access Admin or SEA System Admin access permission to use this feature.
Add the users who can access remote sessions:
- Click the "people icon" in the far right of the header. Click Access Control.
- Click Users > Add user.
- Enter a valid email address.
- A welcome email with log in and password instructions is sent to this address.
- If your organization uses SSO, users receive an email confirmation but are not prompted to enter a password. They use their corporate credentials to login instead.
- Select one or more Roles to define the user's access permissions. The list includes pre-defined roles and your organization's custom roles.
- Select Extend Roles to Sub-tenants to apply the same roles to any sub-organizations the user can access.
- Click Save.
Select the Secure Equipment Access service and click Access Management.
Create a user Group.
- Click Add Group.

- Enter a Group Name and a Description (optional).
- Click Add Users and Connected Clients and then click Add Group.
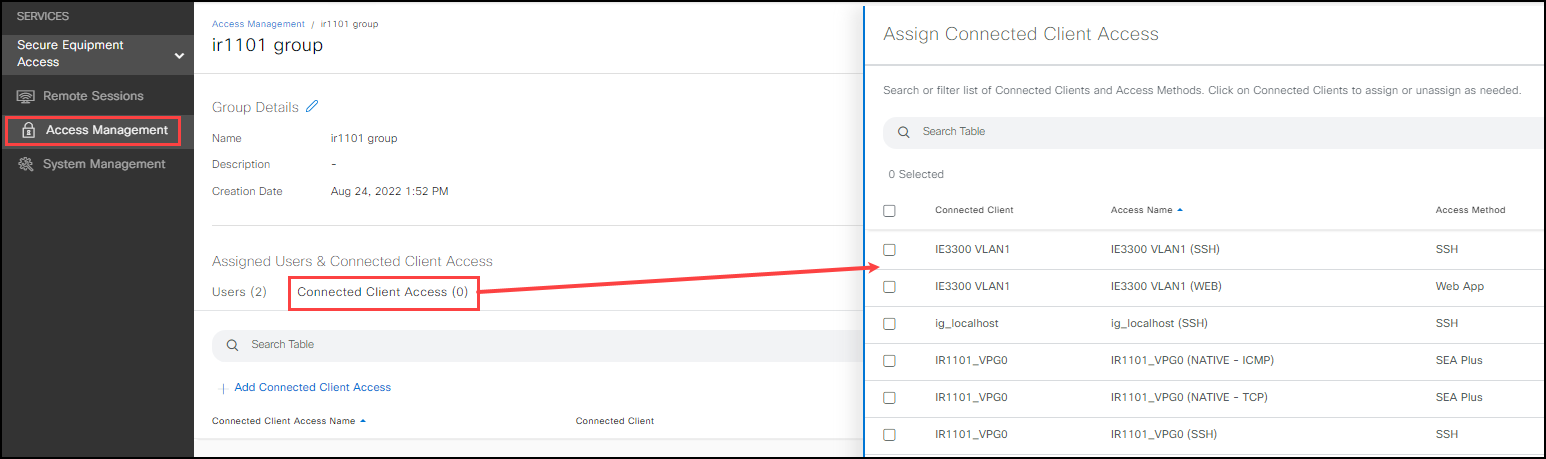
Add devices and users to the group:
- In the Users tab, click Add Users, select the users, and click Save.
- Click the Connected Clients tab and then Connected Clients Accesses. Select the devices users in the group can access. If the required IoT device is not shown, add it using System Management.
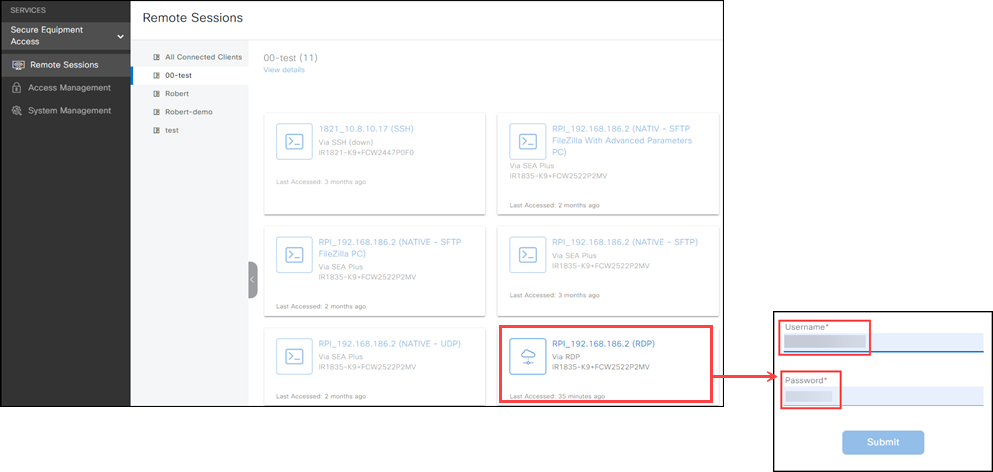
Open a remote session
Use Remote Sessions to securely communicate with the network devices and devices added using System Management.
- Click Remote Sessions. You must have the SEA User access permissions and be added to an SEA group that can access the device.
- Click a device that you have access to.
- Use the pop-up window to communicate and manage the IoT device using the connection method configured for that device.
Note: Users will only see Remote Sessions in the left menu.
Tip: The Search function is only available if you toggle to List View.
