- Overview
- Welcome
- Get Started
- How to order
- Set up the IoT Dashboard
- Link your Smart Account to your organization
- Release notes
- Log in
- Upgrading Cisco IoT OD
- Update network device firmware
- Access control
- Cisco Cross Platform Navigator
- Audit user actions
- Required accounts
- Switch organizations or Services
- View cloud service status
- Feedback form
- Edge Device Manager (EDM)
- Requirements and release notes
- EDM Sandbox
- Onboard network devices
- Onboarding Quick Start Guide for IR devices
- Prepare existing devices for onboarding
- Overview
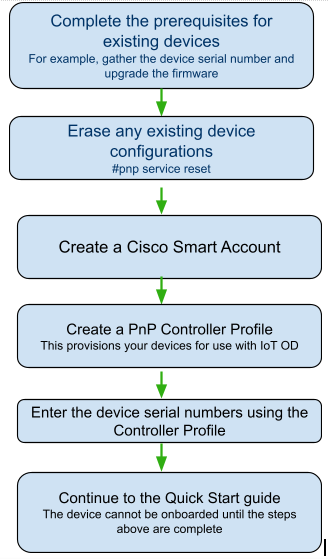
- Summary steps (existing devices)
- Existing device prerequisites
- Erase the device configuration
- Create a Cisco Smart Account
- Create a Controller Profile
- Add your network devices to Plug and Play (PnP) Connect
- Background: The PnP process
- How to use a USB stick to bootstrap an IR1101 or IR1800 network device
- Troubleshoot IR device onboarding
- Manually onboard network devices (alternative method)
- Configure network devices
- Manage network devices
- Monitor network devices
- EDM API
- Application management
- Application management troubleshooting tips
- Application Manager
- Secure Equipment Access
- Secure Equipment Access overview
- Release Notes
- SEA Dashboard
- SEA remote access overview
- SEA operations
- SEA: Quick Wizard
- Enable SEA on Your Network Devices Using CLIs
- Add network devices
- SEA: New System Admin Workflow
- SEA: HTTP(S) proxy support
- SEA: Multi-VLAN and Static IP support
- Manage access control groups for remote access
- Bulk Configuration Cloning
- Manage remote sessions
- Monitor sessions
- Identity Threat Detection and Response (ITDR) Insights
- Duo user security posture checks
- Record Inline Sessions
- Access methods
- SEA Plus Access Method
- Configure SEA Plus Protocol definitions
- SEA API
- Edge Intelligence
- Industrial Asset Vision
- Overview
- Prerequisites
- Quick start guide
- View status and troubleshoot
- Create alerts and generate reports
- RF Performance Tool
- Add Templates
- Stream sensor data
- Add Geofences
- Group sensors and assets
- Northbound APIs
- Using APIs
- APIs
- Overview
- API
- Model
- AdditionalAttributesMap
- AdditionalGatewayInfo
- Asset
- AssetListResponse
- AssetRequest
- AssetType
- AssetTypeListResponse
- AssetTypeRequest
- AssignSensorsRequest
- AssignSensorsResponse
- CreateGatewayRequest
- CreateLoraTpSensorRequest
- CreateSensorRequest
- CustomAttributeData
- CustomAttributeMetadata
- DownlinkRequest
- DownlinkResponse
- Error
- Gateway
- GatewayListResponse
- GatewayRxTxHistogram
- GatewayRxTxHistogramList
- LiveDataItem
- Location
- LocationData
- LocationDataResponse
- LoraTpModel
- LoraTpModelListResponse
- OnboardSensorRequest
- OnboardSensorResponse
- PageInfo
- Sensor
- SensorListResponse
- TabularTelemetryDataResponse
- TelemetryData
- TelemetryDataResponse
- TelemetryValue
- UnassignSensorsRequest
- UnassignSensorsResponse
- UpdateGatewayRequest
- UpdateSensorRequest
- Industrial Wireless
- Overview
- Supported firmware
- Add new IW devices
- Manage IW devices
- Upgrade IW devices
- Create Groups
- Assign IW Devices to a Group
- Configure IW Devices in Online / Offline mode
- Edit and Delete Groups
- Remove IW Devices from Group
- Create Templates
- Duplicate Templates
- Edit and Delete Templates
- Export Device Configuration Settings
- Enablement of 4.9 GHz for US and Canada Public Safety
- Enable URWB Telemetry Protocol
- View details
- Migrate to IW Service
- Solution Design
- Developer Resources
- Community and Support
Prepare existing devices for onboarding
Alert: Cisco has made the end-of-life (EOL) announcement for the Cisco Edge Device Manager (EDM).
Overview
Existing network devices must be prepared for onboarding before they can be added using Internet of Things Operations Dashboard (IoT OD) Edge Device Manager (EDM) service. This includes:
- RMA replacement devices
- Devices that are being repurposed for IoT OD
- Devices purchased without the IoT OD product identification (PID)
Note: If you purchased a new network device using a Cisco IoT OD PID, these instructions are not required. Proceed to the Onboarding Quick Start Guide --IR devices.
To prepare a network device, all configurations must be completely erased from the device, which is then entered in the Cisco Network Plug and Play Solution (PnP) that provisions them for use with Cisco IoT OD. PnP also provides the device with the required security certificates and redirects it to Cisco IoT OD so it can be added to your organization's account.
Summary steps (existing devices)
After the existing network device is prepared, you can add the devices to Cisco IoT OD and complete the network configuration.
Existing device prerequisites
| Requirement | Description |
|---|---|
| Create a Cisco Smart Account | A Cisco Smart Account is required to prepare your network device. See Get a Smart Account |
| Device serial number | Note the 11 character device serial number of your network device. For example: FTX2000000N. Use the following command to show the PID and serial# for your device: #show license udi |
| Supported firmware | Make sure the edge device is running a supported software version. See Supported devices and firmware |
| Network and device requirements | Verify all network and device requirements are met. For example: * Use a supported network device interface for onboarding. * Verify that devices on your network can reach the IoT OD cloud at https://us.ciscoiot.com/ or https://eu.ciscoiot.com/ (must be all lower-case). For more information, see Firewall Rules: Device and network requirements. |
Erase the device configuration
IMPORTANT Any existing configurations on an existing device must be removed before you add the device to the network. If any previous configuration exists on the device, provisioning will fail.
Recommended method
Enter the following command on your IR1101 or IR18xx series device. This will erase the configuration and reload the device:
Alternative method
- Delete all IOS images in the flash except the current IOS image.
To view the currently running IOS image:
#show version | include image
System image file is "flash:ir800-universalk9-mz.SPA.159-3.M2a
2. Remove the startup-configuration using the following commands:
#erase nvram:
#reload
3. Remove or rename any files in the flash that have the .cfg extension.
4. Reboot the network device without saving the configuration. Do not save config when asked.
IMPORTANT: After the device reloads, DO NOT type anything on the console until it says PNP_DISCOVERY_DONE.
Note: If using an IR829 gateway, the AP must be in autonomous mode and not unified mode. If AP is in unified mode, convert the AP to autonomous mode.
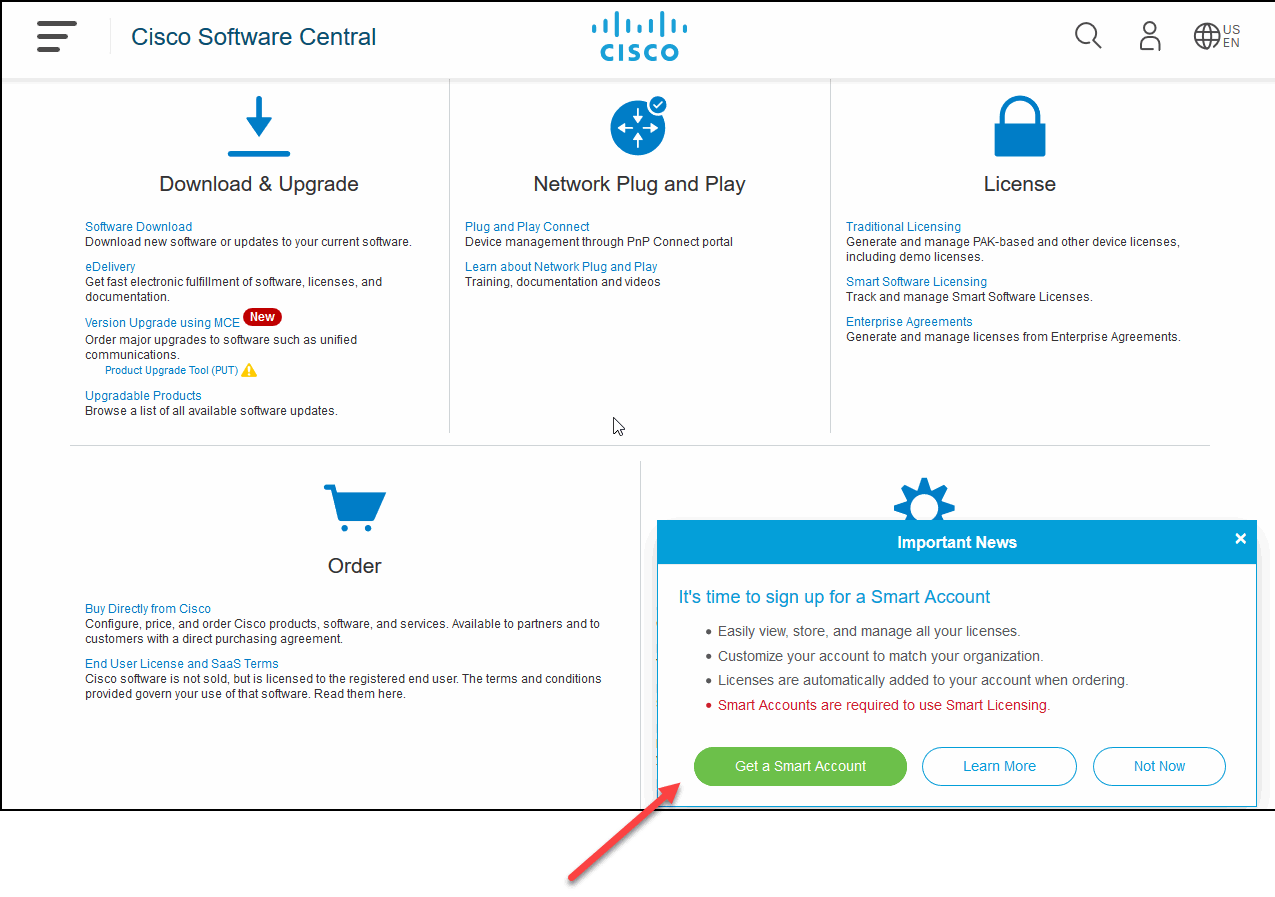
Create a Cisco Smart Account
A Cisco Smart Account is required to use Cisco PnP. Ask to be added as an administrator if your organization already has an account.
To create a new account:
- Go to Cisco Software Central at software.cisco.com.
- Click Get a Smart Account and enter your information.
- If a new domain identifier is entered, wait for an approval call from the Cisco Smart Account team. If an existing domain identifier is used, the Smart Account is created.
Learn more about Smart Accounts.
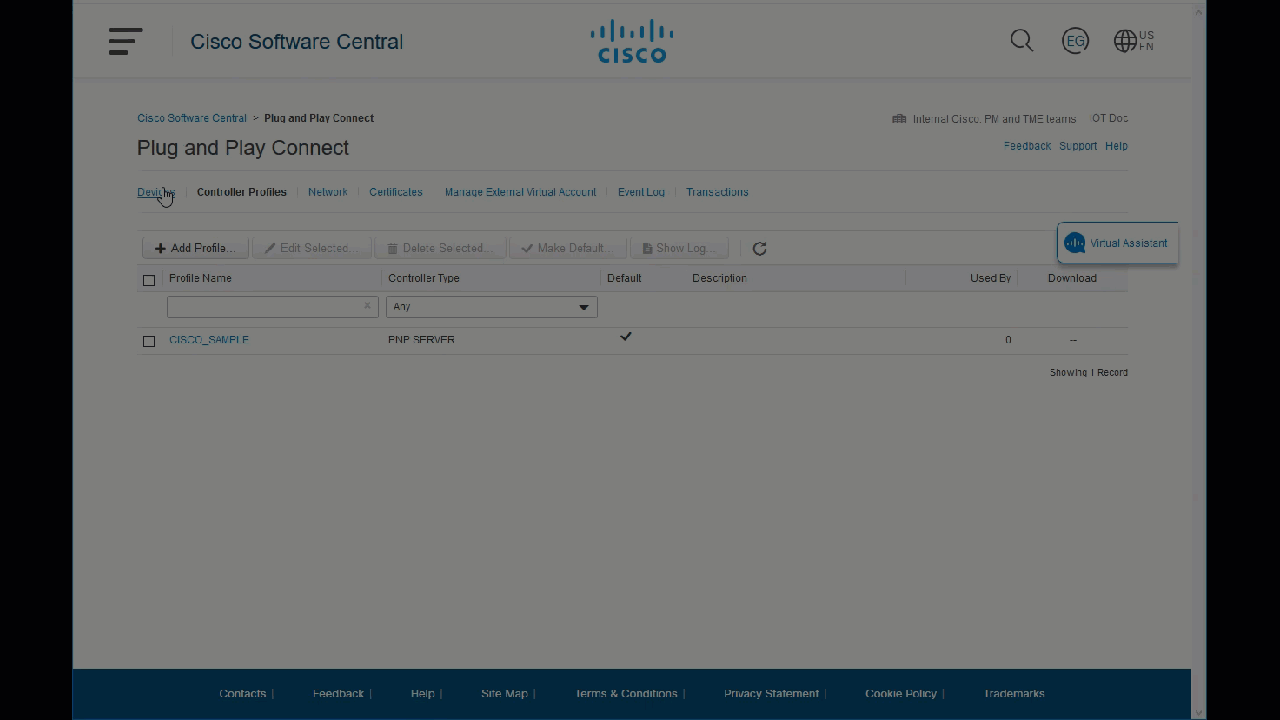
Create a Controller Profile
The Controller Profile specifies the Cisco IoT OD host that provisions your devices for use with Cisco IoT OD. The profile is selected when adding a device to Cisco PnP.
The profile also includes an SSL certificate for secure communication.
Go to https://software.cisco.com and log in to an "administrator" account.
Click Plug and Play Connect.
Select your Cisco Smart Account or Virtual Smart Account (top right).
Click the Controller Profiles tab, then click Add Profile.
Next to Controller Type, select PNP SERVER, then click Next.
Enter the following information:
- Profile Name—A meaningful name, such as MYCISCO.
- Default Profile—Select Yes if this Smart Account is only used for Cisco IoT OD. This profile will be used any time you order an network device.
- Host Name —Enter either eu.ciscoiot.com or us.ciscoiot.com based on the device location (must be all lower-case).
- SSL Certificate —Copy and paste the certificate chain below. Be sure to copy the certificate in its entirety.
You can also select the security certificate file if it is stored on your computer.
- Click Next.
- Review the profile details and click Submit > Done.
Learn more about Controller Profiles.
Copy and paste this certificate chain to your PnP Controller Profile.
Add your network devices to Plug and Play (PnP) Connect
Supported network devices added to PnP will be provisioned using the connection details in the selected Controller Profile you just created. Once added, you can add the devices to your organization's IoT OD account.
Go to https://software.cisco.com.
Click Plug and Play Connect.
Select your Cisco Smart Account or Virtual Smart Account (top right).
Click the Devices tab, then click Add Devices.
Accept the agreement if prompted.
Under Identify Source, select Enter device info manually and click Next.
Click Identify Device.
Enter the following information:
Serial number—The network device that will be added to Cisco IoT OD. For example: FTX2007800N Note: The Serial Number and Base PID are located on the back of the device.
Base PID—Enter the PID for your device, such as IR1101-K9 or IR18xx-K9.
Controller Profile—Select the profile you just created.
Enter an optional description and click Next.
The devices are added to your profile and will appear in the Pending Redirection state.
Background: The PnP process
The following illustration shows what happens when you use PnP to provision a network device so it can be claimed by Cisco IoT OD.
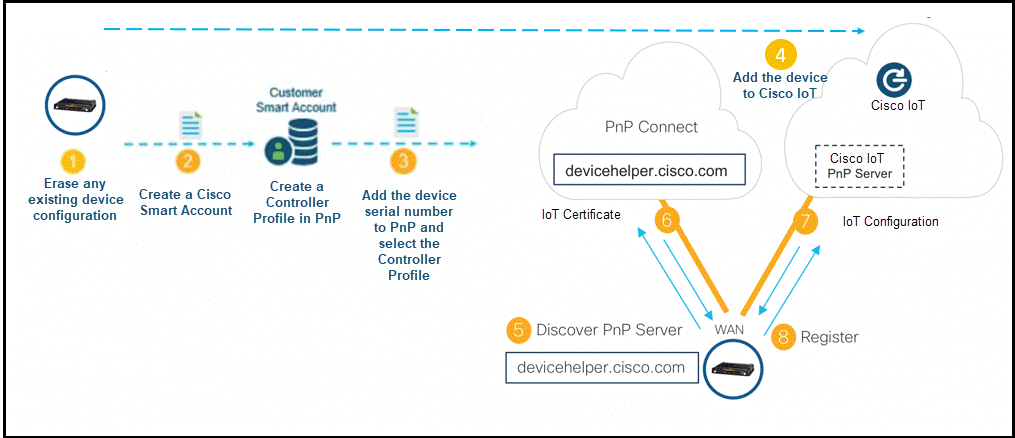
Note: Most of these steps occur in the background. Your task is to obtain the network device for the right Smart Account, connect it to the network, and claim it using Cisco IoT OD.
How to use a USB stick to bootstrap an IR1101 or IR1800 network device
If you power up a device and you don't get an IP address and the PnP process does not start, you can still pre-stage the network device using the USB port. Here are some scenarios where pre-staging the network device is necessary:
- Cellular interface that requires an APN to be configured
- MPLS tags for Gigabit uplinks
- dot1x authentication
- dot1q encapsulation and VLANs
- static IP address in absence of DHCP server
While all those operations can be done on the console, for the Cisco IOS-XE on a Cisco IR1101 or IR18xx series network device, you can preconfigure using just a USB stick. When the network device boots without any configuration, it loads the configuration on the USB stick. This option will not load a full configuration, but enough to get the device internet access and start the PnP discovery process, while the rest of the configuration will be pushed by Cisco IoT Operations Dashboard later.
If there is no startup configuration, Cisco IOS-XE on the Cisco IR1101 will look for a file in the FAT-formatted USB stick called “ciscortr.cfg”. Here is a sample configuration that can be customized for your specific needs. It configures a specific APN, configures a dialer on Cellular 0/1/0, sets the default route, and configures a PnP profile.
Copy this file on a USB stick formatted in FAT. Save this file with name "ciscortr.cfg" on the root directory.
Here is an example you can adjust for your specific needs. For instance, use "m2m.tele2.com" in place of your company's APN cellular provider name. Use the same concept to configure a static IP address, or any other pre-staging before PnP starts.
Insert the stick in any IR1101 or IR18xx series device and boot. If this network device has no configuration, it will boot using this configuration file.