Application Management
Alert: Cisco has made the end-of-life (EOL) announcement for the Cisco Edge Device Manager (EDM).
Overview
"Applications" are Cisco IOx applications that run on a Cisco IoT network device (such as an IR800 or IR1100) to provide additional functionality such as collecting and transforming data from assets and then sending it to the Cisco IoT cloud or other data destinations.
Applications can be developed by Cisco, your organization, or other third-party developers and are deployed and managed using the Cisco IoT Operations Dashboard (IoT OD).
Application management allows you to:
- Add the application to the IoT OD. Upload the application package to the Dashboard so it can be installed on a device(s).
- Install the application: Configure and install the application on specific devices.
- Manage the application: Manage installed applications. Use IoT OD to start, stop and upgrade applications, or view logs and uninstall them.
Prerequisites
- An application that meets the IOx requirements.
- See Develop IOx applications for more information.
- A Cisco IoT OD network device that supports IOx and has been onboarded and is ready to use.
- Cisco IoT OD organization with the application management feature active (requires an Advantage IoT OD license).
- The device operator role has application management permissions by default, which can be utilized to start quickly.
Notes:
- You need Application Management permission to view the Applications menu item and page.
- The application management actions which result in changes will be audited. These audit logs will be present in the "Application Manager" tab in the audit page.
Application States
An application installed on a device, can be in any of the following states:
- DEPLOYED: Application is installed on the device, but, resources needed by the application is not committed to the application.
- ACTIVATED: The resources required by the application is now committed. Associated container artifacts are also generated.
- RUNNING: Application is now running.
- STOPPED : Application is stopped.
Add applications to IoT OD cloud
Upload applications to IoT OD so they can be installed on network devices.
- Download the application package to a local or network drive. For example, see the EI software download page.
- Add the application.
- Log in to the IoT OD.
- Select Edge Device Manager from the left banner, if needed.
- Select Applications to open the application inventory.
- Click Add Application.
- In the popup window, choose the file or drag and drop the file from your local/network drive. Add a .tar or .tar.gz file (created using iox-client) to upload an application to IoT OD.
- Click Upload.
- Wait for the process to complete. The uploaded application version will be visible in the inventory.
IMPORTANT: Do not close the dialog box during the add application process or the upload process will cancel.
Install applications
You can install previously uploaded applications. If you attempt to install a non-Cisco signed or third-party application via App Management, IoT OD will disable App Signature Verification on the device to facilitate the installation. This setting will remain disabled until you manually re-enable it from the troubleshoot page or directly through the device CLI.
Install applications on individual devices
Use these instructions to select the specific devices where an application will be installed:
Go to Applications and click on the application name.
Click Install Application.
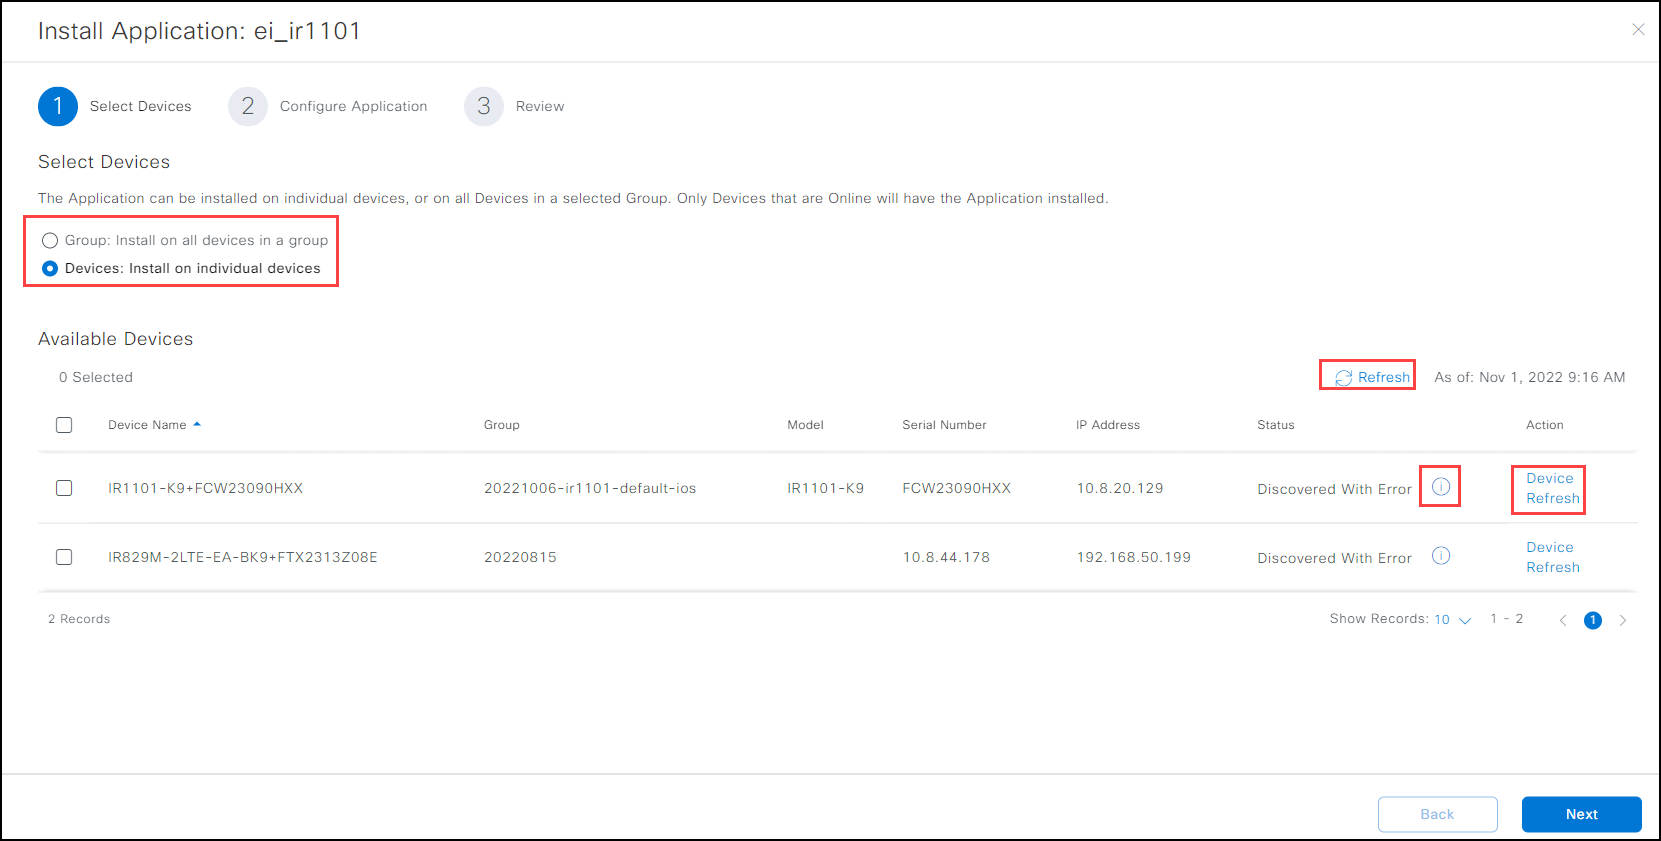
Select the devices where the application needs to be installed. Devices can run more than one application. Use the Platform Support Matrix for application estate planning purposes.
Notes:
- The device IP address is shown in the serial number field if the device has not yet been contacted. The serial number is displayed once the device is discovered.
- If the device status “Discovered with error” is shown, select Device Refresh to clear any temporary errors.
Click Next.
Under Application Specific Parameters, you can accept the default settings, or change them (see below for more information).
Click Next to review your changes.
If installation fails Install Error Reason column. Roll over the error for more details. Review the set of devices and the configuration.
Click Finish.
Wait for the process to complete, which can take a minute or more based on your network connectivity.
Check the status in the Instances page.
- Click Device Refresh for the latest device status, then click the table Refresh button to see the latest application status, which will change to "Running" if installation is successful.
- Errors are displayed under the status column. Rollover the "i" for tips that explain errors.
- The column "Data fetched at" shows when the status/health data was retrieved from the device.
- If an application installation fails due to configuration error or lack of resource availability, correct the values and re-install the application.
Install applications on device groups
Use these instructions to install applications on multiple network devices using device groups.
Set up device groups, if necessary. See Create or edit device groups.
Go to Applications and click on the application name.
Click Install Application.
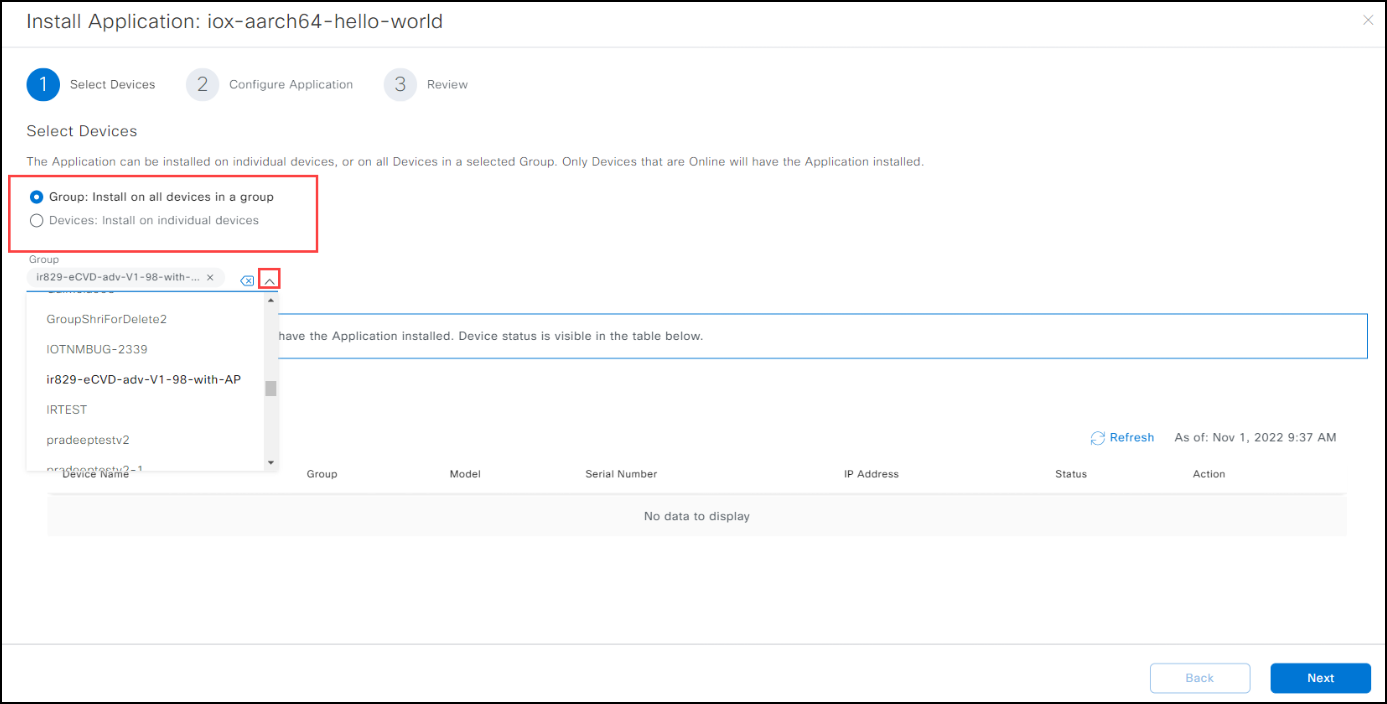
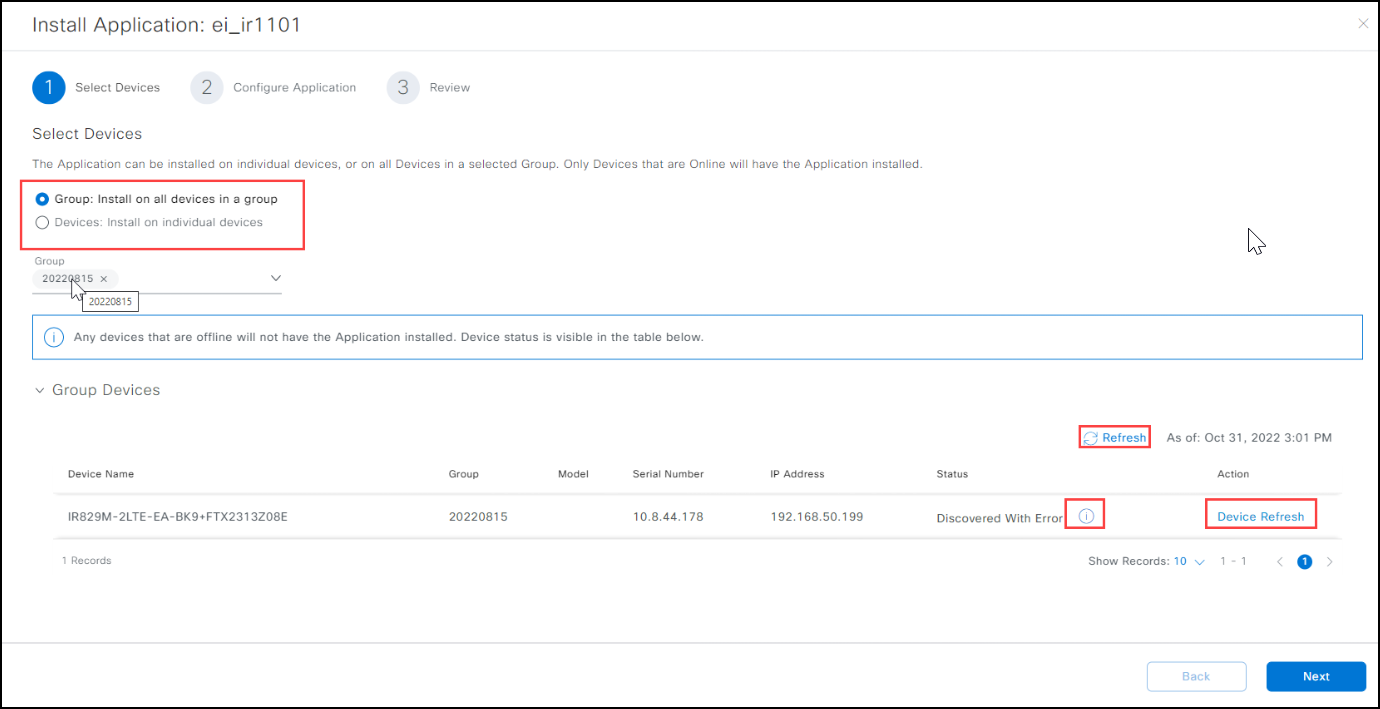
Select the radio button Group: Install on all devices in a group.
Select one or more groups that have devices of the same platform, such as the IR8x9 or IR1101. The Group Devices detail window populates with all the devices included for this installation process.
Click Next.
Under Application Specific Parameters, you can accept the default settings, or change them (see below for more information).
Click Next to review your changes.
If installation fails Install Error Reason column. Roll over the error for more details. Review the set of devices and the configuration.
Click Finish.
Wait for the process to complete, which can take a minute or more based on your network connectivity.
Check the status in the Instances page.
- Click Device Refresh for the latest device status. Click the table Refresh button to see the latest application status, which will change to "Running" if installation is successful.
- Errors are displayed under the status column. Rollover the "i" for tips that explain errors.
- The column "Data fetched at" shows when the status/health data was retrieved from the device.
- If an application installation fails due to configuration error or lack of resource availability, correct the values and re-install the application.
Change the application settings
Use the following information to optionally modify the application settings during installation on network devices.
The developer recommended configuration is entered by default. Modify the settings only if required by your organization.
The Resource Profile fields match device capabilities. You can also choose any other available profile based on application runtime requirements.
Under Network Configuration > Device Network, choose one of the available options. For example, for IR8x9 devices, typically iox-bridge0 and iox-nat0 are options.
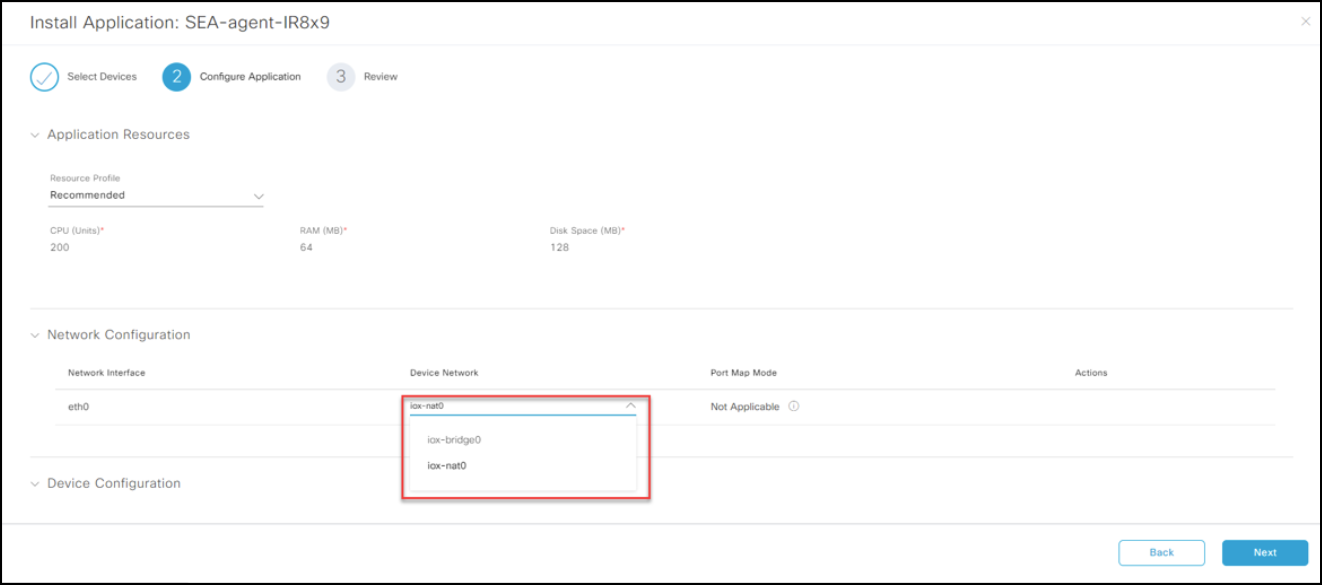
Device Network mode and IP Address allocation.
- There are two ways IP Address for Application interfaces can get configured: NAT and Bridge modes. These can be configured during installation of the application.
- If Device Network for an interface is assigned as "NAT" type, the interface is assigned an internal IP address by IOx and the address is translated to a unique IOx IP address and port combination when external communication happens. These internal IP addresses are not reachable directly from sub-tended devices. The sub-tended devices use the IOx IP address and the correct port to reach these interfaces.
- If Device Network for an interface is assigned as "Bridge" type, each interface is assigned a unique IP address in the same subnet as the IOx IP address, based on the DHCP rules. These IP addresses are reachable from sub-tended devices.
- For IR8XX devices, the network mode (NAT or Bridge) can be chosen during application installation. For IR1101 and IR1800 series devices, the default network for applications in VPG0 (Virtual Port Group) and this is configured in bridge mode.
Port mapping is available for IOx-nat0 only. See Actions > Edit Port Map Mode. Select the port mapping mode 1to1 if you want to specify a different port than what the application developer has configured.
Under Device Configuration, the following peripheral device configurations are supported:
IR8x9 — Only serial ports can be selected; USB is not supported.
IR1101 & IR1800 — Only serial ports can be selected; USB is not supported.
Notes:
- Peripheral devices specified in the application package can be mapped to a port mapping during installation.
- Dynamic addition of peripheral devices/ports during installation is not currently supported. Applications that need peripheral devices should be specified in the package definition by the developer.
Upgrade or downgrade an application
Change the application version to upgrade or downgrade an application on a device or group of devices.
Configuration parameters cannot be modified when changing the version. Before you begin, verify that the application version change can be done without configuration modifications.
Applications may not support upgrading/downgrading from any version to any other version. Contact the application developer for the supported upgrade/downgrade paths.
Wait until any previous operation finishes before attempting to upgrade or downgrade (change version) on the device.
Click View Instances to display the devices where the application is running.
- Your selected application version appears above the Instances list. Remove the version filter to display all devices where the application is installed.
- To view devices with a different application version, use the Filter button to change the version number.
Select the device from the Instances list and click Change Version. The details window appears.
Note: Only versions that were previously added to IoT OD are displayed.
Click Select Version and choose the new application version.
Click Apply. The selected application version will install on the device(s).
Wait for the process to complete, which can take up to a minute based on your network connectivity. Refresh the table to see the latest results.

Stop or start an application
- Click View Instances to display the devices where the application is installed.
- Select the device from the Instances list and click Stop or Start.
Uninstall an application
Uninstall an application to remove it from a device. The application remains in IOT OD and can be installed or re-installed on devices.
Applications can be uninstalled only if the device is online.
- Go to Applications and click on the application name.
- Click View Instances.
- Under the Actions column for one or more devices, click
 and then select Uninstall.
 - Wait for the process to complete, which can take a minute or more based on your network connectivity. Refresh the table to see the latest results.
Note: When a network device is deleted from EDM, the application instance corresponding to that device is also removed from application management.
Delete an application
Removing an application version from IoT OD means it will no longer be available to install on devices.
An application version can be deleted only if it is not installed in any device.
- Uninstall the application from all devices.
- Go to Applications and select the application to be deleted.
- Under the Actions column for that application version, click
 and select Delete.
Note: When a network device is deleted from EDM, the application instance corresponding to that device is also removed from application management.
Application management options
The following options are available on applications installed on a device.
Go to Applications and click on the application name.
Click View Instances to display the devices where the application installation is attempted. Use this page to manage the applications on a device.
- Your selected application version appears above the Instances list. Remove the version filter to display all devices where the application is installed.
- To view devices with a different application version, use the Filter button to change the version number.
Use the Action buttons above the table to:
- Start or Stop the application on a device list
- Uninstall the application on a device list
- Change Version (used to upgrade or downgrade)
Use the checkboxes and Actions button drop-down menu to:
- Device Refresh.
- View/Download the application logs (installed applications only)
- View Resource Usage of the application–Shows data over the last 24 hours.
- View IP Configuration of the application–Provides detailed information about the network configuration of the application, including the IP address and ports reachable from the sub-tended devices.
- Download the Tech Support Log bundle. Note: Downloading large log files can fail and cause the browser tab to crash. The supported size depends on the available RAM in your computer. Refresh the page and close other applications in the system to free up RAM and try again.
View the application management details from Device Inventory
The device inventory page allows users to view the status of application management framework and the applications if application management is enabled and accessible on a device.
Use the following instructions to see application details from device inventory:
- Select the Edge Device Manager service in the left banner.
- Go to Inventory and select the Network Device Name. Device summary page appears with the widget of Applications. Note: The number below the widget shows the count of installed applications, and icon shows their current aggregated status.

| Widget Content | Details on the corresponding status |
|---|---|
| Application count (no icons) | Occurs when: All of the applications are in the running state and the application management framework is functioning properly. |
| Application count with red icon | Occurs when: A red icon will only appear when at least one application is in the inactive mode, even though the application management system is functioning properly. Resolution: Application needs to troubleshoot. |
| Unknown | Occurs when: Enabling application management on the device failed. Resolution: Check the application tab for more details and look through the device event logs to see if there were any issues with configuration or onboarding. Occurs when: IOx on the device is either unreachable or the device itself is unreachable. Resolution: Go to the application tab, to check the current status of IOx and the most recent error message. Occurs when: IOx is running on the device but is not fully functional. Resolution: Check the Applications tab to see the status of IOx. |
- Click the Applications tab. The screen displays details about the installed applications on the device.
- To troubleshoot the application,
- Select Navigate to App Instance from the row where the application name is mentioned. Instances page appears.
- To troubleshoot the application, click (…) from Actions column and select options from drop-down.
- Select Navigate to App Instance from the row where the application name is mentioned. Instances page appears.
Troubleshooting options are as follows:
* Device Refresh
* View Application Logs
* View IP Configuration
* View Resource Usage
* Download Tech Support Logs
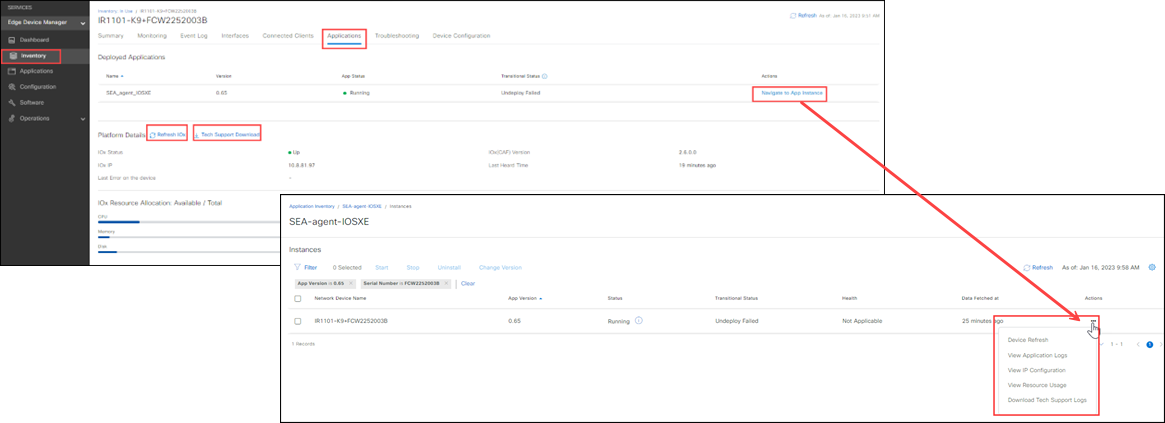
In case of IOx platform issues, try using Refresh IOx or use the Tech Support Download option to download the logs from IOx and examine them to identify the problem.
