Duo user security posture checks
In regular day-to-day activities, any user's PC can be used for multiple purposes, such as storing and accessing files, folders, programs, etc. Without strong security management, malicious external parties can access confidential or process-sensitive information on that user's computer, furthermore, a low-security posture can allow third parties access through that computer and a remote access solution to assets on remote sites can be jeopardized. Additionally, Operational Technology (OT) programs (for PLC, HMI, robots, etc.) can be accessed and copied without authorization. Utilizing Duo integration allows you to conduct a system posture check on a user's device before allowing access from the device to a remote OT Asset using the SEA Plus access method.
Duo integration with SEA Plus
Prerequisite: The SEA System Admin, who sets up the external integration, must have a Duo Admin account with a unique URL. Or, the SEA System Admin can work with a dedicated Duo administrator to capture Duo credentials for integration with IoT OD. It is necessary to create appropriate policies on Duo for the user’s computer security posture check for remote access to OT assets. You can request a free, 30-day trial that works with IoT OD. Click Duo.com to request a 30-day trial.
Introduction
The integration between Duo and SEA Plus has two steps:
- Creating the SEA Plus application in Duo
- Adding the Duo client ID and secret to SEA
From the Remote Sessions screen, click the SEA Plus toggle switch to activate SEA Plus. If you have an active Duo integration configured when you launch SEA Plus, Duo performs a system posture check to ensure that the system complies with Duo's security policies defined for this use case by the Duo Administrator. If the user's computer passes Duo's posture check criteria, then the Duo logo turns green and activates SEA Plus connectivity. For more information on using the SEA Plus access method, refer to SEA Plus access method documentation.

Note: If the security posture check fails, you receive an error message.

To view Details of the Duo session, click SEA Plus Details. The details panel opens on the right side of the screen.

Note: If Duo integration is not enabled on your system then Duo logo remains grayed out. You can still enable SEA Plus and access SEA Plus sessions. However, your computer security posture check won't be initiated.
Configure Duo external integration for SEA Plus
Note:
- To configure Duo external integrations, you must have an SEA System Admin role.
- This Duo integration only applies to the SEA Plus access method. The Duo integration does not apply to user login. If you need to use Duo during IoT OD login, a separate integration must be configured with an Identity provider and Single Sign On (SSO) must be enabled.
Create the SEA Plus (Web SDK) application in Duo
- From the left menu of your Duo Admin account (Duo Admin Login), navigate to Applications > Protect an Application.
- In the Protect an Application screen, choose Web SDK option and click Protect.
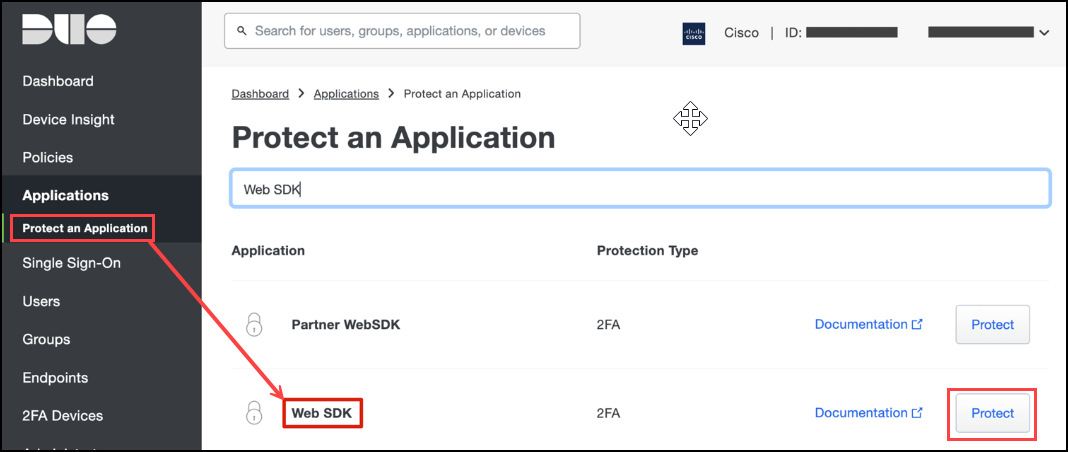
- We recommend you change the name from Web SDK to something more meaningful like SEA Plus.
- In the Duo Admin Dashboard navigate to Applications > Web SDK.
- Scroll down to Settings section, change the Name.
- Scroll to the bottom of the page to Save.

Configure SEA Plus policy in Duo
Note: The example is used to understand available options and simplify the initial stage of Duo configuration. We highly recommend you become familiar with Duo policy documentation to fit to your requirements. For more information, see Duo Administration: Policy & Control.
- In Duo, from the menu, choose Policies.

- Scroll down to the Custom Policies section at the bottom of the section and click New Policy.

Type in an appropriate policy Name.
Remaining in the Policy section, configure the policy elements located at the left of the Policy section, that apply to SEA Plus users. For example:
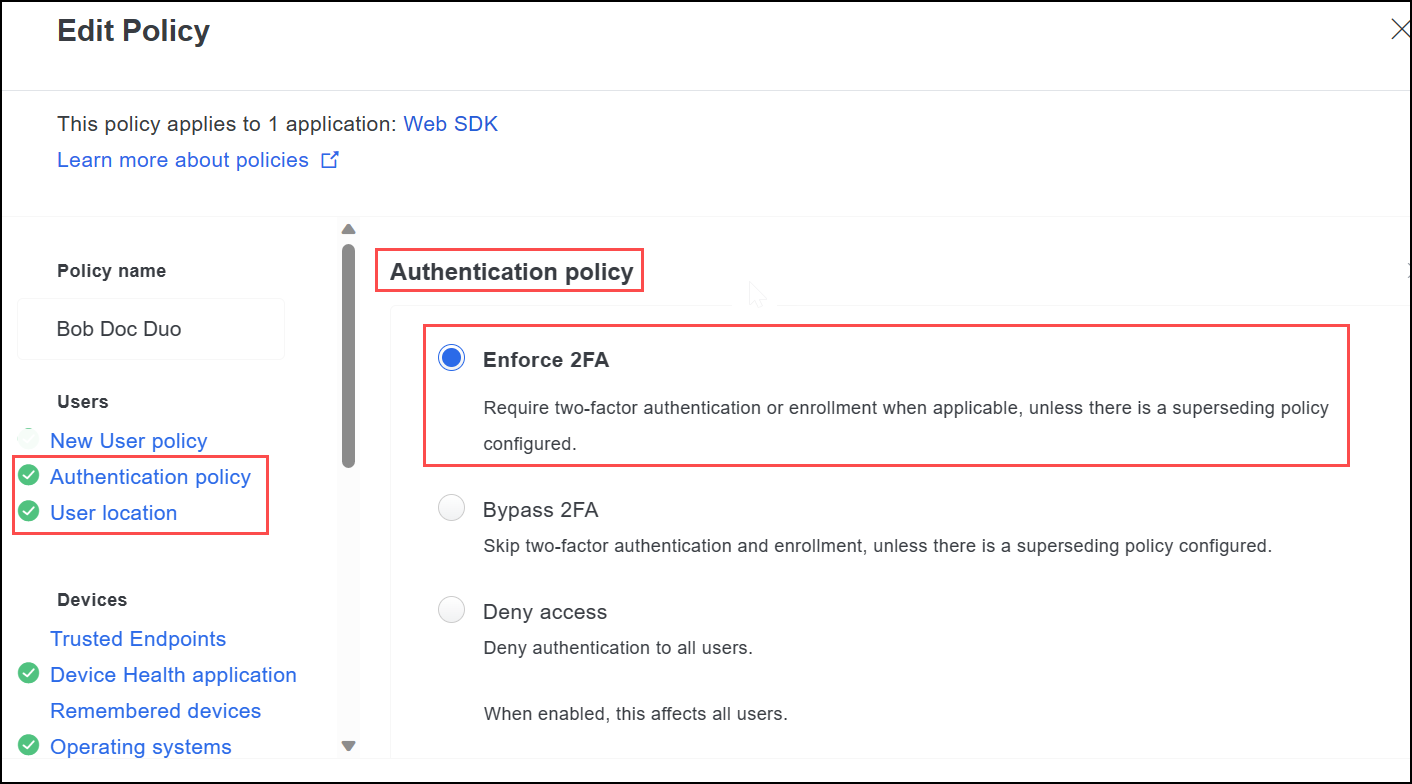
a. Click Authentication Policy and choose Enforce 2FA.
Note: Although we choose Enforce 2FA, we will disable it later in the policy. This setting is enabled to force a user to undergo device posture checks.
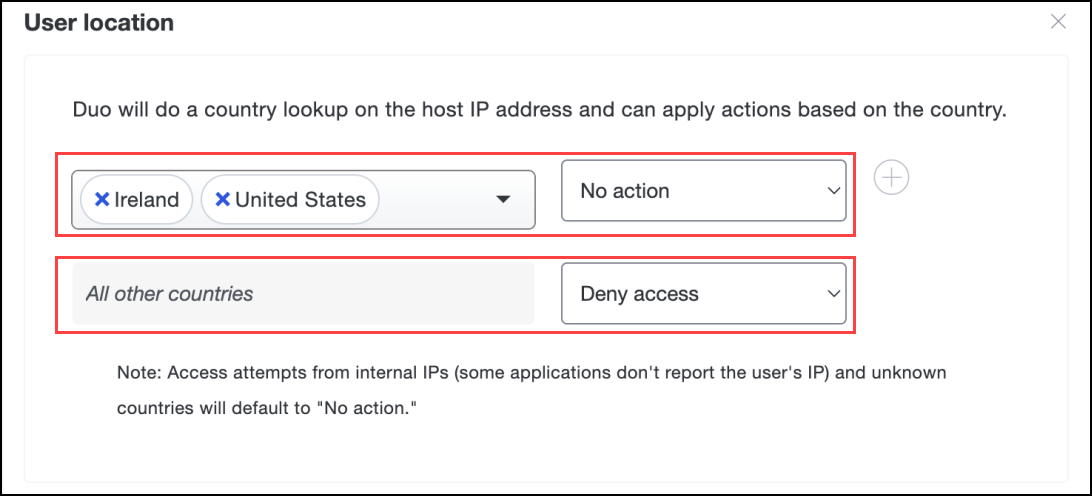
b. Click User location and choose the countries to which remote access should be enabled and choose No action from the dropdown for the chosen countries. For All other countries, choose Deny Access.
c. Click Device Health Application.
Note:- The default screen lists both macOS and Windows in reporting status. Under Windows, click Require users to have the app and at a minimum require a firewall and a system password.
- We highly recommended you block access if an endpoint security agent is not running (not shown in the screen).

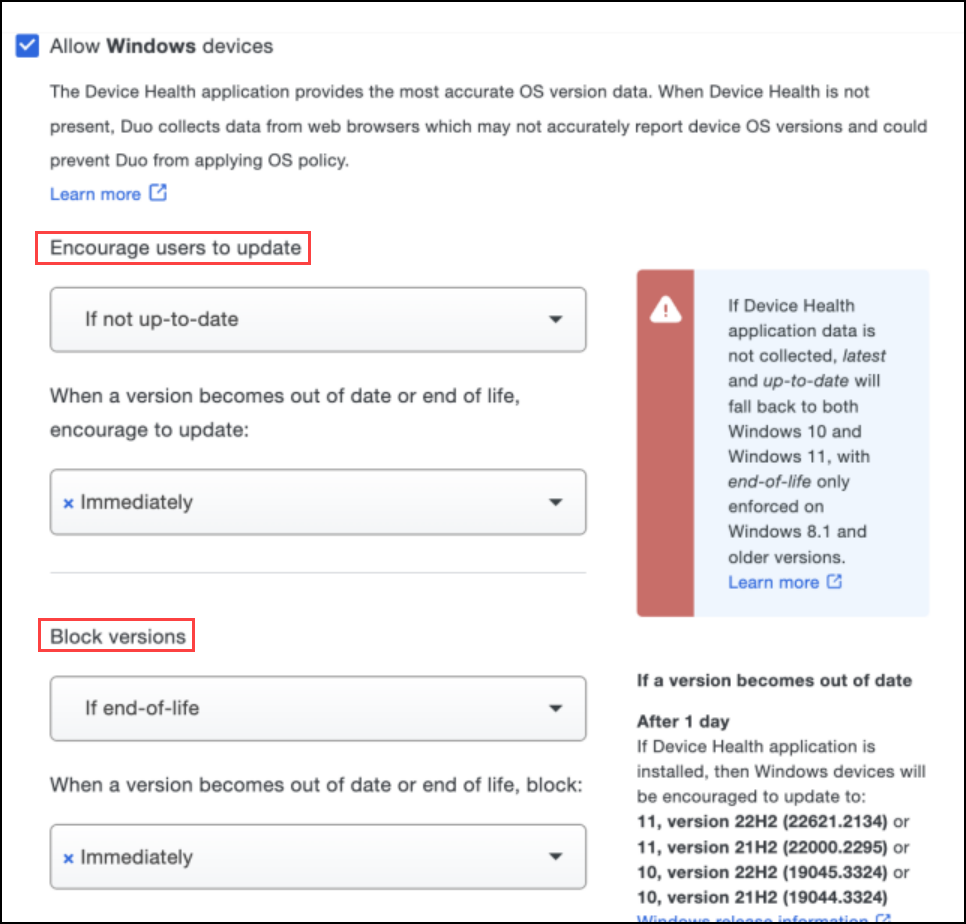
d. Click Operating Systems and uncheck all boxes except for Allow Windows devices located at the bottom of the screen.
Note: SEA Plus is only supported on Windows. Any authentication attempts that are not Windows is suspicious behavior.
e. Scroll down in the Policy section and choose Networks > Authorized networks. In the Allow access without 2FA from these networks field enter 0.0.0.0-255.255.255.255. This addresss covers every possible network and ensures that nobody undergoes additional 2FA checks.
Note: Choosing this option disables 2FA for SEA Plus. We disable 2FA for SEA Plus because you have already undergone the identify verification when you logged into IoT OD. This action eliminates unnecessary 2FA checks.
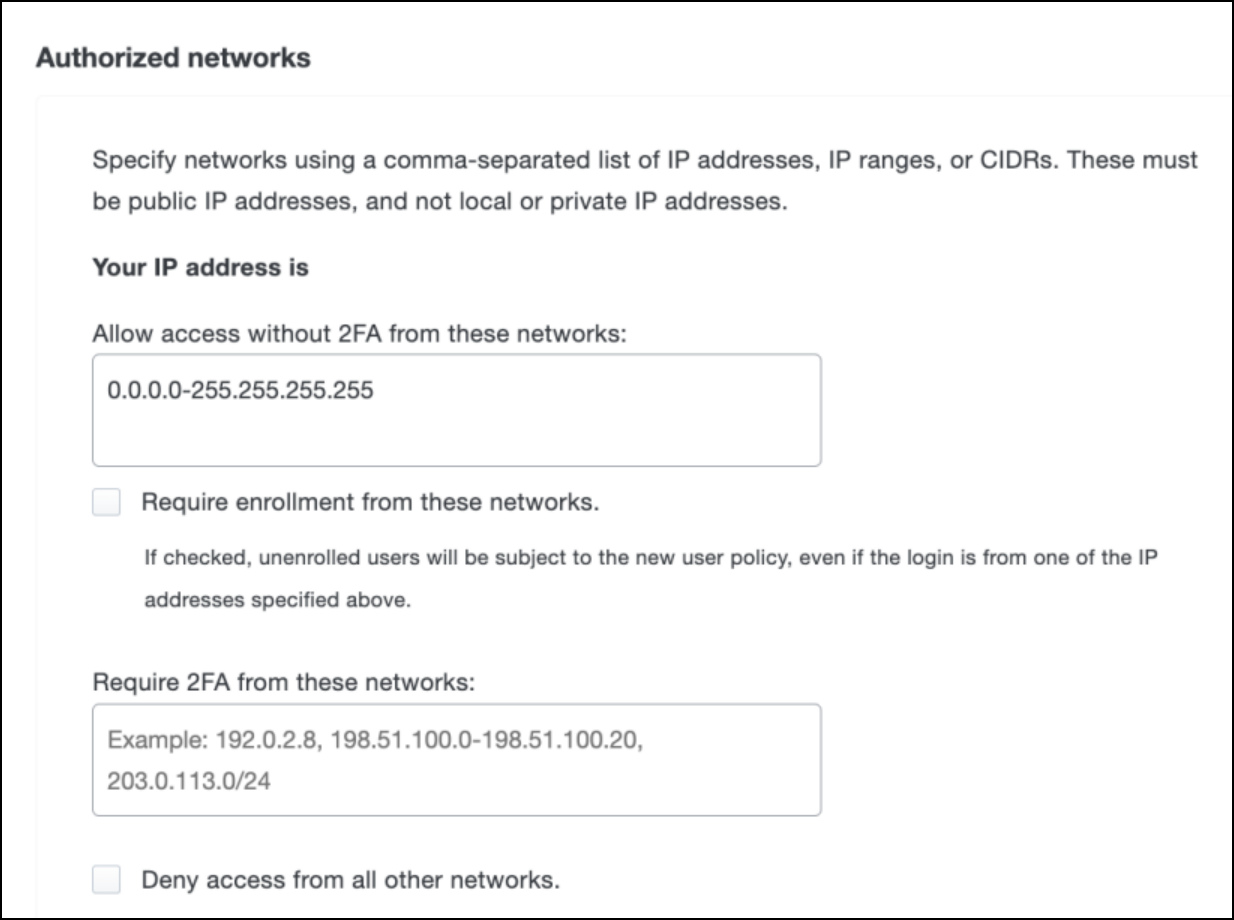
f. Click Save Policy.
In Duo, navigate to Applications menu and scroll down to choose the Web SDK application you created to protect SEA Plus.
Navigate to the Policy section and click Apply a policy to all users.
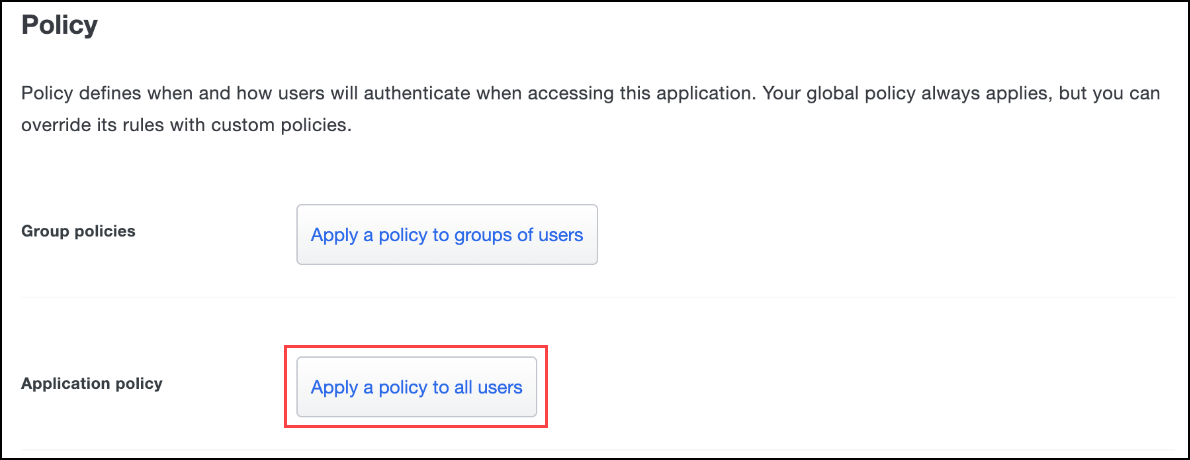
Choose the newly created Policy (SEA Plus) from the drop-down menu.

Click Apply Policy.
Scroll to the bottom of the page and click Save.
Enable Duo integration in SEA
Open IoT OD in a separate page so that both Duo and SEA can be open at the same time. Then continue with Enable Duo Integration in SEA step 1.
Note: You must have SEA System Admin role privileges.
In IoT OD navigate to Secure Equipment Access and choose System Management > External Integrations tab.

Click Add External Integration to open the Add External Integration panel.
Choose Duo from the Integration Type drop-down list.
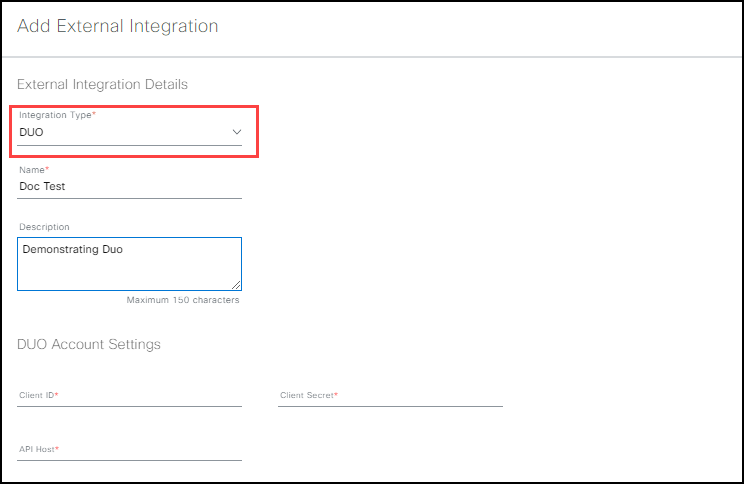
Type in an appropriate Name.
(Optional) Type in a relevant Description.
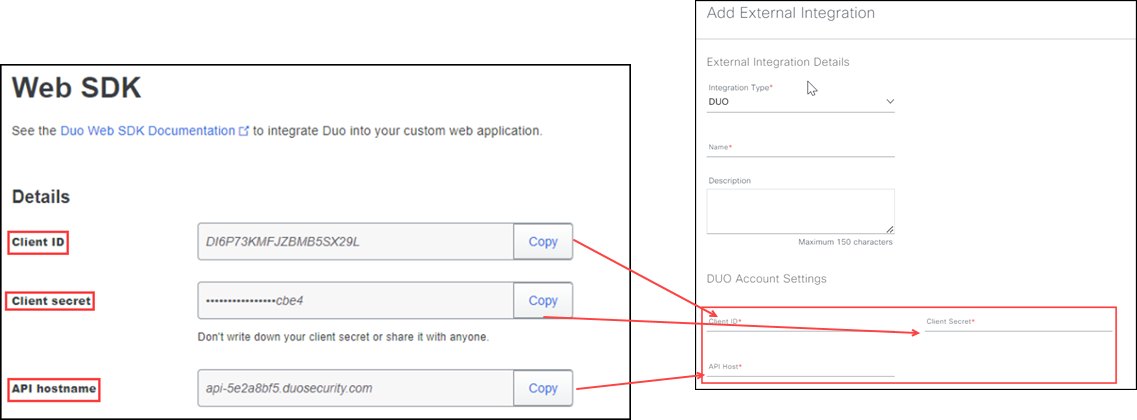
Note: Switch back to Duo and in Applications > Details to retrieve the Client ID, Client secret, and API hostname. Beside each field, click Copy (the lettering switches to Copied), then switch to back SEA and perform a paste on the appropriate field.
(Required) Enter the Duo Account Settings from the SEA Plus application created in Duo:
- Paste the Client ID (Alphanumeric Duo application key).
- Paste the Client Secret (Alphanumeric Duo application password key).
- Paste the API Host (API server that is validating the login request).
When finished, click Add Integration (bottom right). The Enable External Integration prompt opens stating that enabling the new integration record will disable any previously enabled Duo Integration. With the Duo integration enabled, you can now activate SEA Plus with the integrated Duo posture check.
Note: SEA allows only one active integration type (for example, Duo) at a time.
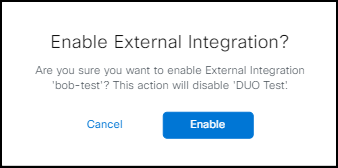
IMPORTANT: The external integration for Duo allows adding multiple Duo accounts to SEA Plus, for example, for troubleshooting purposes. But only one Duo account can be chosen as Active in SEA Plus at any moment.
Verify SEA Plus and Duo are integrated
- In IoT OD, from the left pane, click Secure Equipment Access > System Management.
- Click the External Management tab.
- Verify that the Duo integration is Active.
