Enable and Manage EI Agents
Alert: Cisco has made the end-of-life (EOL) announcement for the Cisco Edge Intelligence.
Cisco Edge Intelligence is enabled by installing the EI Agent software on your Cisco network devices. The EI Agent is a Cisco IOx app that runs on Cisco network devices such as the IR809, IR829, IR1101, IR1800, IE3400, and IC3000.
In this release, enable the EI Agent on your network devices using Cisco Field Network Director (FND), Cisco IoT Operations Dashboard (OD), or the Local Manager. EI Agent details cannot be modified from EI.
Note: Previously installed EI Agents must be updated to the latest version to ensure full feature compatibility with the Cisco EI cloud software. See Upgrade EI Agents.
The following table summarizes this multi-step procedure.
| # | Step | Description |
|---|---|---|
| 1 | Download EI Agent (IOx application) | Go to Cisco Software Download page to download the EI Agent. |
| 2 | Gather input parameters | You need to gather the following specific parameters from the EI web-based management backend: * Access Token * Upstream Configuration URL See: Copy the URL and Access Token |
| 3 | Upload and install EI Agent using FND, EDM (Application Management) | * To use FND, see: Install the EI Agent Using FND * To use EDM, see: Application Management Note: Access to the IoT Dashboard service and Application Management feature is required. Ask your administrator or support representative for assistance if necessary. * To use Local Manager, see: Install the EI Agent Using Local Manager |
Gather the EI Agent app and required parameters
Download the EI Agent (IOx Application)
To download EI Agent that will be installed on your Cisco network devices, go to Cisco Software Download page.
Copy the URL and Access Token
In the EI Agents > Enable EI Agents page, copy the upstream URL and generate an access token. Both are used when adding the EI agent to a network device in FND, IoT Dashboard, or Local Manager.
This feature requires the access permission “Operations management”.
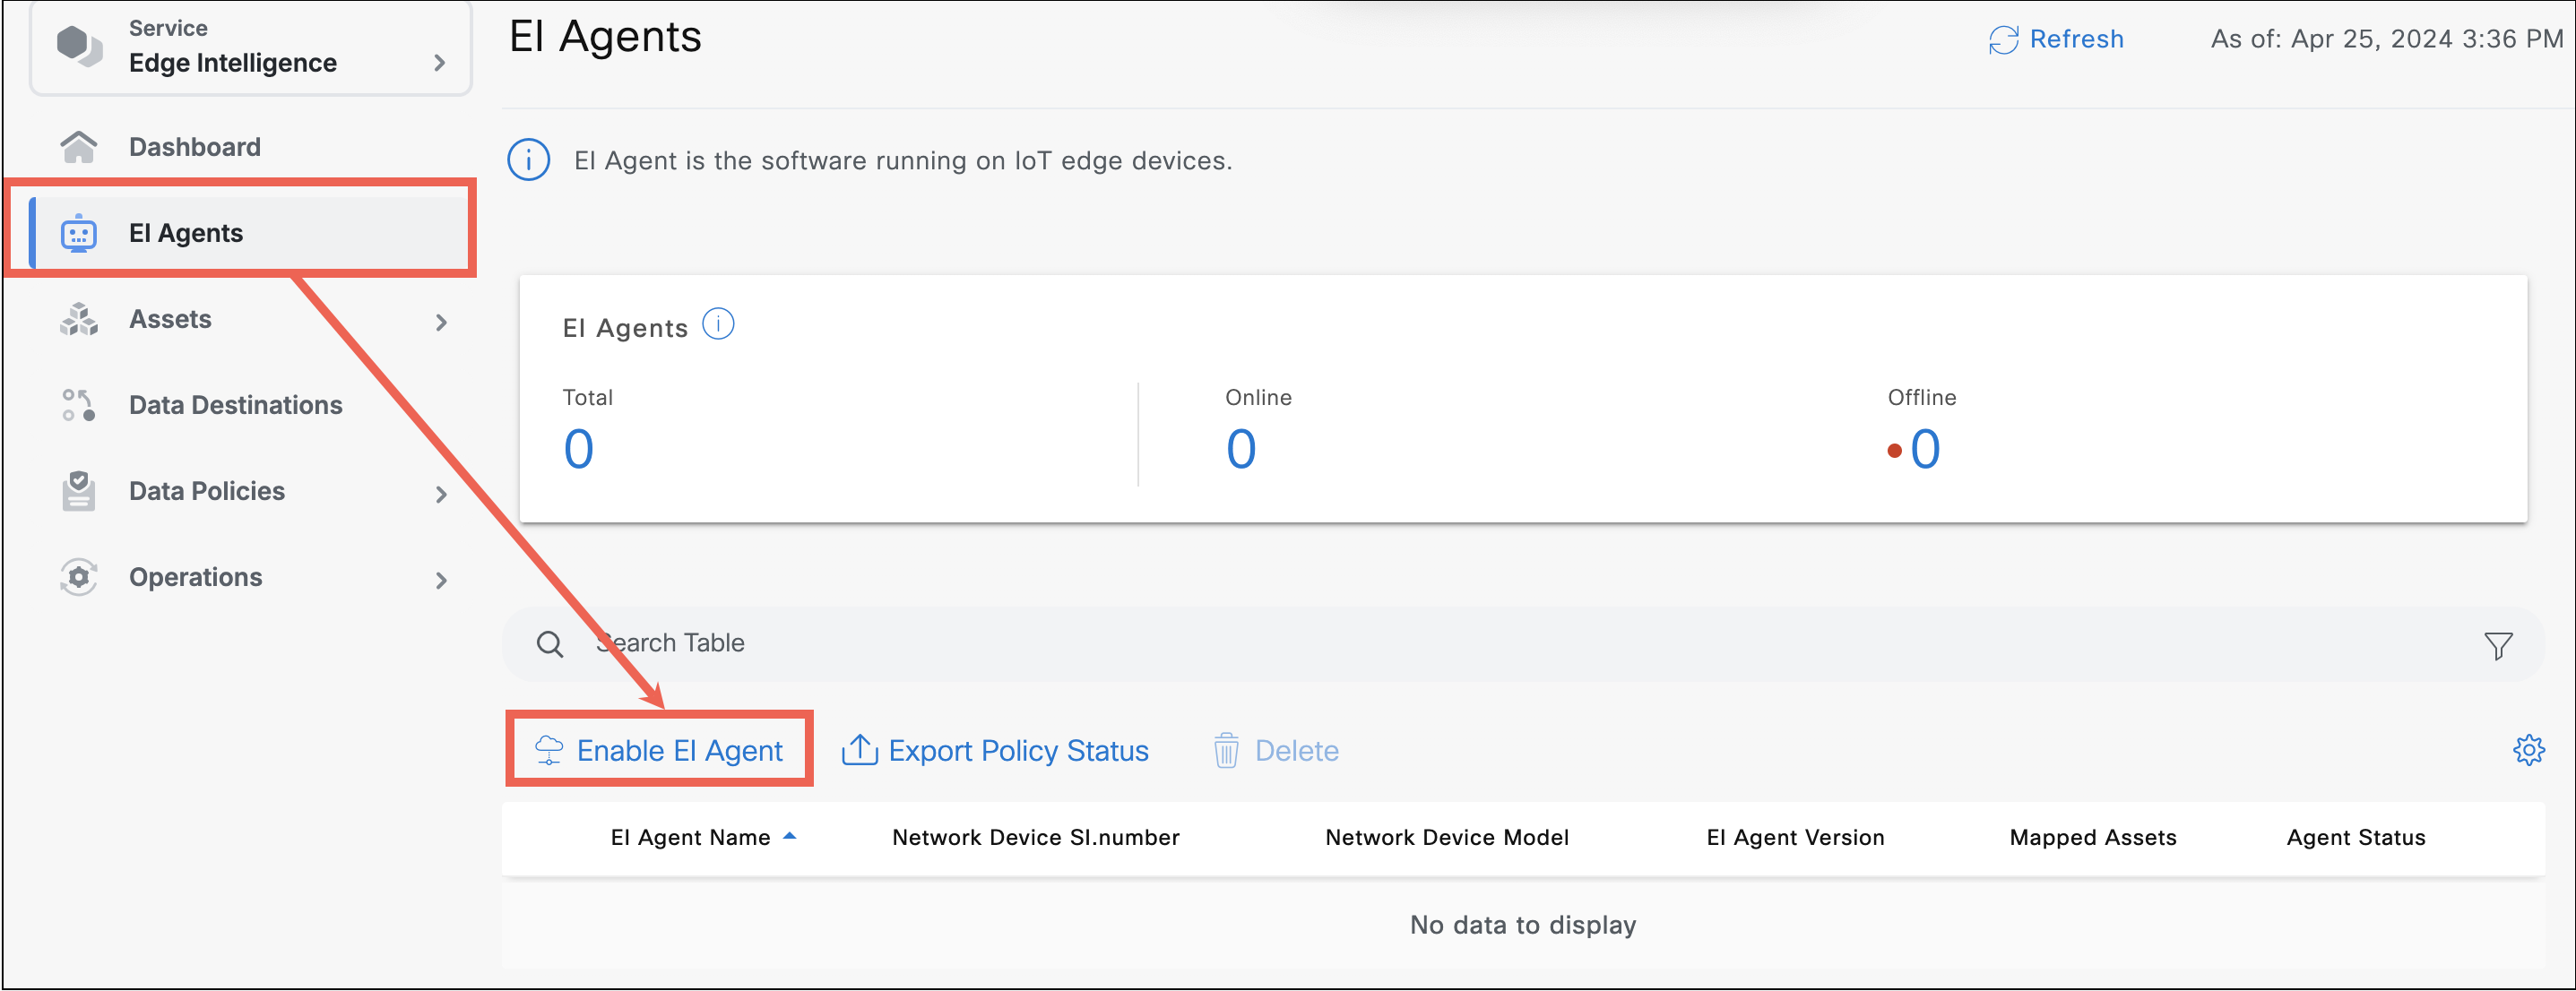
- In EI, from the left menu, click on EI Agents > Enable EI Agent.
- In the Enable EI Agent page:
- Download EI Agent IOx Image package that will be installed on the network devices.
- Copy the URL and generate an access token.
- In the Edge Intelligence Url field, click Copy to copy the auto-generated URL.
- In the Token field, click Generate to generate a token and click Copy to copy the token for use in FND, EDM or Local Manager.
Note: The generated token can be used to connect an EI Agent to Cisco IoT EI. It is valid for 24 hours OR up to 10 activations (whichever comes first). Tokens are not stored or managed in EI. Copy and save the token until no longer needed.
Upload and Install the EI Agent
Install the EI Agent Using IoT Dashboard
You can use the IoT OD Edge Device Manager (EDM) to install the EI Agent.
Tip: For more information, see Application Management.
Prerequisites
You must have the following:
- Access to the Edge Device Manager service.
- You must belong to a user role that includes the Application Management permission. For example: Device Operator.
Procedure
Before you begin:
- Download the EI Agent application package to a local or network drive.
- Log in to the IoT Dashboard.
- Under Services, select Edge Intelligence, if necessary.
- Click EI Agents > Enable EI Agent and copy the EI Agent URL and Access Token. Learn more
Add the application to EDM.
- Under Services, select Edge Device Manager.
- Click Applications > Add Application.
- In the popup window, choose the file or drag and drop the EI Agent file from your local/network drive.
- Click Upload.
- Wait for the process to complete and close the dialog once the operation is completed. On successful upload, the uploaded application version will be visible in the inventory.
Deploy the EI Agent to your edge devices:
- Click on the application you just uploaded.
- Select the devices where the application needs to be installed and click Next.
- In the Configure application tab, under Device Configuration, select the device name:
- Only serial ports can be selected; USB is not supported.
Scroll down Application Specific Parameters.
Next to broker_upstream, enter the EI Agent URL and Access Token values you obtained in Step 1.
Click Next and review your settings.
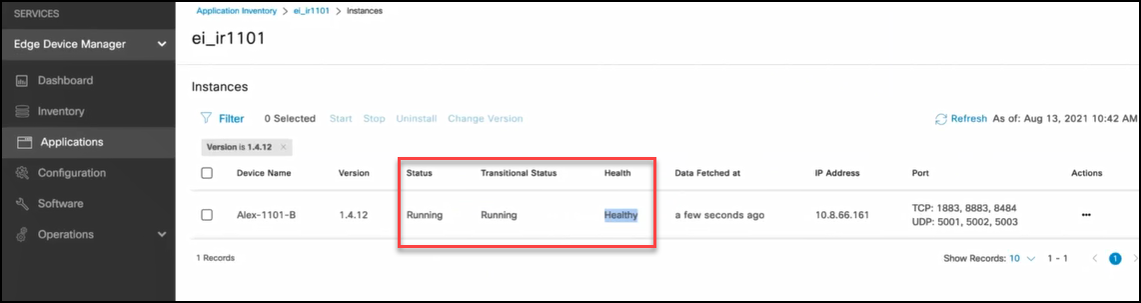
Click Finish. The devices now appear in the Instances page with appropriate status.
Note: Wait for the process to complete, which can take a minute or more based on your network connectivity.
Click Refresh to see the latest status. When the EI Agent is running on the network device, you should see the following:
- Status: Wait for the application status to change from "Deploying" to "Running". This means the EI agent was successfully copied to the device and is running.
- Health: "Healthy" means the app on the network device is communicating with the IoT Operations Dashboard.
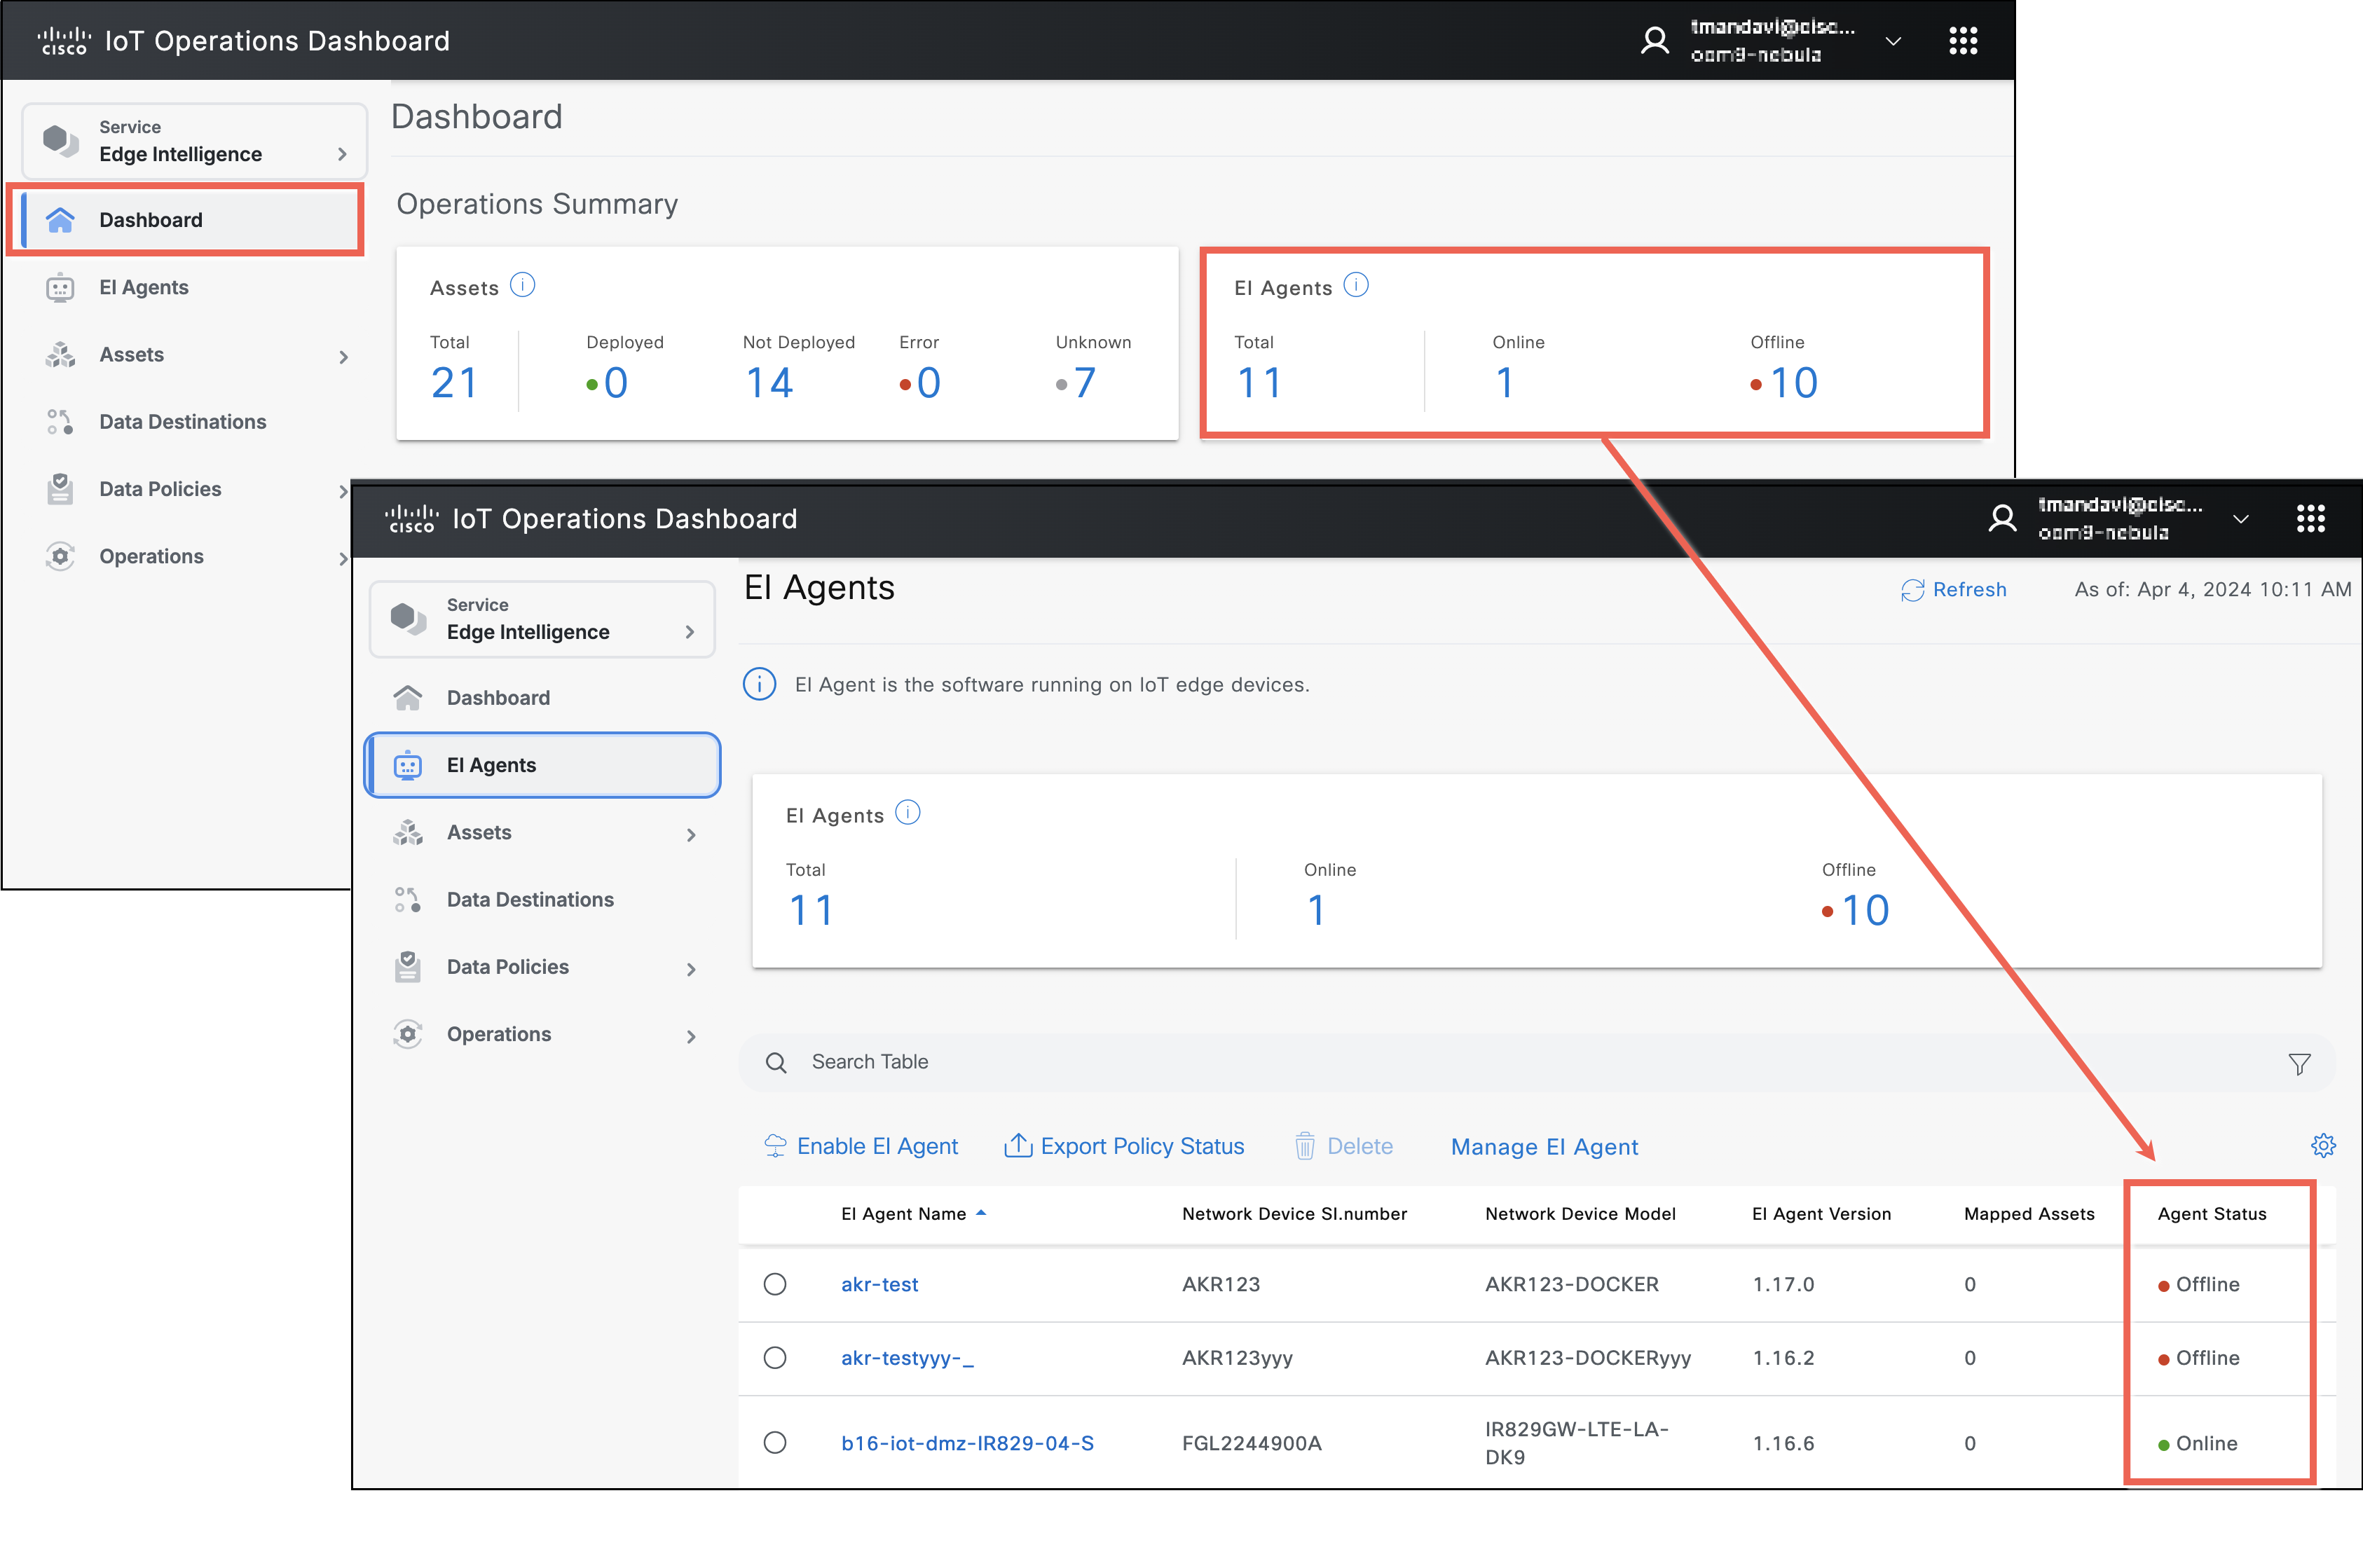
In Edge Intelligence, verify the EI Agent is successfully deployed:
Under Services, select Edge Intelligence.
In the EI dashboard, you should see an additional EI Agent in the summary. You may need to refresh your browser window.
Click the Total number (in blue) to open the details page.
Verify that the EI Agent you just installed appears in the list with the Agent Status "Online". "Online" means the EI Agent running on the device is communicating with the IoT Dashboard.
Installing EI Agent on IE Switches with IoT OD
Installing EI on IE Switches is the same as installing EI on an OD-Managed device (see Introduction to Edge Intelligence: Overview). However, there's one difference: when setting up the IE Switch, make sure to specify the VLAN where the EI ethernet interface will go. The chosen VLAN should possess the following functionalities:
- DHCP services to assign EI interface an IP address.
- Default route for EI to reach the internet and IoT OD cloud.
- DNS IP address resolution to resolve the host names of IoT OD and any other hosts the EI will be configured to connect.
Note: Unlike the VLAN configuration for SEA, you should utilize the VLAN configuration feature in Application Management instead of the EI service.
In the example below, we add EI to an industrial switch (IE3400) using VLAN 20. This VLAN provides all the services described above to ensure EI can register to IoT OD. After installation, the EI agent should appear online in the EI Service pane of IoT OD. Enable EI agents, and configure EI assets, data policies, and data destinations (see Using EI). If this EI agent connects to devices on VLAN other than 20 (for example, 21), the EI IP should have a layer 3 route (forward and return) to reach devices on VLAN 21 for successful communications.
Install EI Agent on Unmanaged Devices with IoT OD
Installing EI on unmanaged devices is the same as installing EI on an OD-Managed device (see Introduction to Edge Intelligence: Overview). However, there's one difference: when setting up the IE Switch, make sure to specify the VLAN where the EI ethernet interface will go. The chosen VLAN should possess the following functionalities:
- DHCP services to assign EI interface an IP address.
- Default route for EI to reach the internet and IoT OD cloud.
- DNS IP address resolution to resolve the host names of IoT OD and any other hosts the EI will be configured to connect.
Note: Unlike the VLAN configuration for SEA, you should utilize the VLAN configuration feature in Application Management instead of the EI service.
In the example below, we add EI to an industrial switch (IE3400) using VLAN 20. This VLAN provides all the services described above to ensure EI can register to IoT OD. After installation, the EI agent should appear online in the EI Service pane of IoT OD. Enable EI agents, and configure EI assets, data policies, and data destinations (see Using EI). If this EI agent connects to devices on VLAN other than 20 (for example, 21), the EI IP should have a layer 3 route (forward and return) to reach devices on VLAN 21 for successful communications.
Install the EI Agent Using FND
Before you upload and install the EI Agent in FND, ensure that you have finished downloading the EI Agent IOx application. These steps are outlined in Gather the EI Agent app and required parameters.
Note: An accurate upstream configuration is an important requirement for establishing a network device connection to the EI portal.
- Register the device in FND. Refer to the procedure outlined here.
- Login to FND.
- Click APPS > Import Apps. Then, upload the IOx application (.tar.gz).
- In the right pane, click Install.
- Select the device on which the IOx application needs to be deployed. Click Next.
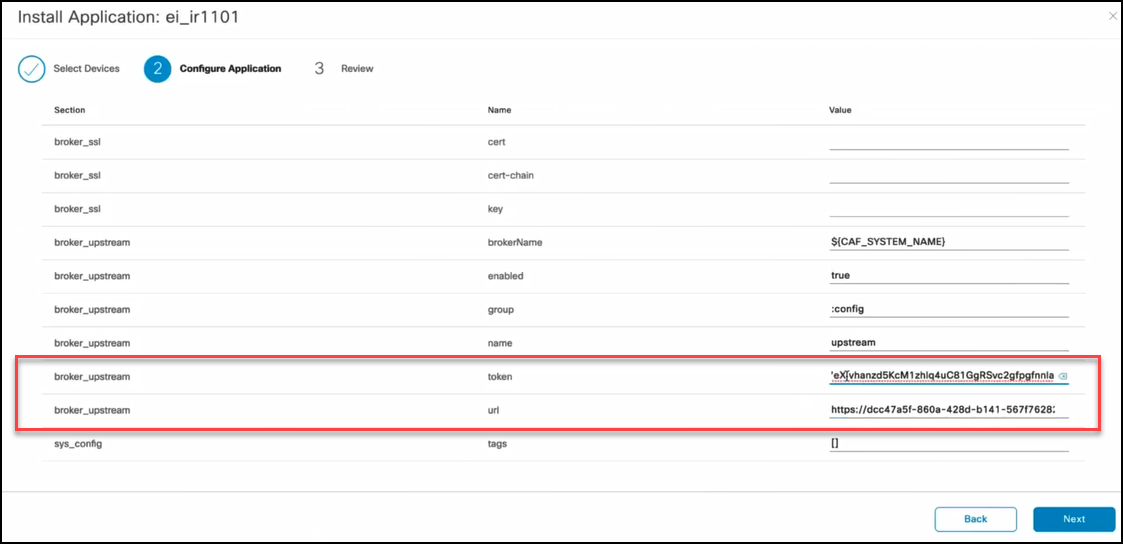
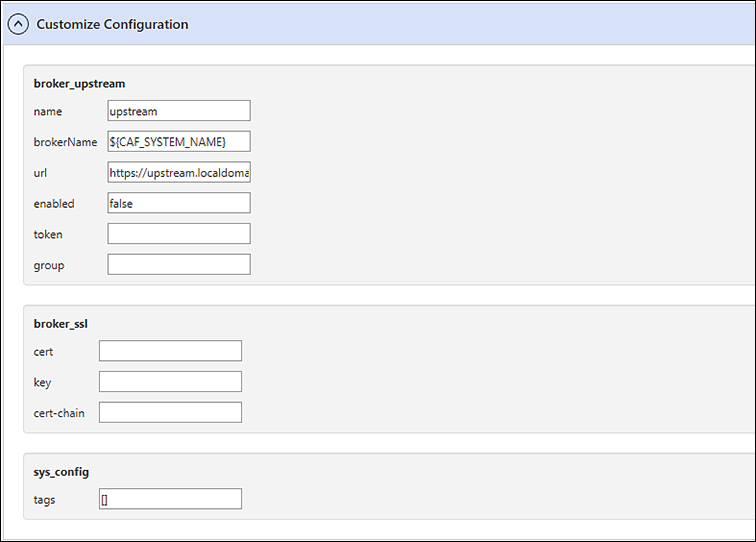
- The Installation Summary page appears. Under Customize Configuration, complete only the broker_upstream section with the following information:
| Field | Description |
|---|---|
| Group | Enter the following text:”:config” |
| Enabled | Set this value to “true” |
| brokerName | You can do one of the following: * Do not make any changes and the system will populate the device name such as "${CAF_SYSTEM_NAME}", which is a combination of network device model number and network device serial number. For example: IR829_FTX2112Z0EL. * Enter a name of your choice. This name will uniquely identify the device in the EI UI. |
| token | Enter the value that you obtained from the previous section: Copy the URL and Access Token. |
| url | Enter the value that you obtained from the previous section: Copy the URL and Access Token. |
| name | You can either change this field or leave as it is. |
As an example, refer to the following screenshot.
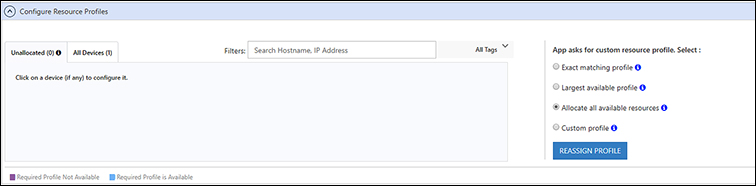
- Next, under Configure Resource Profiles, select Allocate all available resources. Refer to the following screenshot.
The network configuration is specific to the Cisco network device type being configured.
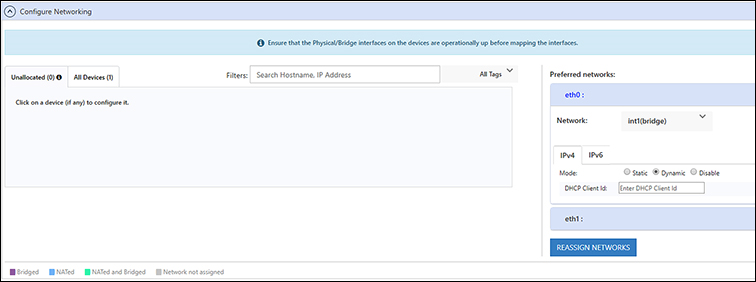
- For the industrial routers the application package will configure two network interfaces – one for northbound communication and one for southbound communication.
- For IC3000, map eth0 to int1 (bridge), eth1 to int2 (bridge) and eth3 to iox-nat_docker. The configuration of eth0 and eth1 can be done via DHCP, or using a static and manual configuration. The interface eth0 is conceptually meant to connect to the internet to provision data as the northbound interface of the architecture. The interface eth1 is the southbound counterpart and is meant to connect internally to the data originators. The third interface eth2 is an internal interface and will not communicate outside of the network device.
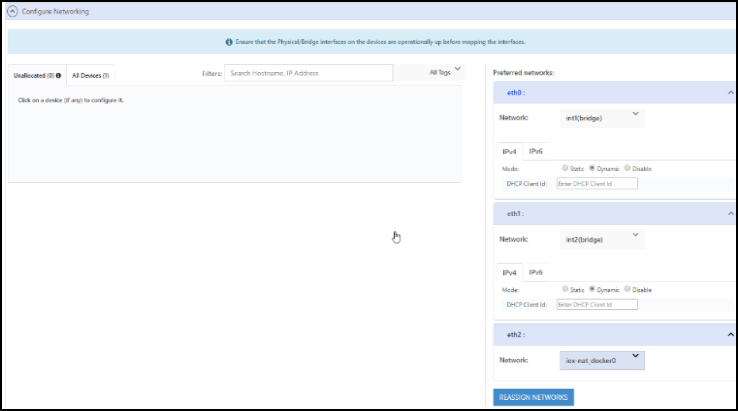
Important: This is a critical network configuration step. The application will not function as expected if the network interfaces are incorrectly mapped.
Do not make any changes under Configure Action Plan. Refer to the following screenshot.
- For IC3000: In Runtime Options section, type -e "CAF_SS_IP_ADDR=192.168.10.65” in Docker Run Options field.

Note: To configure IC3000 using Local Manager UI, provide the same runtime option.
- Do not make any changes under Network Status. Refer to the following screenshot.

- Do not make any changes under Upload App Data. Refer to the following screenshot.

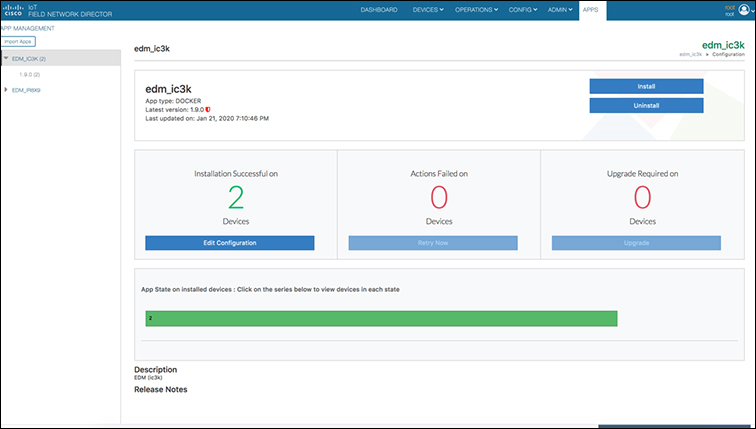
- After successful deployment of IOx application, the count increases for the number of successful installations, as indicated in the following screenshot.
Install the EI Agent Using Local Manager
- Log in to the network device WebUI.
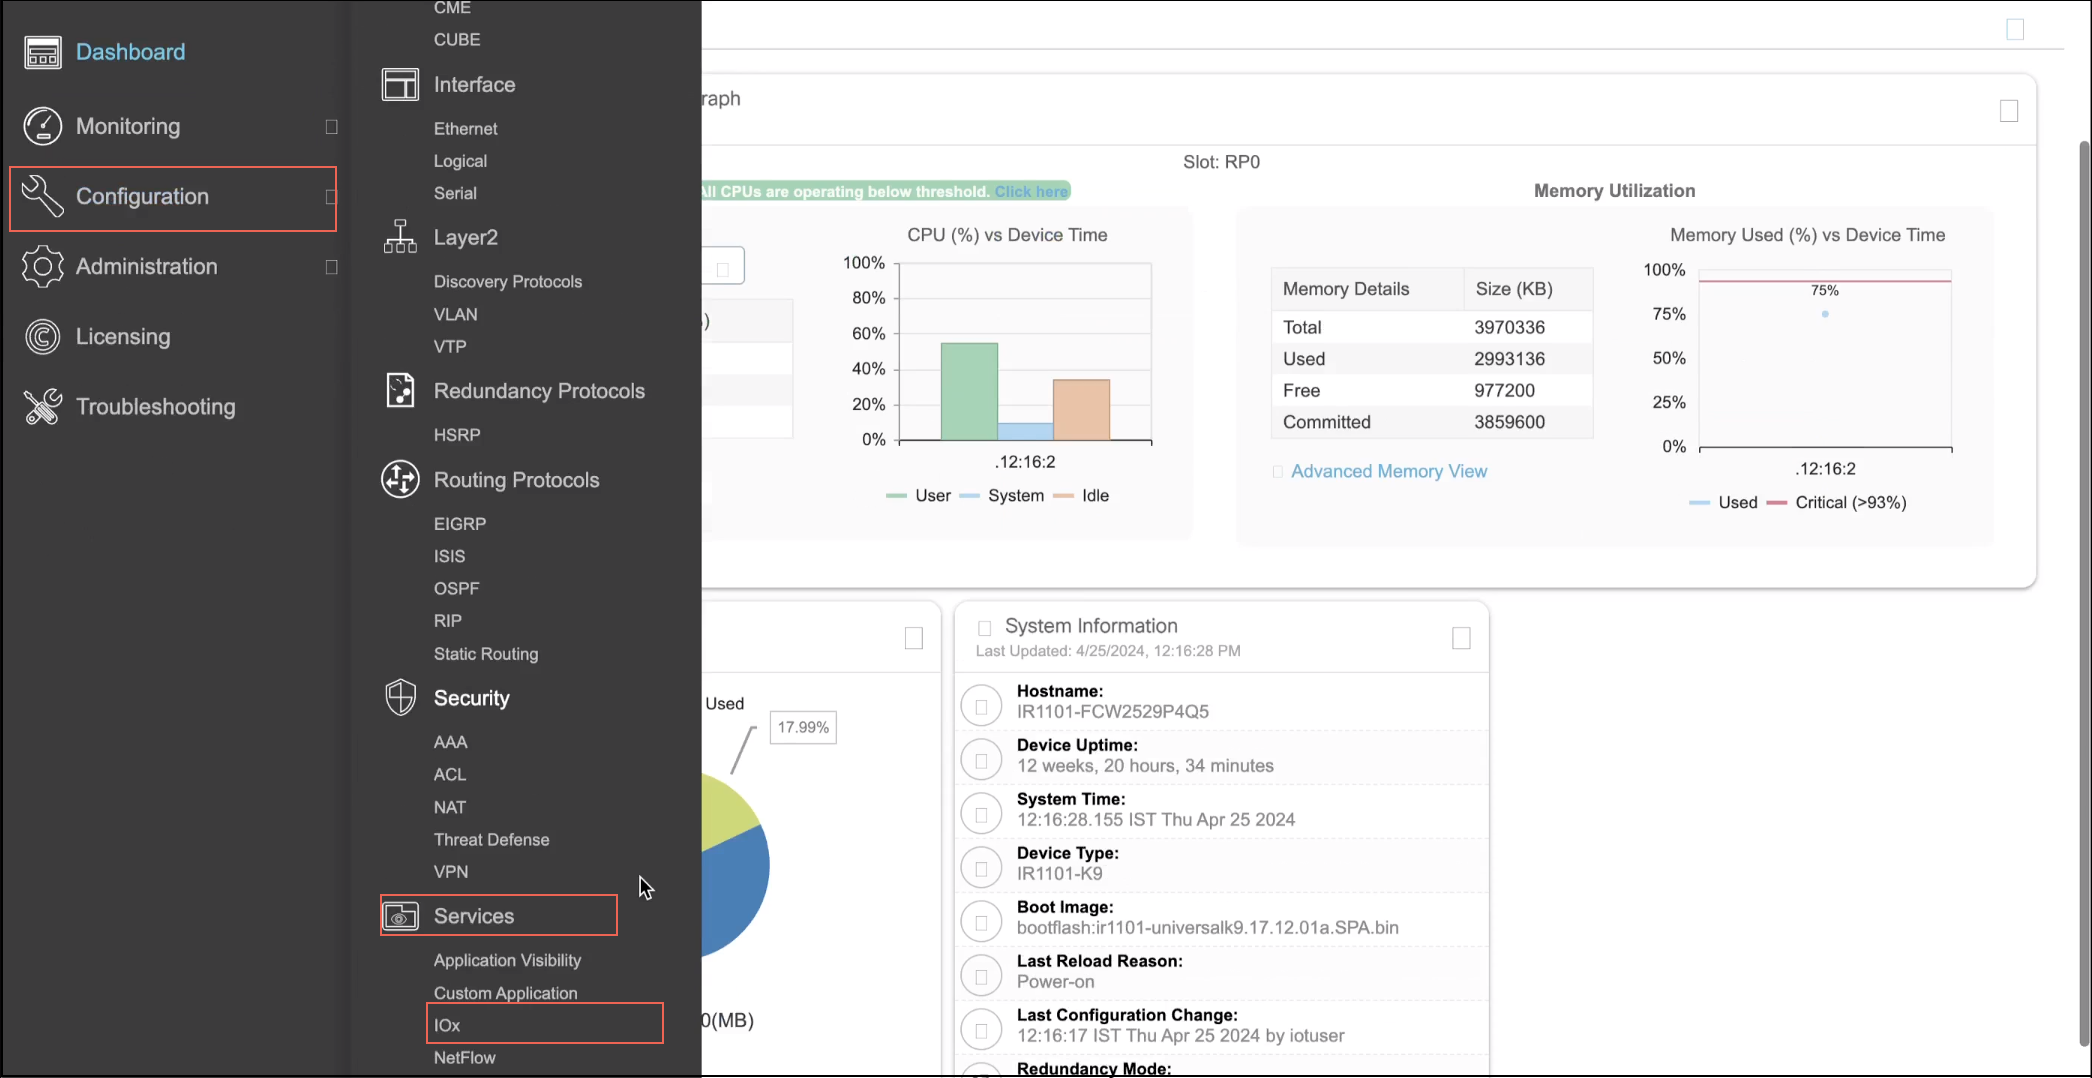
- From the left pane, click Configuration > Services > IOx.
- Log in to the Cisco IOx Local Manager.
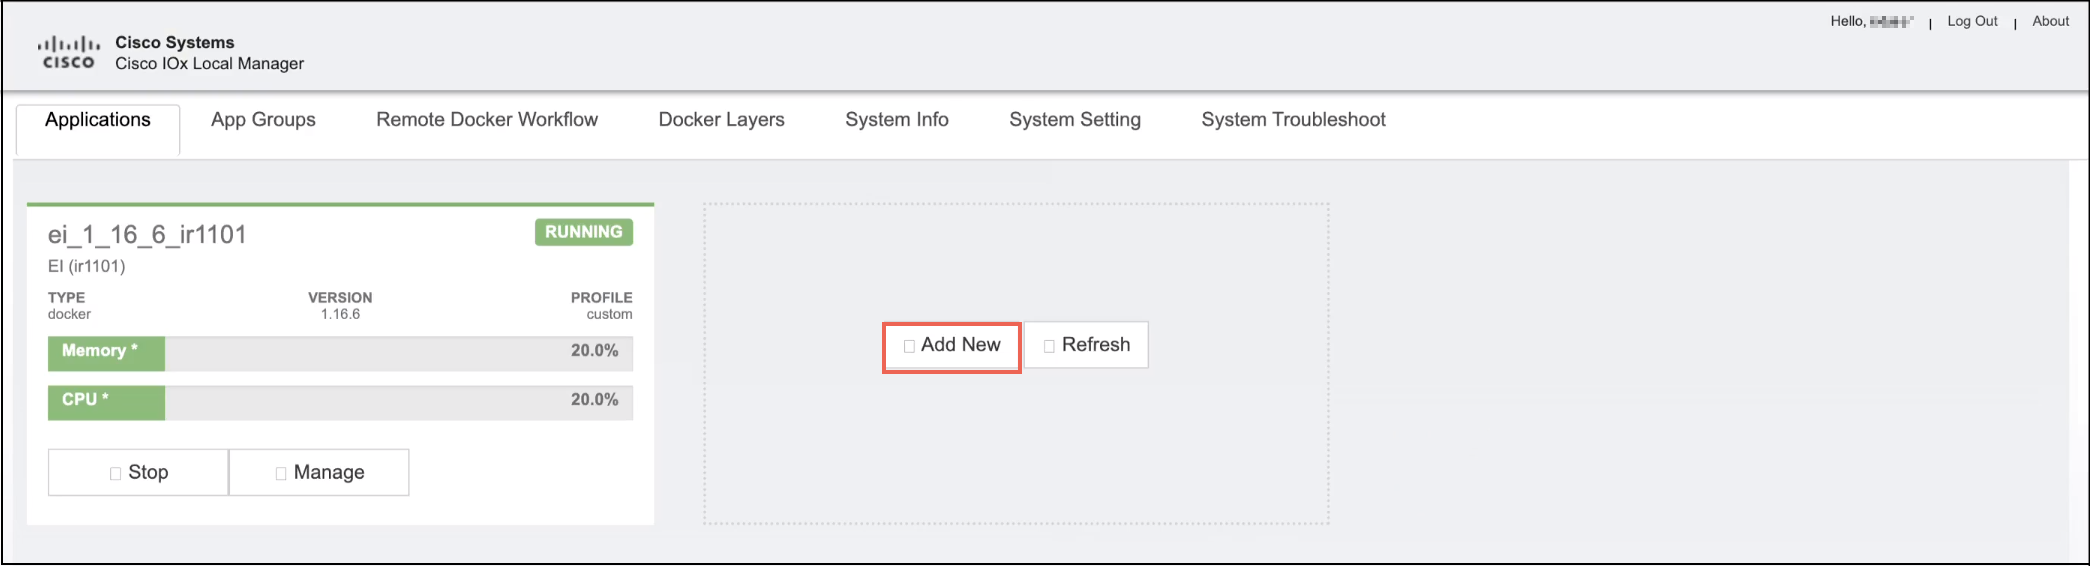
- In the Applications tab, click Add New to install a new EI image. A pop-up appears.
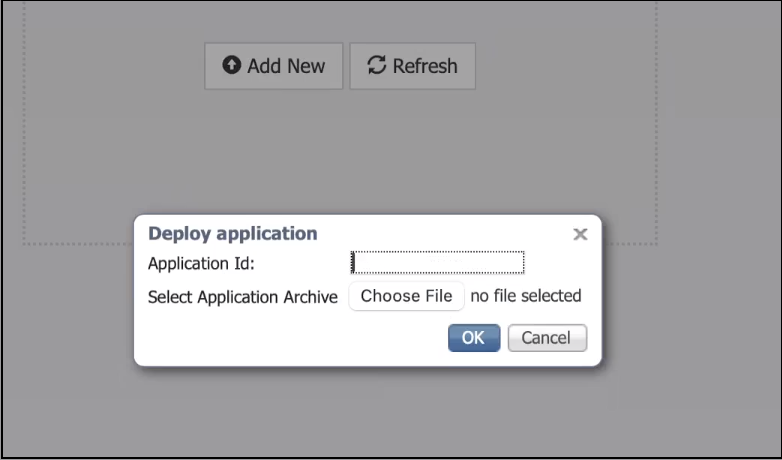
- In the Deploy Application pop-up, enter the EI image name in the Application Id field.
- Click Choose File to select an application image file to be installed in the Select Application Archive field. Then click OK.
Note: It takes a couple of minutes to upload. Do not refresh the browser at this time.
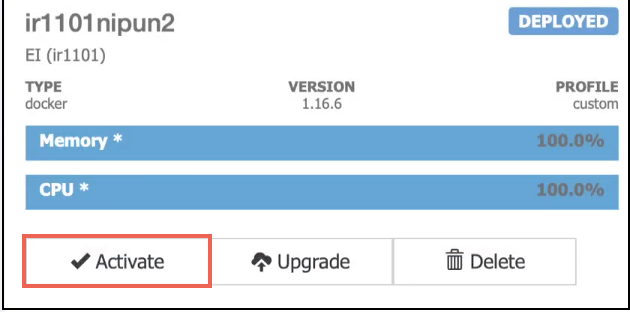
- Now, in the Applications tab, under EI Agents, click Activate to activate the application.
- In the Resources tab under EI Agent, click Activate App in the top right corner of the screen.
Note: It takes a couple of minutes to upload. Do not refresh the browser at this time. If you get a "Peripherals must be present" message, click OK and:
- In the Peripheral Configuration section, click edit in the Action column.
- In the Device Name field, select an appropriate option from the drop-down list and click OK.
- Click OK when a pop-up is prompted and then click Activate App in the top right corner of the screen.
Note: It takes a couple of minutes to upload. Do not refresh the browser at this time.
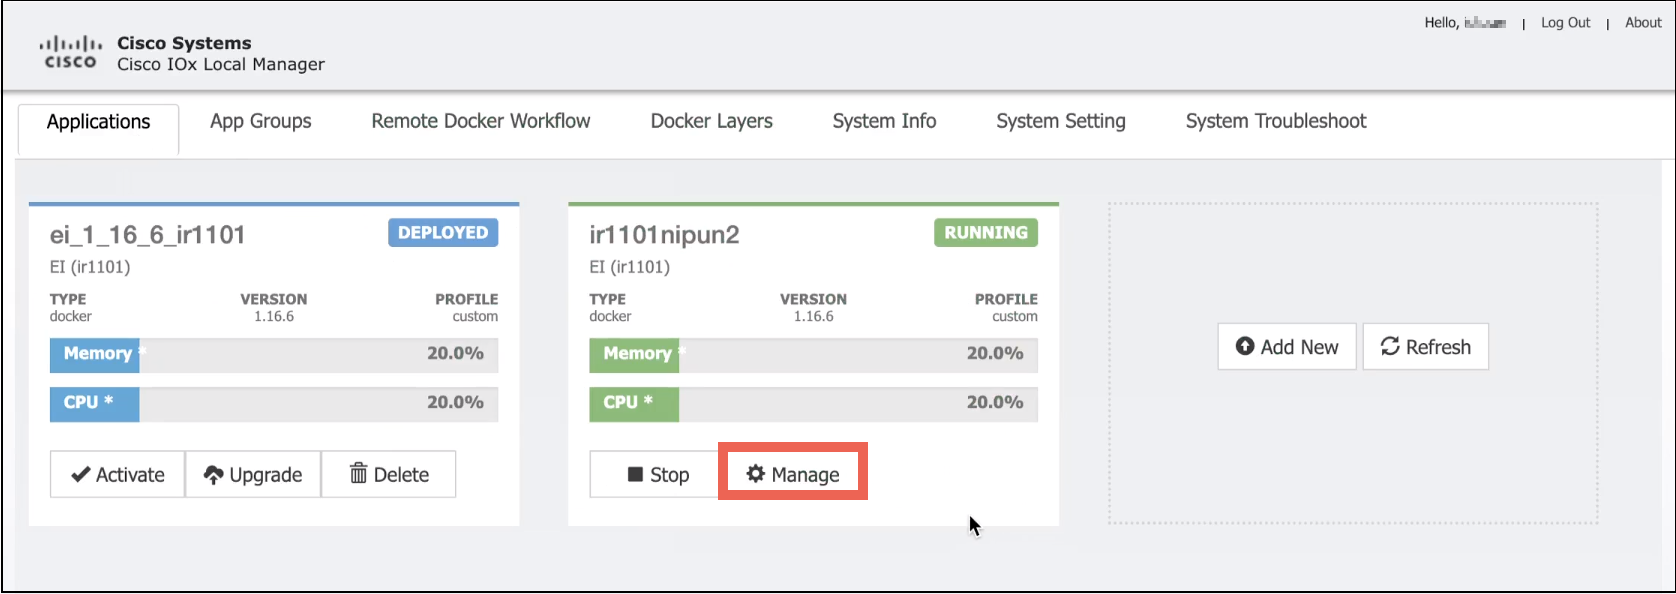
- The application is activated. Now, update the Application Configuration.
- Under the Application tab, in the EI Agent section, click Manage.
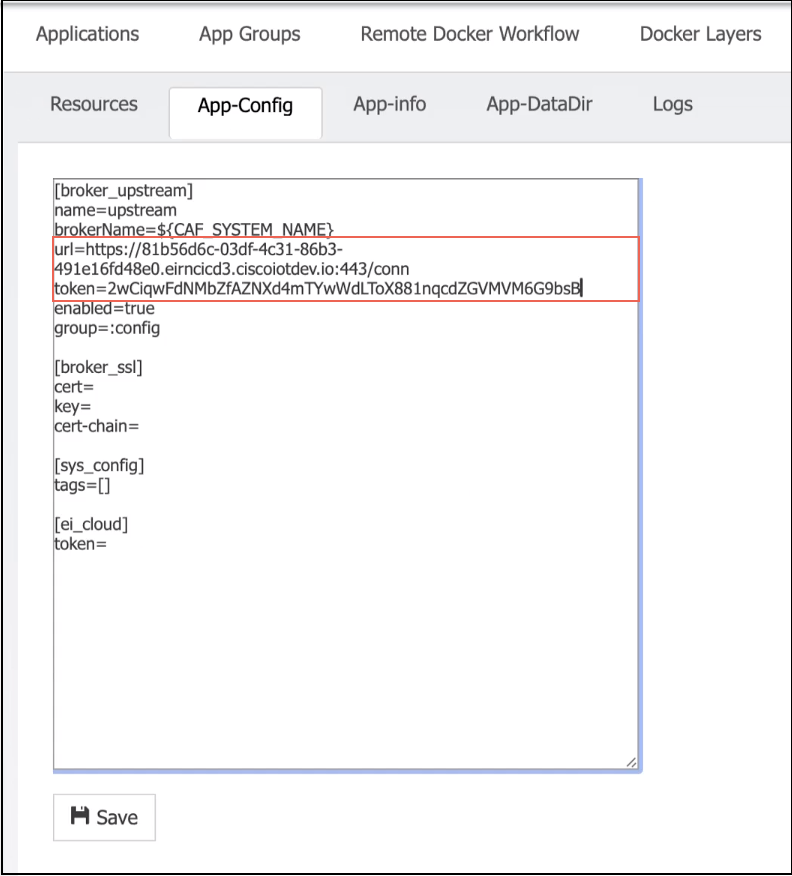
- In the App-Config tab, update the token and url values. See Copy the URL and Access Token.
- Click Save and then click OK when prompted.
- Go back to the Applications tab and click Start in EI Agent.
Note: It takes a couple of minutes to upload. Do not refresh the browser at this time.
- The EI Agent is now installed and running successfully. You can check this in the EI Agents page.
- To stop the application, in the local manager, click Stop in the EI Agent under the Applications tab.
Install the EI Agent on a SD-WAN Managed Device using Local Manager
Cisco Edge Intelligence is enabled by installing the EI Agent software on your Cisco network devices. The EI Agent is a Cisco IOx app that runs on Cisco network devices such as IR809, IR829, IR1101, IR1800, IE3400 and IC3000.
Prerequisite
The edge device is managed by SD WAN Manager and follow the below link to configure the device using SD WAN Manager:Cisco Catalyst SD-WAN Getting Started Guide
Once the edge device is onboarded and connected with SD-WAN Manager, additional configuration is required to ensure the Edge Intelligence agent can be enabled on the device. To achieve this, attach the sample CLI template mentioned in the procedure below to the device configuration. This procedure shows you on how to achieve a basic deployment:
Note: In some scenarios, your deployment might require adjustments with specific configuration parameters.
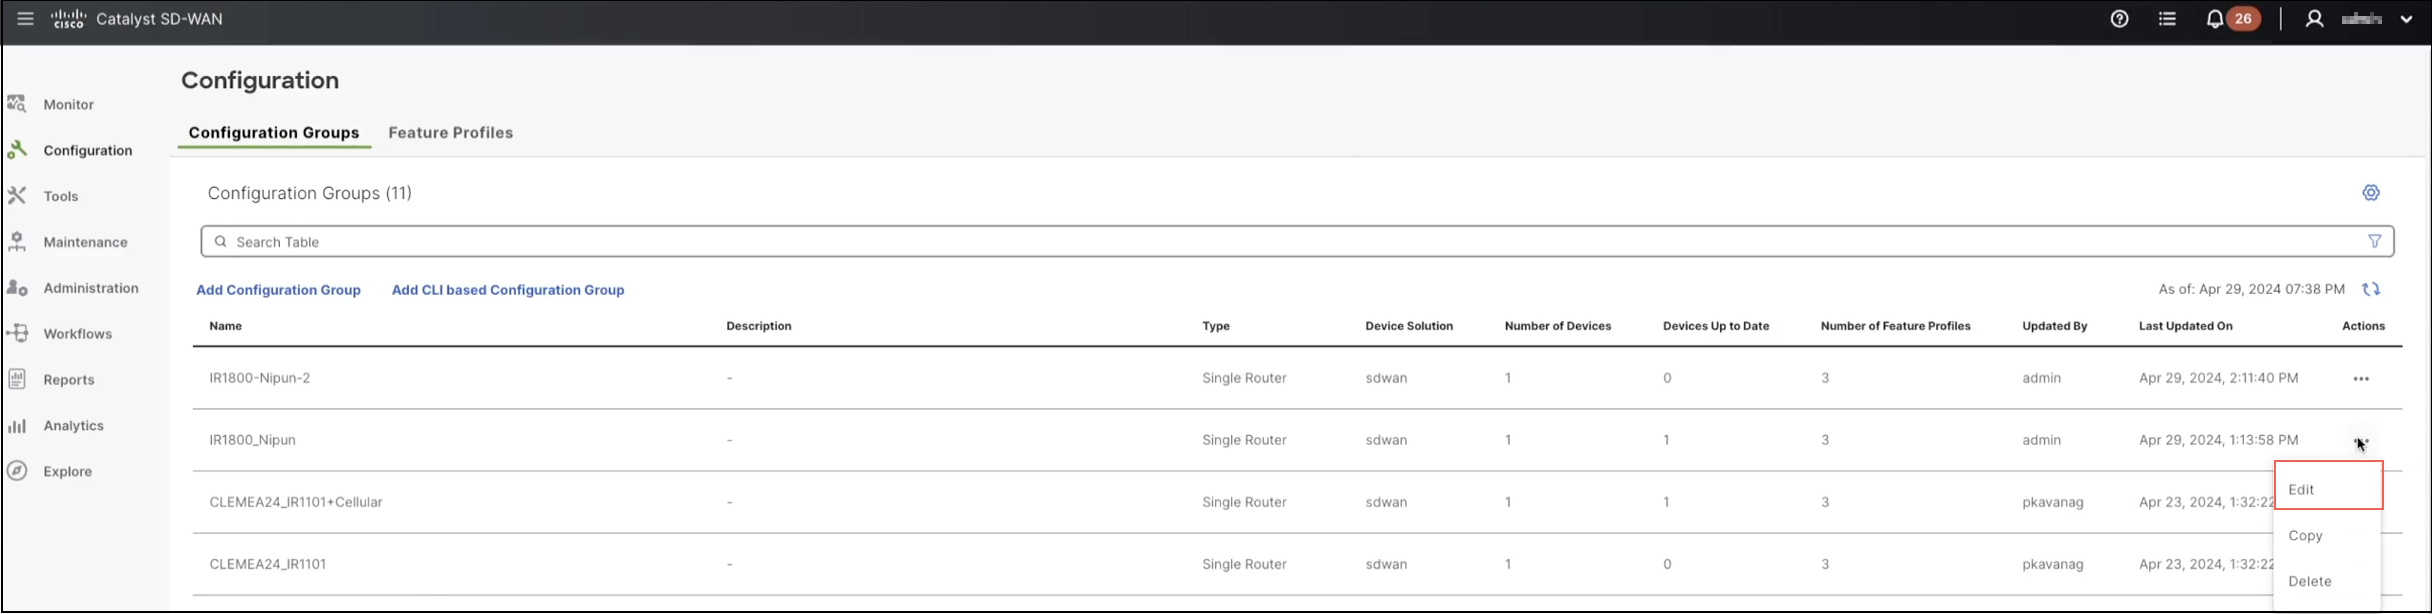
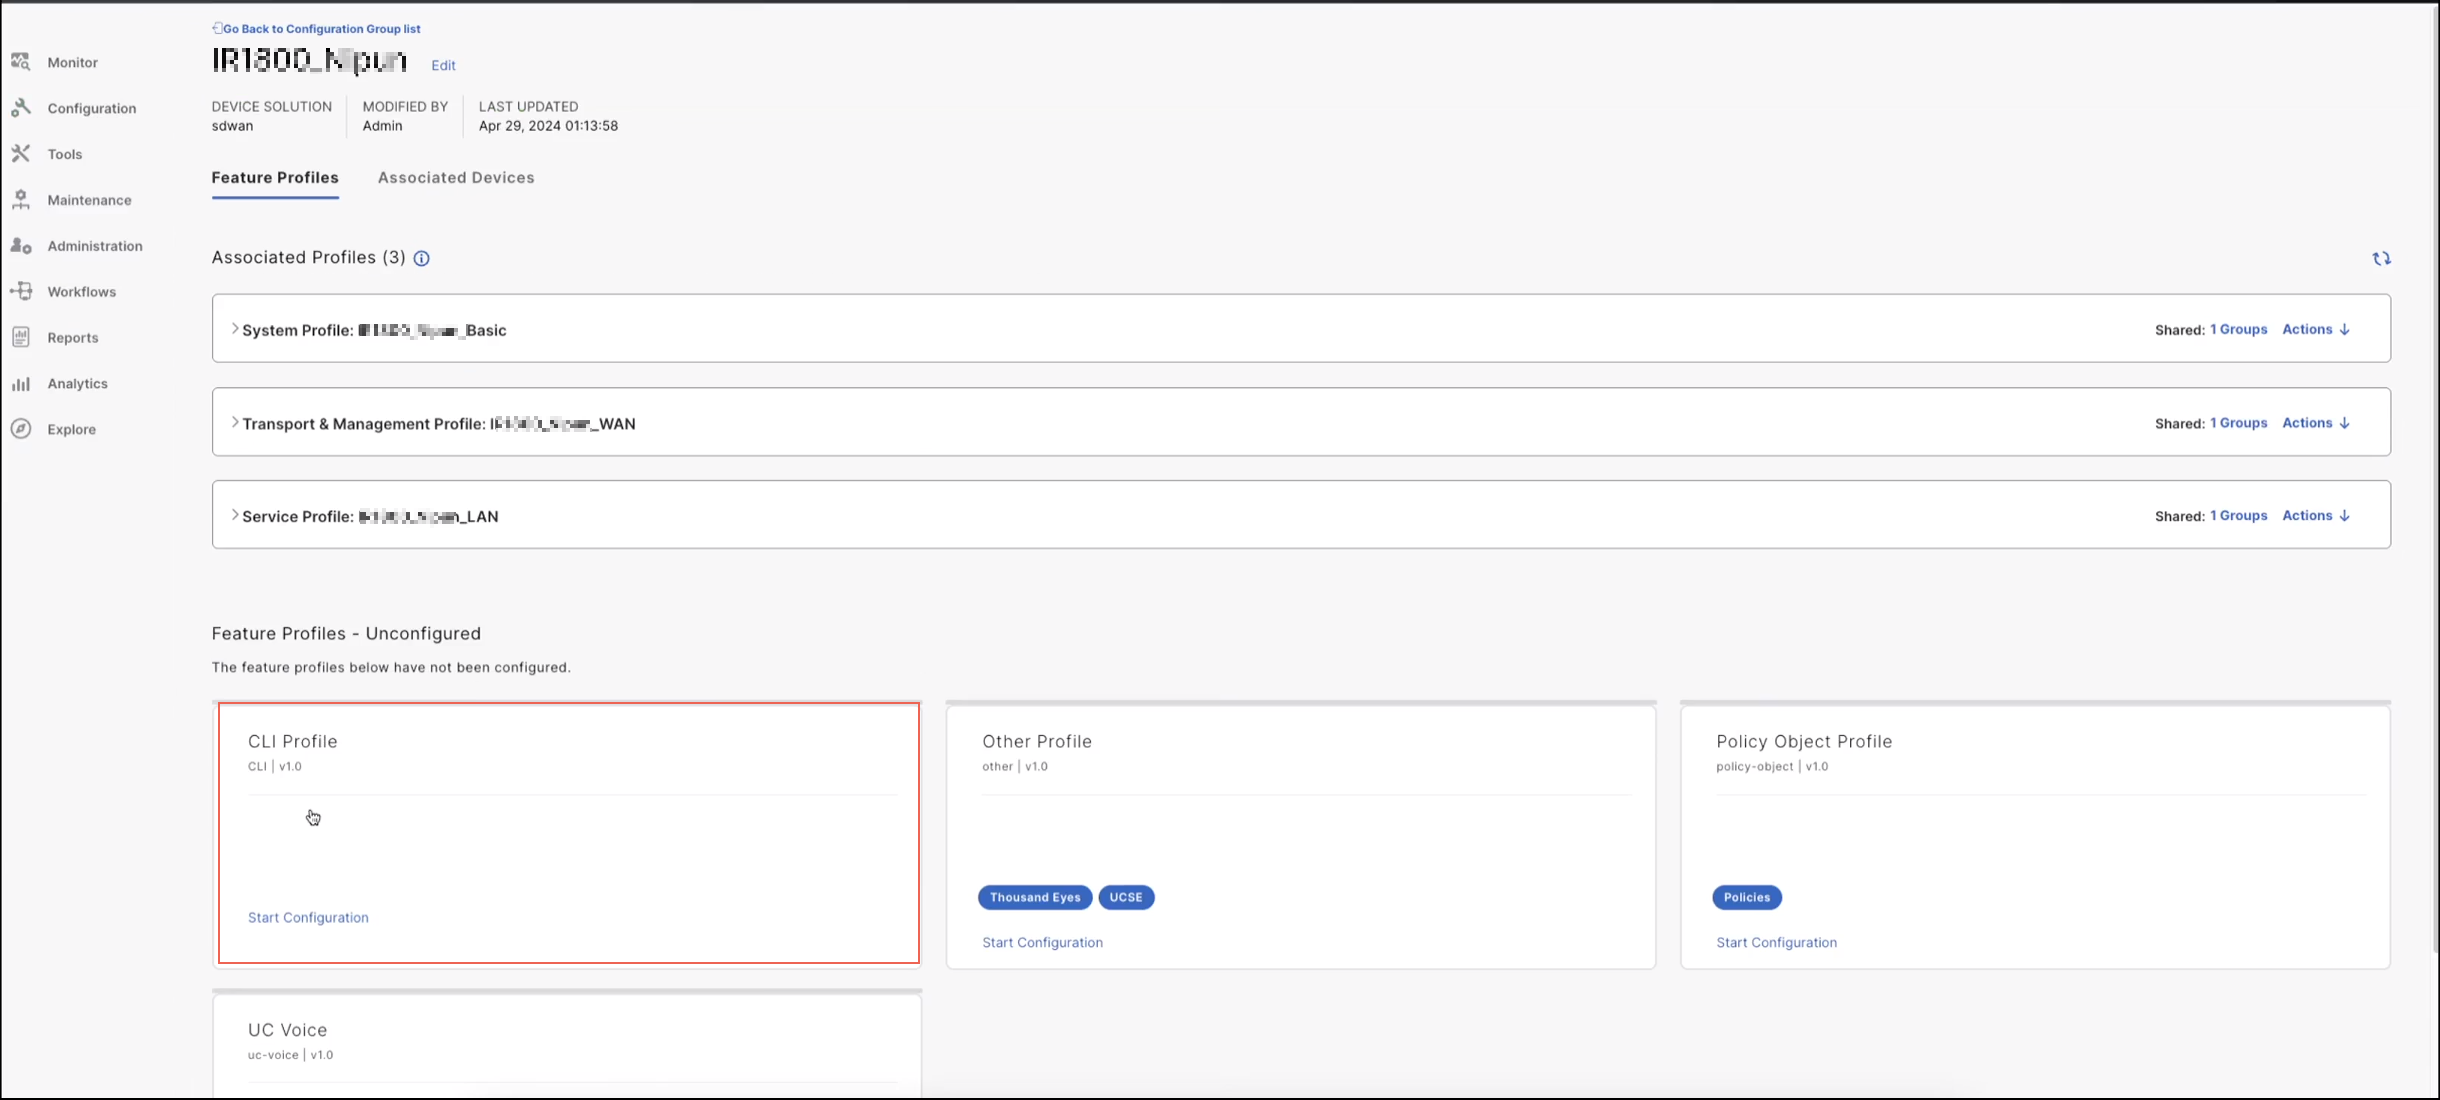
- From the left pane, click Configuration > Configuration Groups.
A list of configuration groups in a table are shown.
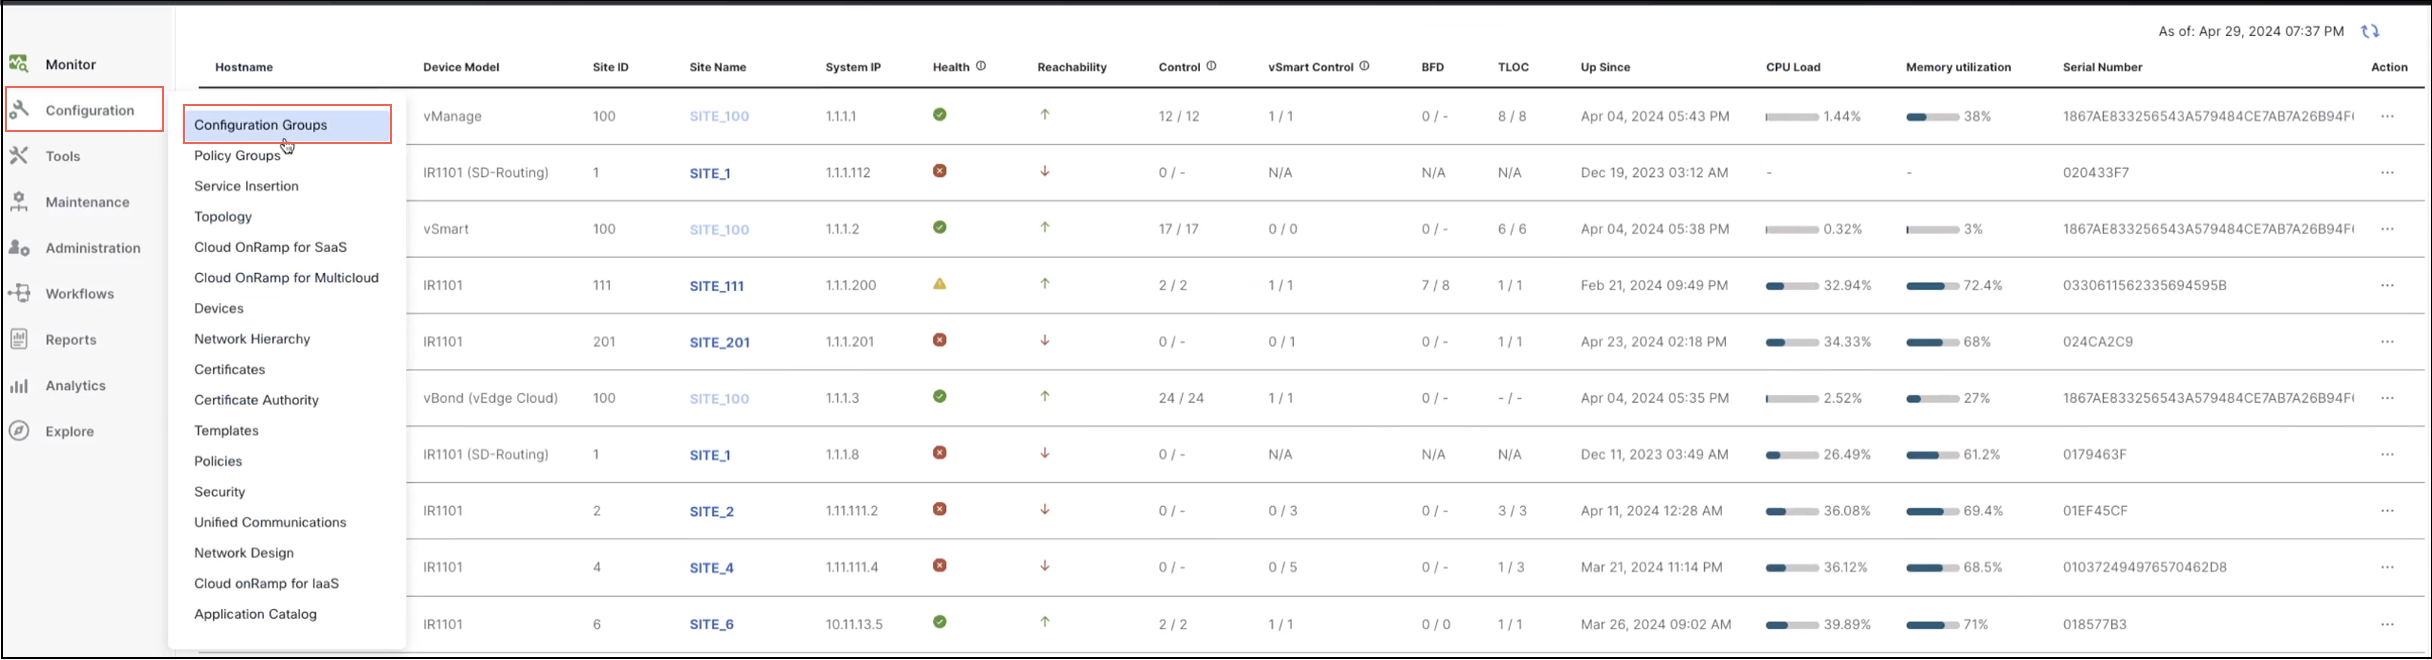
- Select the configuration group, click
 under Actions column and then Edit.
A detailed Configuration Group opens.
- Click CLI Profile to add a new profile for the group.
A pop-up Add Feature Profile appears.
- Select Create New and fill the Name and Description fields.
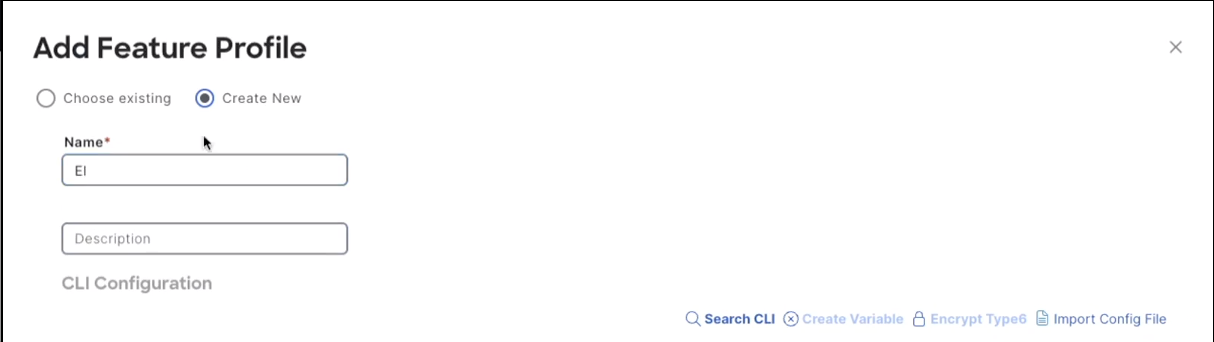
Copy the following commands and paste in the CLI configuration box:
- To configure the IOx DHCP pool (IP addresses of containers):
ip dhcp pool ioxpool vrf 2 default-router 10.11.233.177 dns-server 10.11.233.177 8.8.8.8 network 10.11.233.176 255.255.255.248 exitNote: Make sure the correct
vrfis configured for SD WAN network.- To allow traffic and communication for IOx as part of network allocation table (NAT):
Note: You can also specify the IP range based on the requirement.
ip access-list extended NAT_ACL 10 permit ip any any !- To enable authentication for EI installation through local manager.
ip http authentication local ip http server !- For username and password to access local manager.
Note: This is an example.
username ***** priv 15 password *****- To specify the interface from which traffic comes in:
ip nat inside source list NAT_ACL
interface Cellular0/1/0 overload
In this example, the interface is
Cellular0/1/0
For MODBUS connector, use the following example:!for modbus traffic interface Async0/3/0 no shutdown encapsulation relay-line vrf forwarding 2 media-type rs485 half-duplex exit- To configure virtual port group interface for the IP traffic generating in the network:
interface VirtualPortGroup0 description IOx Interface no shutdown vrf forwarding 2 ip address 10.11.233.177 255.255.255.248 ip nat inside exit- To enable IOx:
iox- To configure the relay line to use the right interface:
relay line 0/3/0 0/0/0- To configure the IOx DHCP pool (IP addresses of containers):
Sample code snippet:
Template - iox
ip dhcp pool ioxpool
vrf 2
default-router 10.11.233.177
dns-server 10.11.233.177 8.8.8.8
network 10.11.233.176 255.255.255.248
exit
ip access-list extended NAT_ACL
10 permit ip any any
!
ip http authentication local
ip http server
ip http secure-server
username cisco priv 15 password cisco
!
ip nat inside source list NAT_ACL interface Cellular0/1/0 overload
!for modbus traffic
interface Async0/3/0
no shutdown
encapsulation relay-line
vrf forwarding 2
media-type rs485
half-duplex
exit
relay line 0/3/0 0/0/0
interface VirtualPortGroup0
description IOx Interface
no shutdown
vrf forwarding 2
ip address 10.11.233.177 255.255.255.248
ip nat inside
exit
- Click Save.

- Click Associated Devices tab.
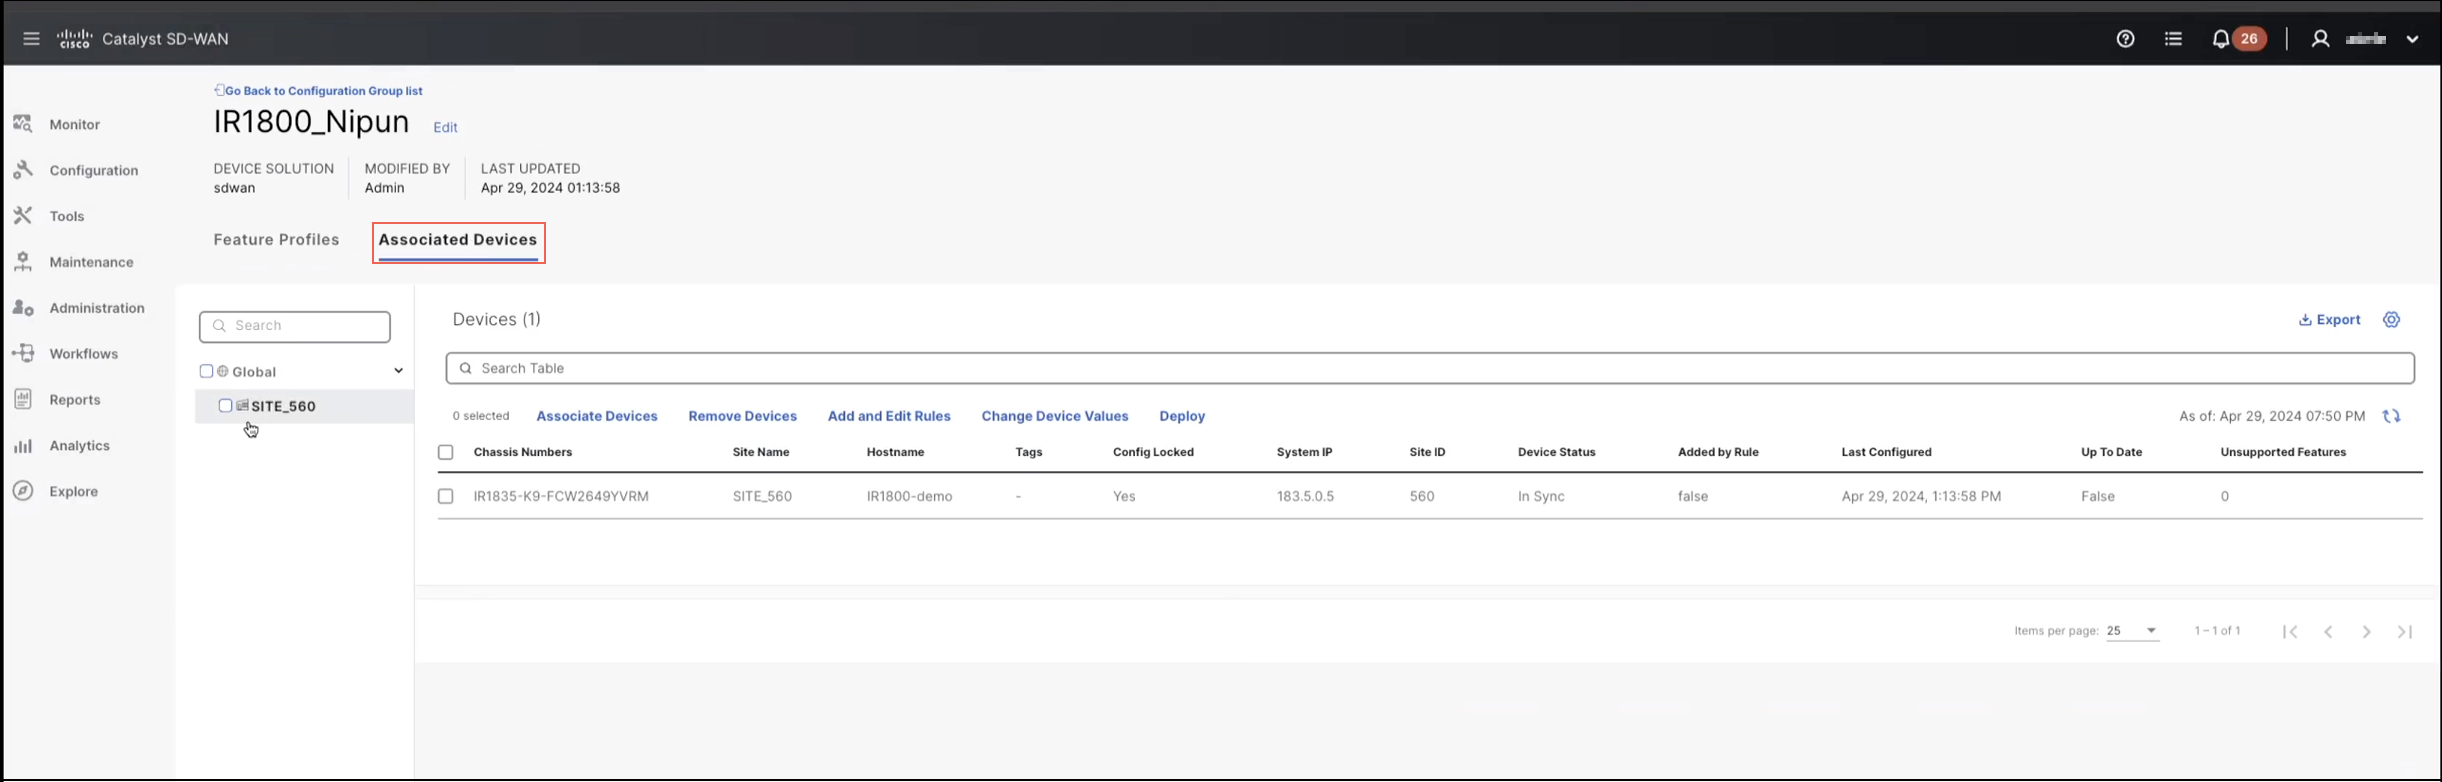
- Select the device and click Deploy.
A new Add and Review Device Configuration page appears.

- Click on the device in left pane and click Next.
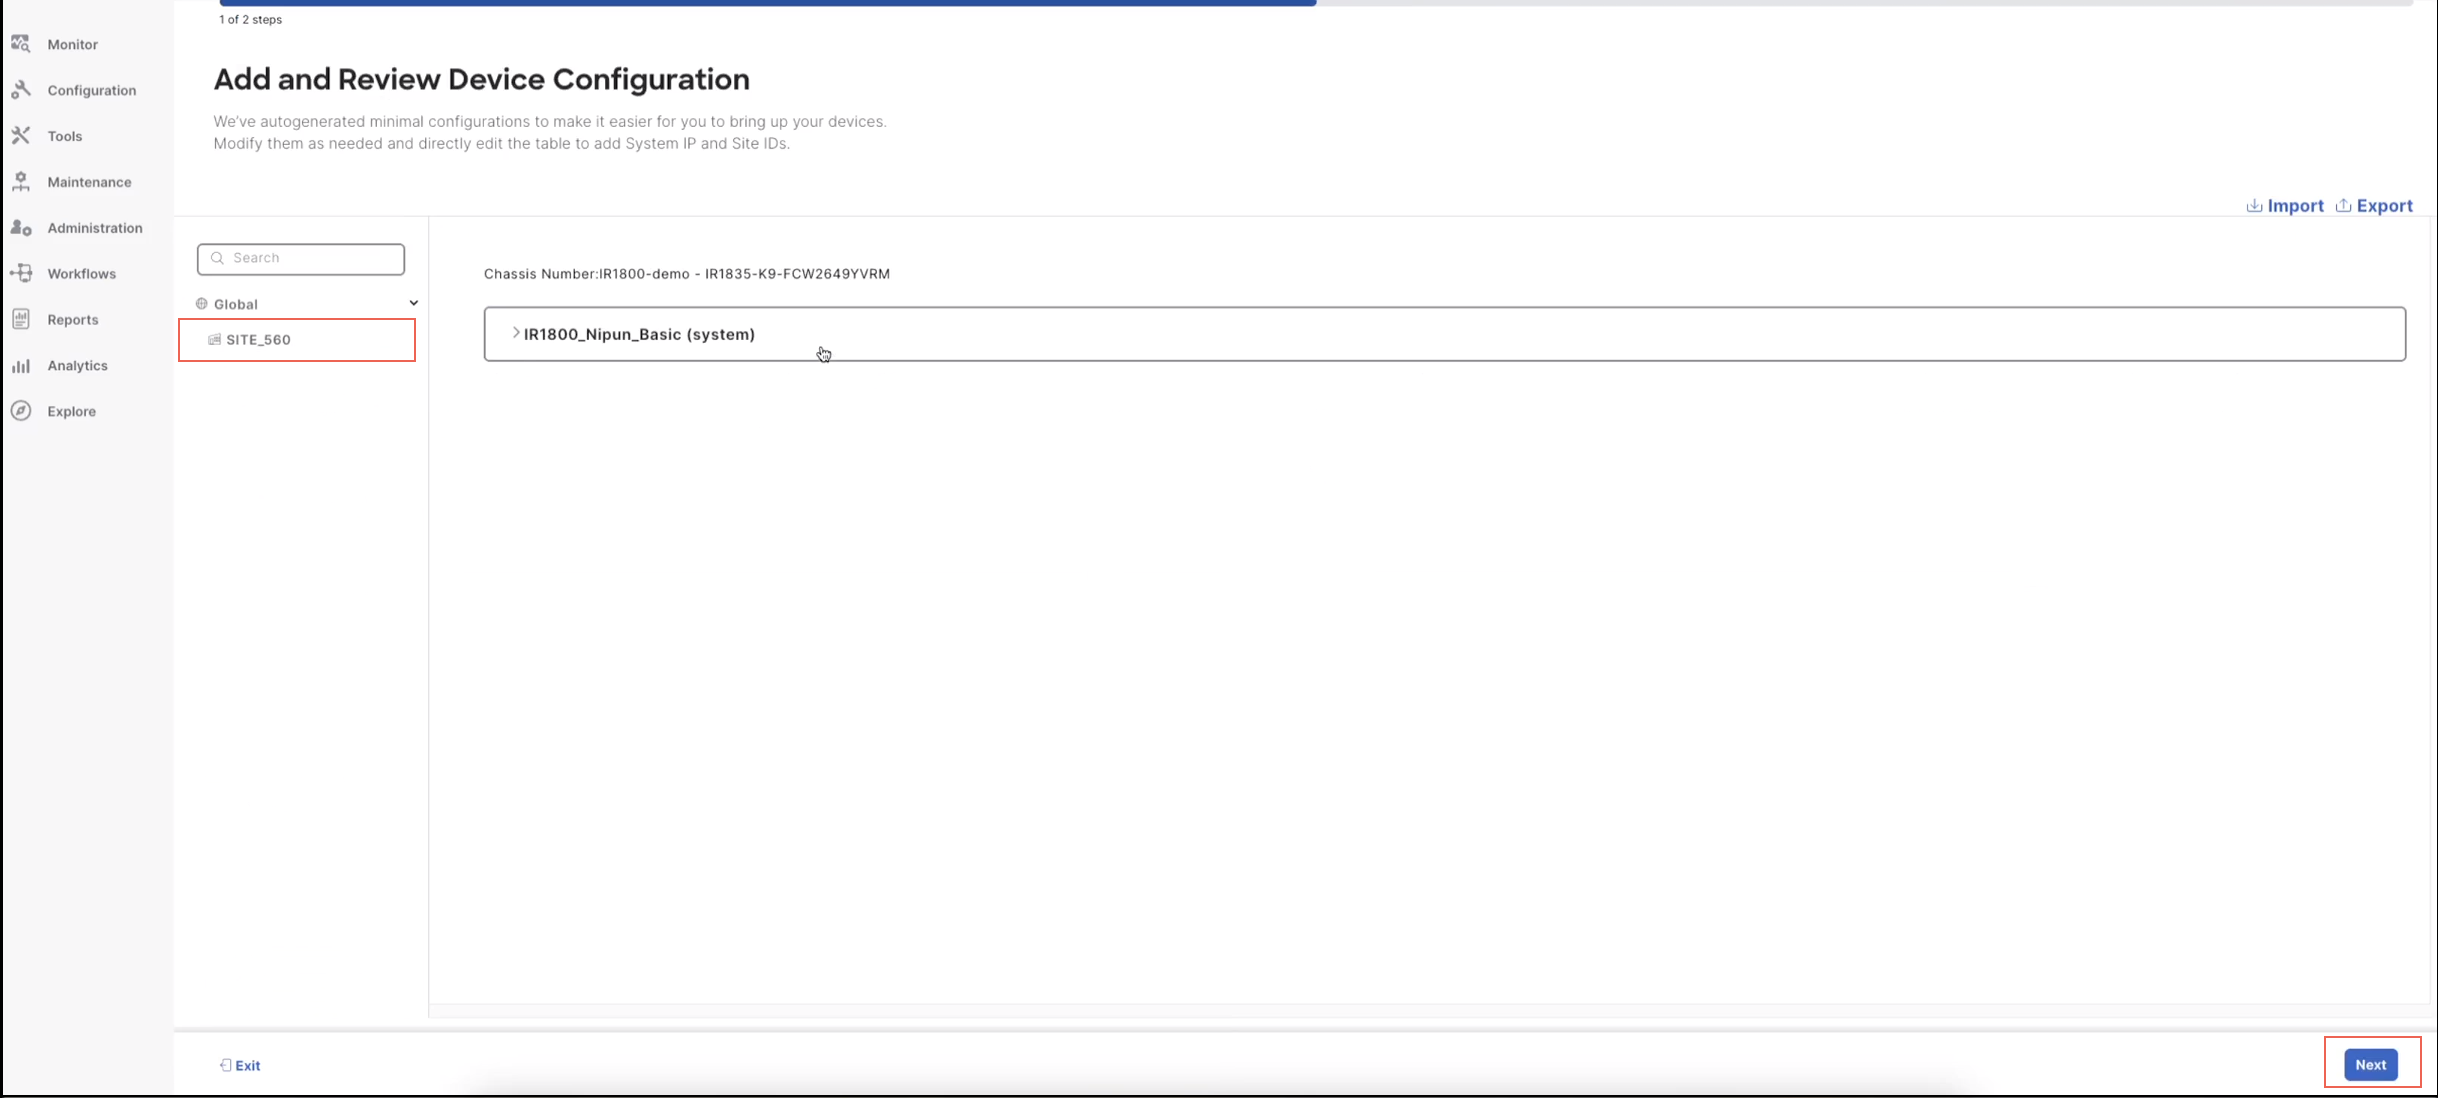
- In the Summary page, click Preview CLI to see the new changes and to validate the newly defined configuration.
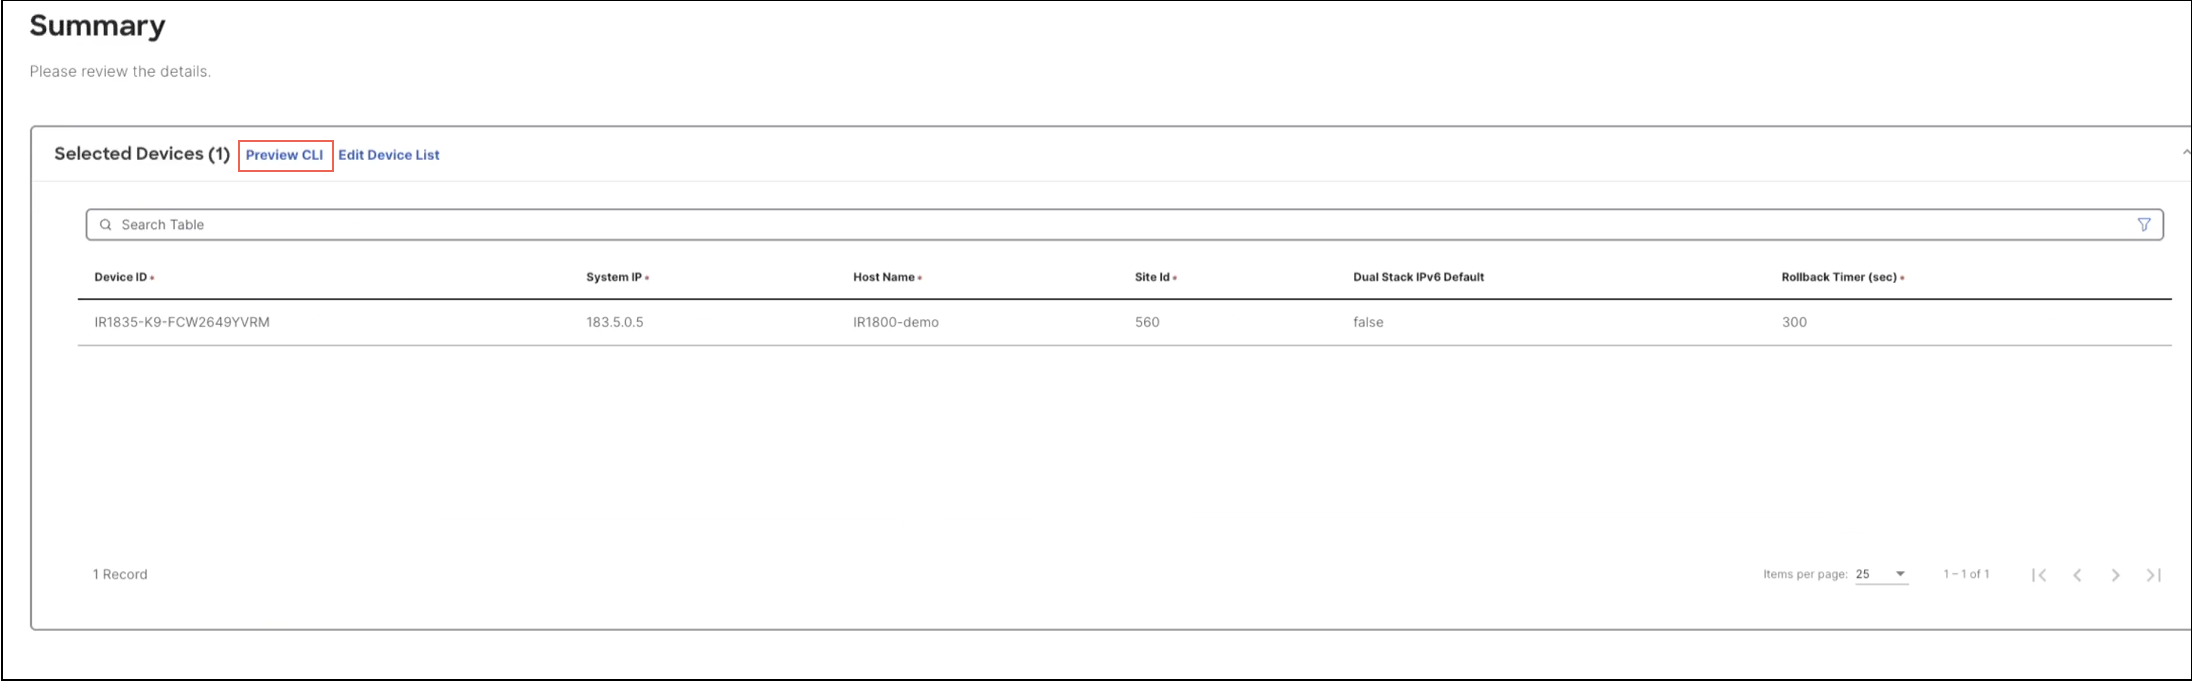
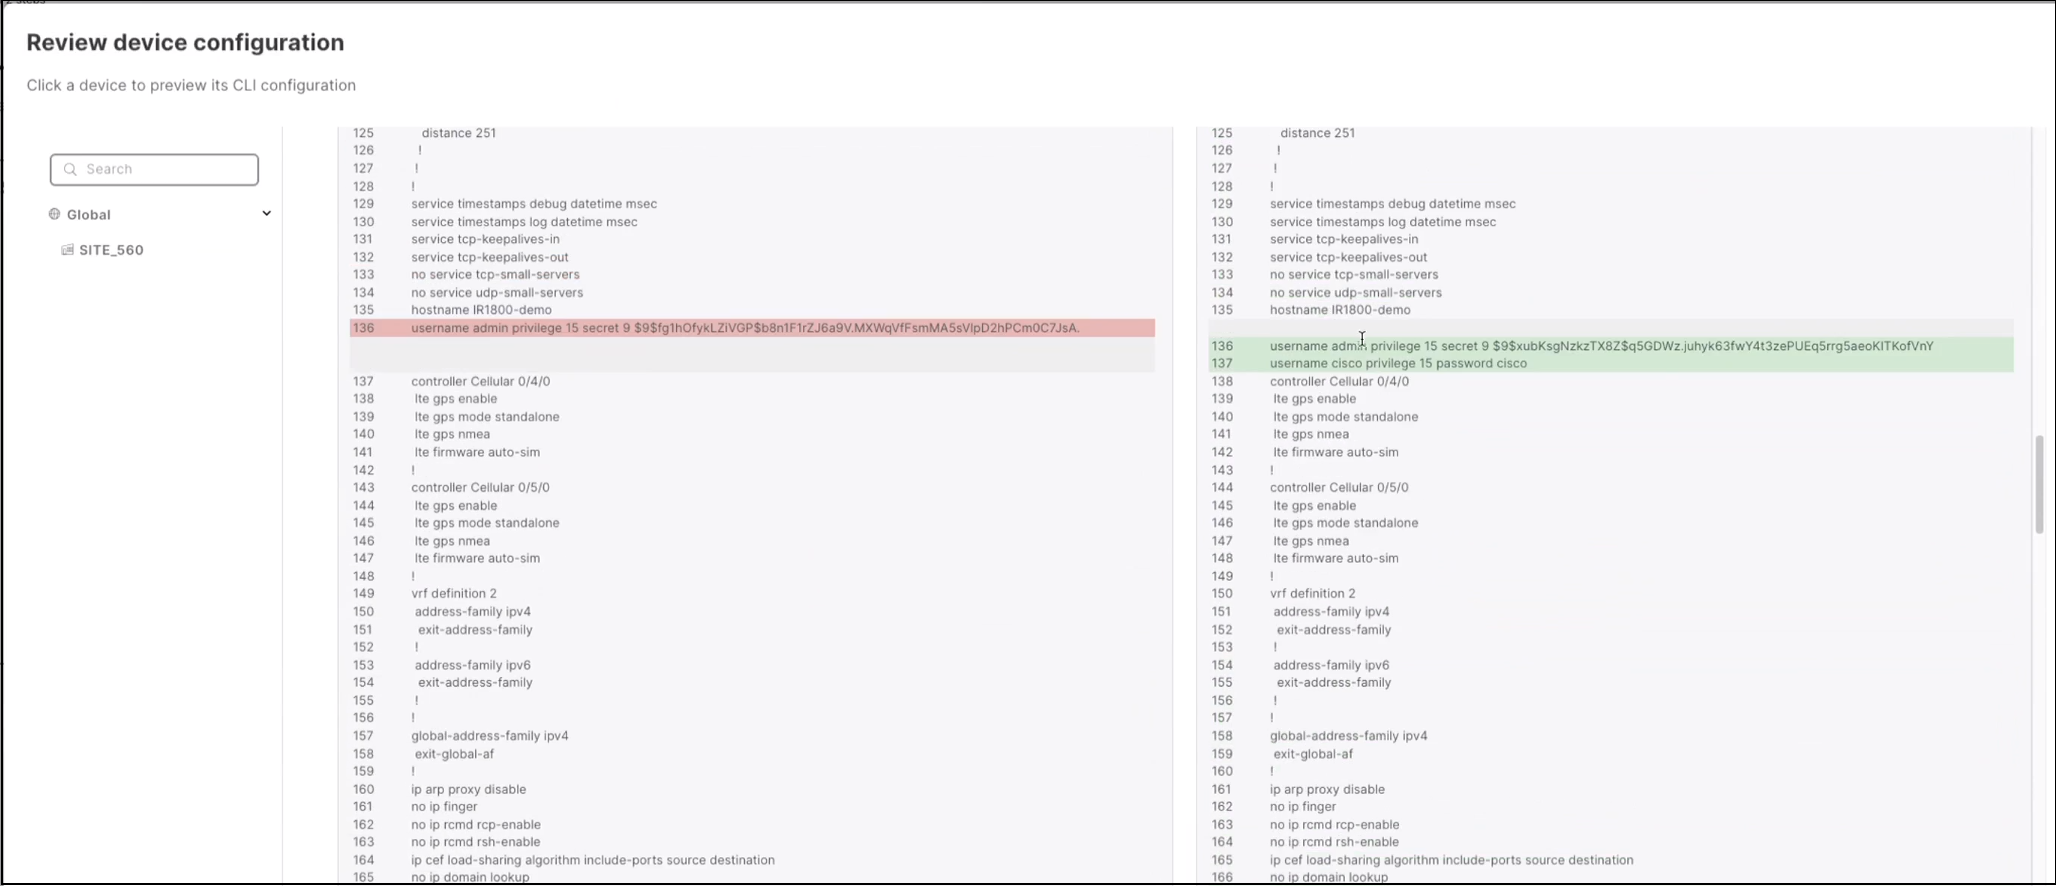
- Click Deploy again after reviewing the changes.
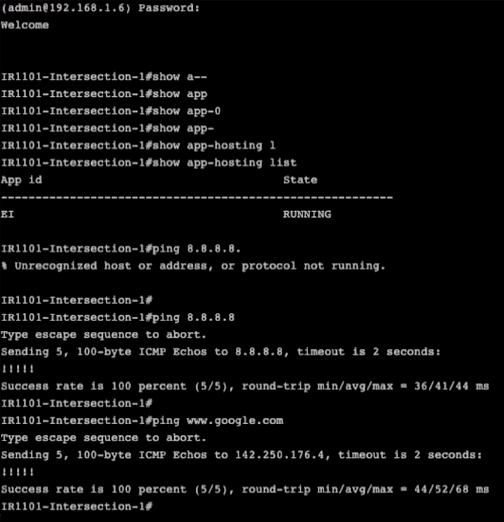
- To connect to the edge device through SSH terminal:
- From the left pane, click Tools > SSH Terminal.

- In the left pane, select the device and then SSH terminal opens.

- Use the commands to know about the application running on the edge device:
#show app-hosting listandping
- From the left pane, click Tools > SSH Terminal.
Procedure
- Log in to the network device WebUI.
- From the left pane, click Configuration > Services > IOx.
- Log in to the Cisco IOx Local Manager of the device.
- In the Applications tab, click Add New to install a new EI image.
A pop-up appears.
- In the Deploy Application pop-up, enter the EI image name in the Application Id field.
- Click Choose File to select an application image file to be installed in the Select Application Archive field. Then click OK.
Note: It takes a couple of minutes to upload. Do not refresh the browser at this time.
A successful pop-up appears after deployment. - In the Applications tab, under EI Agents, click Activate to activate the application.
The Resources tab under EI Agent opens.

In the Resource Profile section, fill the CPU, Memory, Disk fields.
Click Activate App in the top right corner of the screen.
Note: It takes a couple of minutes to upload. Do not refresh the browser at this time.
If you get a Peripherals must be present message, click OK and do the following:- In the Peripheral Configuration section, click edit in the Action column.
- In the Device Name field, select an appropriate option from the drop-down list and click OK.
- Click OK when a pop-up is prompted and then click Activate App in the top right corner of the screen.
Note: It takes a couple of minutes to upload. Do not refresh the browser at this time.
The application is activated. Now, do the following to update the Application Configuration:
- In the Application tab, click Manage.
- In the App-Config tab, update the URL and access token and click Save. In the confirmation pop-up, then click OK.
Follow these steps to copy URL and generate an access token:
Note: This feature requires the access permission Operations management.- Log in to the IoT Dashboard.

- Select the tenant.

- Under Service, select Edge Intelligence.
- Click on EI Agents > Enable EI Agent.
Note: Depending on how the tenant is onboarded, you will see Enable EI Agent page as below:

- In the Edge Intelligence Url field, click Copy to copy the auto-generated URL.
- In the Token field, click Generate to generate a token and click Copy to copy the token.
Note: The generated token can be used to connect an EI Agent to Cisco IoT EI. It is valid for 24 hours or up to 10 activations (whichever comes first). Tokens are not stored or managed in EI. Copy and save the token until no longer needed.
- In the Application tab, click Manage.
Go back to the Applications tab and click Start for the respective EI Agent.
Note: It takes a couple of minutes to upload. Do not refresh the browser at this time.
The EI Agent is now installed and running successfully.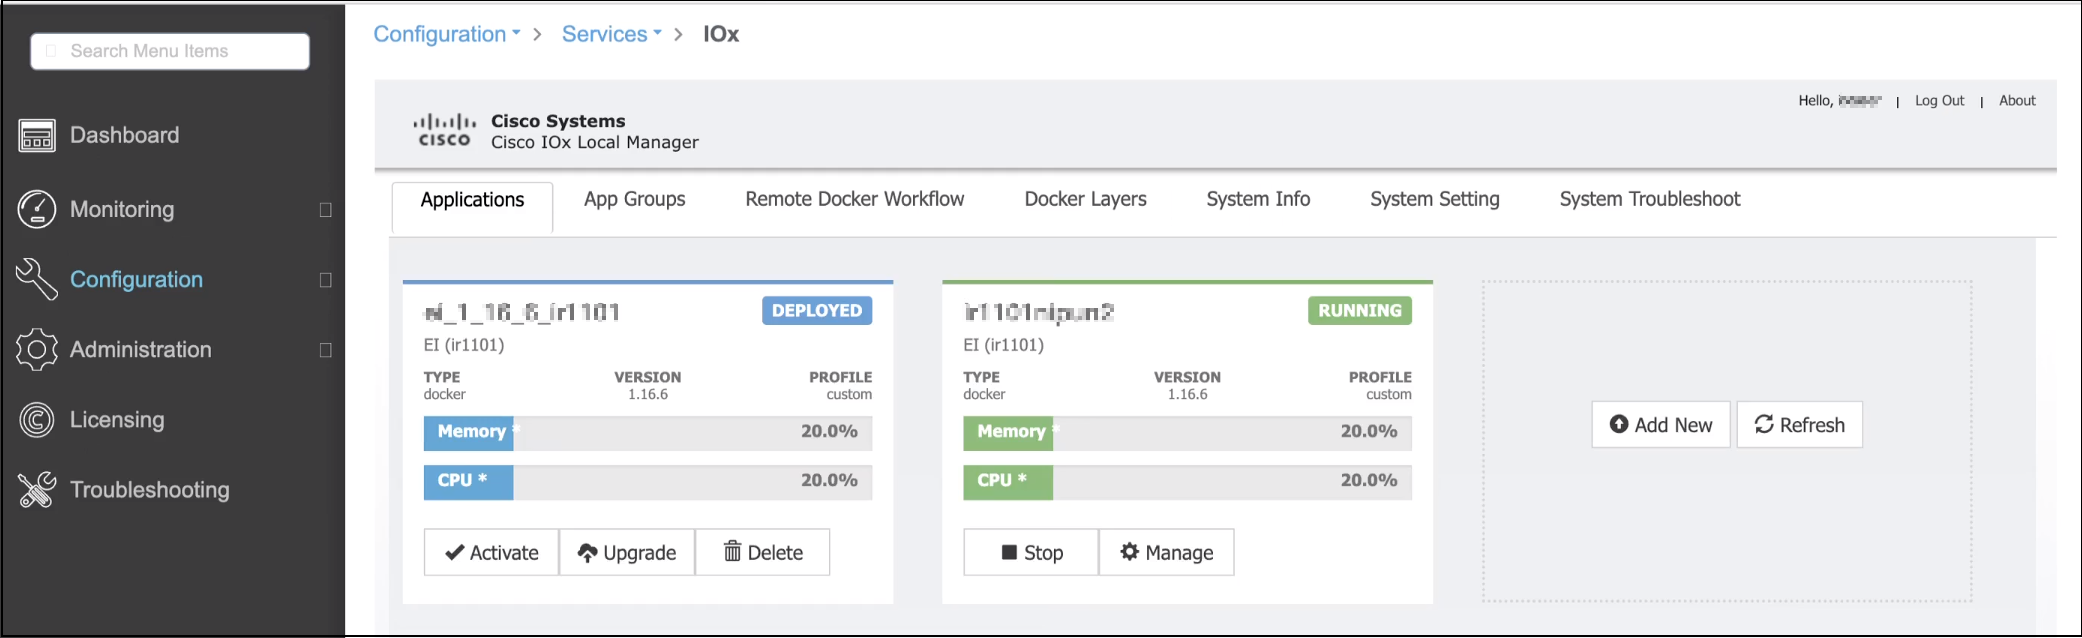
To view the EI agent in the IoT OD EI:
- Log in to the IoT Dashboard.
- Select the tenant.
- Under Service, select Edge Intelligence.
- On the left pane, click EI agent.
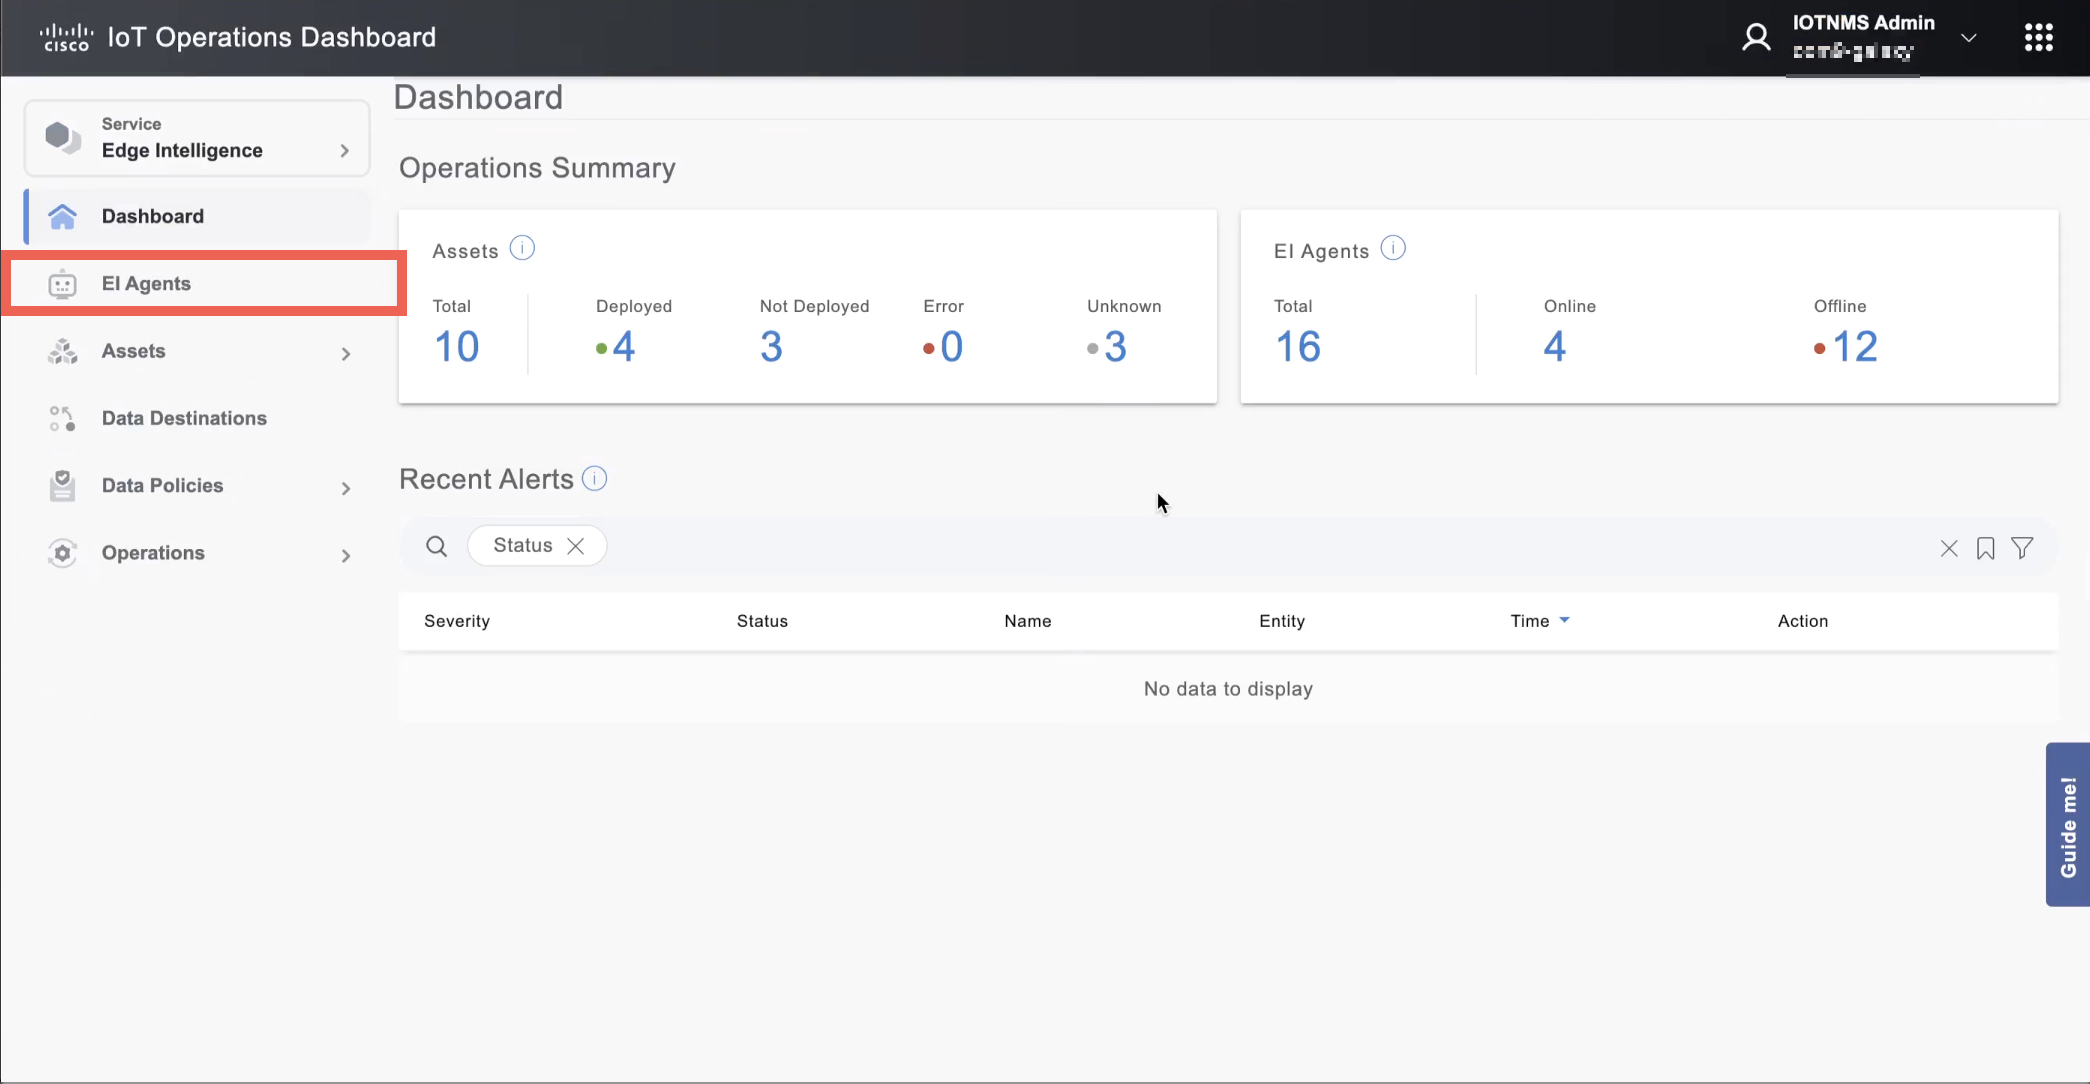
- The deployed EI agent appears as shown in the table below:
- Log in to the IoT Dashboard.
To stop the application, in the local manager, click Stop in the EI Agent under the Applications tab.
After the successful installation of the EI agent on the edge device using the local manager, the traffic from the device is smooth as shown below in SD WAN Manager System Status:
The below image from SD WAN Manager System Status also shows successful and smooth traffic from the edge device:

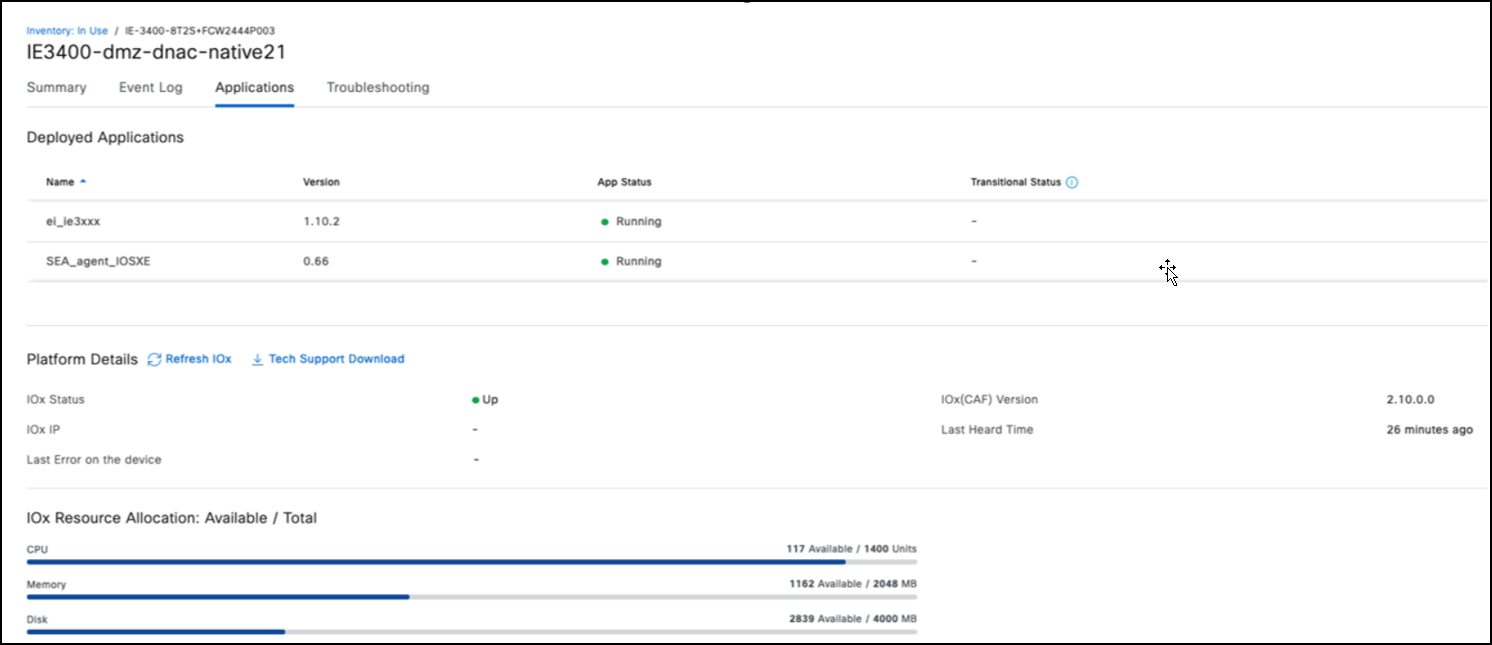
View EI Agent details and troubleshoot
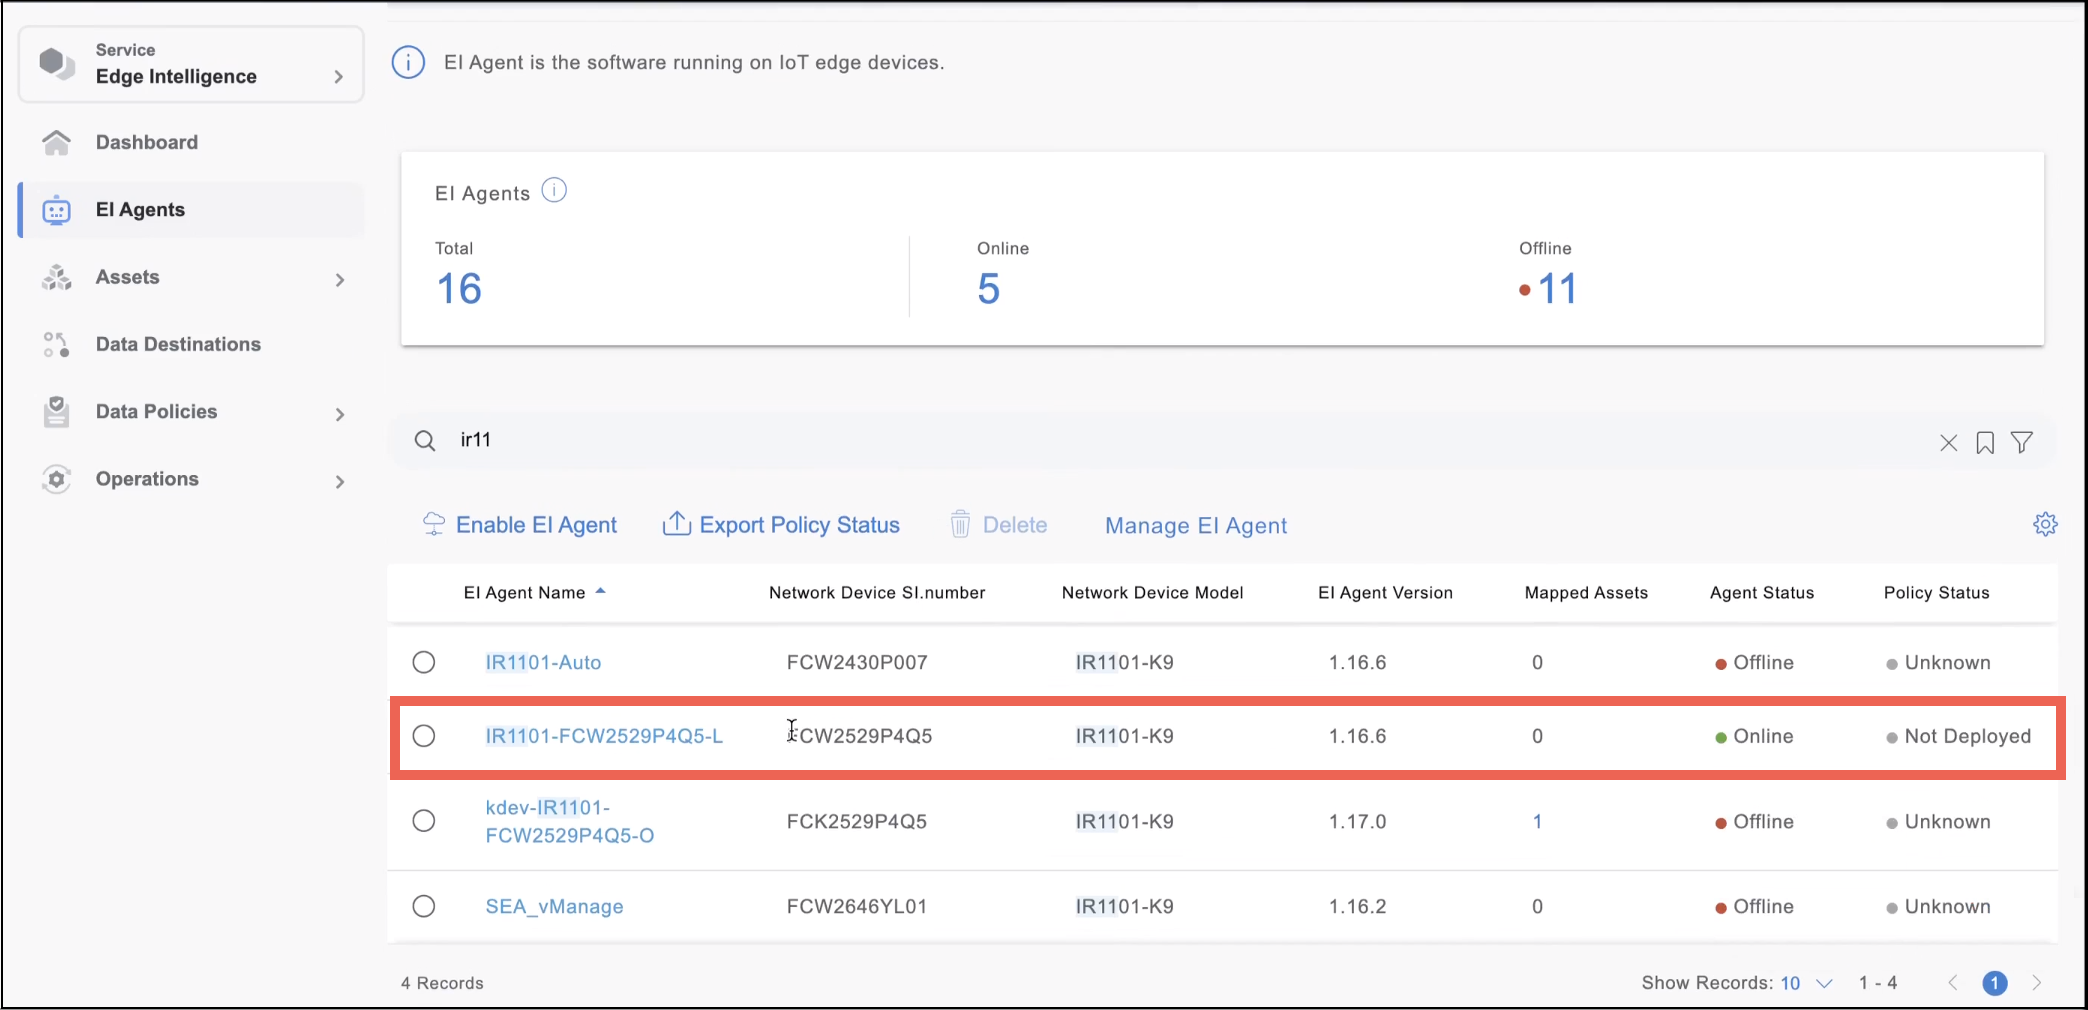
- From the left pane, click EI Agents and click on the EI Agent for which you want to view the details.
- The Summary tab shows the EI Agent details.
- Click the Event Log tab to view the log of all the events occurred.
- Click the Troubleshooting tab to troubleshoot the EI Agent.
- This tab shows the EI Agent Connection Status.
- In the Troubleshooting Options section, click Restart to start the EI Agent again.
- Click Download to download the EI Agent log.
- Click Reset to clear all the data policy deployment information of the EI Agent. This also removes all the in-memory caches and queues. You cannot reset if the EI Agent is already offline.
Note: If the EI cloud shows that the policy is still deployed on the EI agent, then trigger the Undeploy action from the EI cloud to reset the state in the EI cloud.
- Click View More Application Details to see the details of the application from which the EI Agent was installed. This option is disabled if the application is not installed.
Note: These options are available only if the EI Agent is installed using IoT OD (Edge Device Manager).
Remove an EI Agent
You might want to remove an EI Agent that was used for testing, or to decommission a running instance.
Removing an EI Agent deletes all existing data related to the EI Agent and cannot be undone. An EI Agent can be removed from the system only if the status is "Not Reachable".
- Remove the EI Agent from the network device using one of the options described below. The decommissioned EI Agent will then appear as “Not Reachable”. You can also disconnect the network device from the network.
- Select the EI Agent and click Delete.
Note: If an Agent is removed and added again with the same name in FND, the name shown in EI is appended with a random character.
Uninstall using the IoT Operations Dashboard
Uninstall an application to remove it from a device. The application remains in the IoT Dashboard and can be installed or re-installed on devices.
You must first remove the EI Agent from the device using EDM, then return to the EI service and delete the EI agent entry.
- Uninstall the EI Agent from the device:
- Under Services, select Edge Device Manager > Applications.
- Select the Application Name from the list.
- Click View Instances.
- Select the Device Name where the agent is running.
- Click Stop.
- Wait for the status to change to "Stopped". Click Refresh if necessary.
- Select the device again and click Uninstall.
- Delete the EI Agent from Edge Intelligence.
Although the EI Agent was removed from the network device, you must also delete the entry in EI.
- Under Services, select Edge Intelligence > EI Agents.
- Select the EI Agent Name and click Delete. The Agent Status must be "Offline".
- Click Continue to confirm.
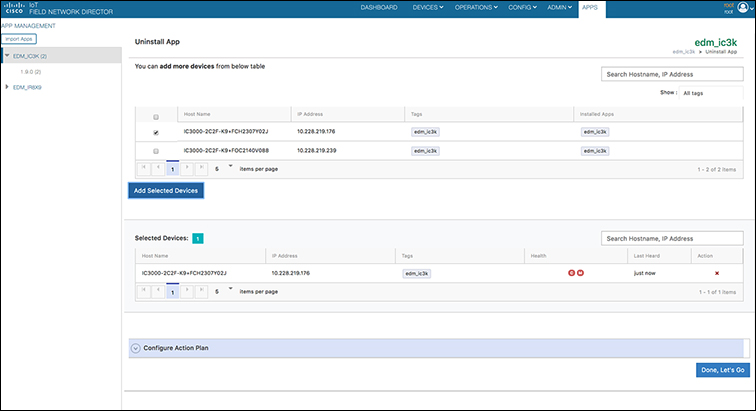
Uninstall EI Agent using FND
To undeploy the IOx application, click Uninstall.
In the Uninstall App page, select the device on which the IOx application needs to be undeployed. Then, click Add Selected Devices. The selected devices appear in the lower part of the screen as shown in the following screenshot.
After the undeployment process finishes successfully, the installation count decreases as shown in the screenshot below.

EI Agents actions
The following actions are supported on devices:
- Restart EI Agent for a single device — In the Manage EI Agent page, in the device row, click
 under Actions and click Restart.
 - View Application Details — In the Manage EI Agent page, in the device row, click under Actions and click Application Details. This takes you to the Application Details in EDM.
The following actions are available if the device row shows "Available":
- Bulk restart of EI Agent — In the Manage EI Agent page, select the required devices to restart and click Restart.
- Upgrade EI Agent for a single device — In the Manage EI Agent page, in the device row, click under Actions and click Upgrade Version. This option is enabled only if a higher version is available.
Note: Due to limitations in Fog Director if a higher version is uploaded before the installed version, FD considers the installed version as the latest, and the Upgrade button for a single device may not be enabled even if a higher version is present.
- Bulk upgrade of EI Agent — In the Manage EI Agent page, select the required devices to upgrade and click Upgrade Version. This option is enabled only if a higher version is available.
Port Opening Mechanism for Gateways
Certain NTCIP and RSU functions require the opening of specific ports. Port 5001 is designated for RSU, port 5002 for NTCIP streaming modes like J2735 or trafficware, and for trap notifications (For example, wrong way detection), use port 1162.
- Open ports for IR1101 using console access.
Connect to device via ssh or telnet.
Use show app-hosting detail command to find internal IP of device:
Network interfaces
eth0:

   MAC address         : 52:54:dd:81:2e:49

   IPv4 address        : 172.16.16.3 - Internal IP

   IPv6 address        : ::

   Network name        : VPG0

   Multicast           : No

   Mirroring           : No
Use command: config t
Open any required port with below given command:
ip nat inside source static udp
5002 5002, where 5002 - can be any port which you need to open;
- Internal IP - you can find using command "command show app-hosting detail";
- Global Ip - IP of gateway(IOx local manager access IP)
Use command: exit
Verify new rules added with show ip nat translations Command.
- Open ports for other gateways with IOx local manager.
- Connect to IOx local manager.
- Click on Activate button.

- Select the network interface you want to change, then click Edit and go to Port Mapping.

- Add all required TCP Port Mappings and UDP Port Mappings and click OK.

- Click OK once again.

- Connect to IOx local manager.